Get my cookbooks

Loaded Potato Taco Bowls for Easy High-Protein Meals

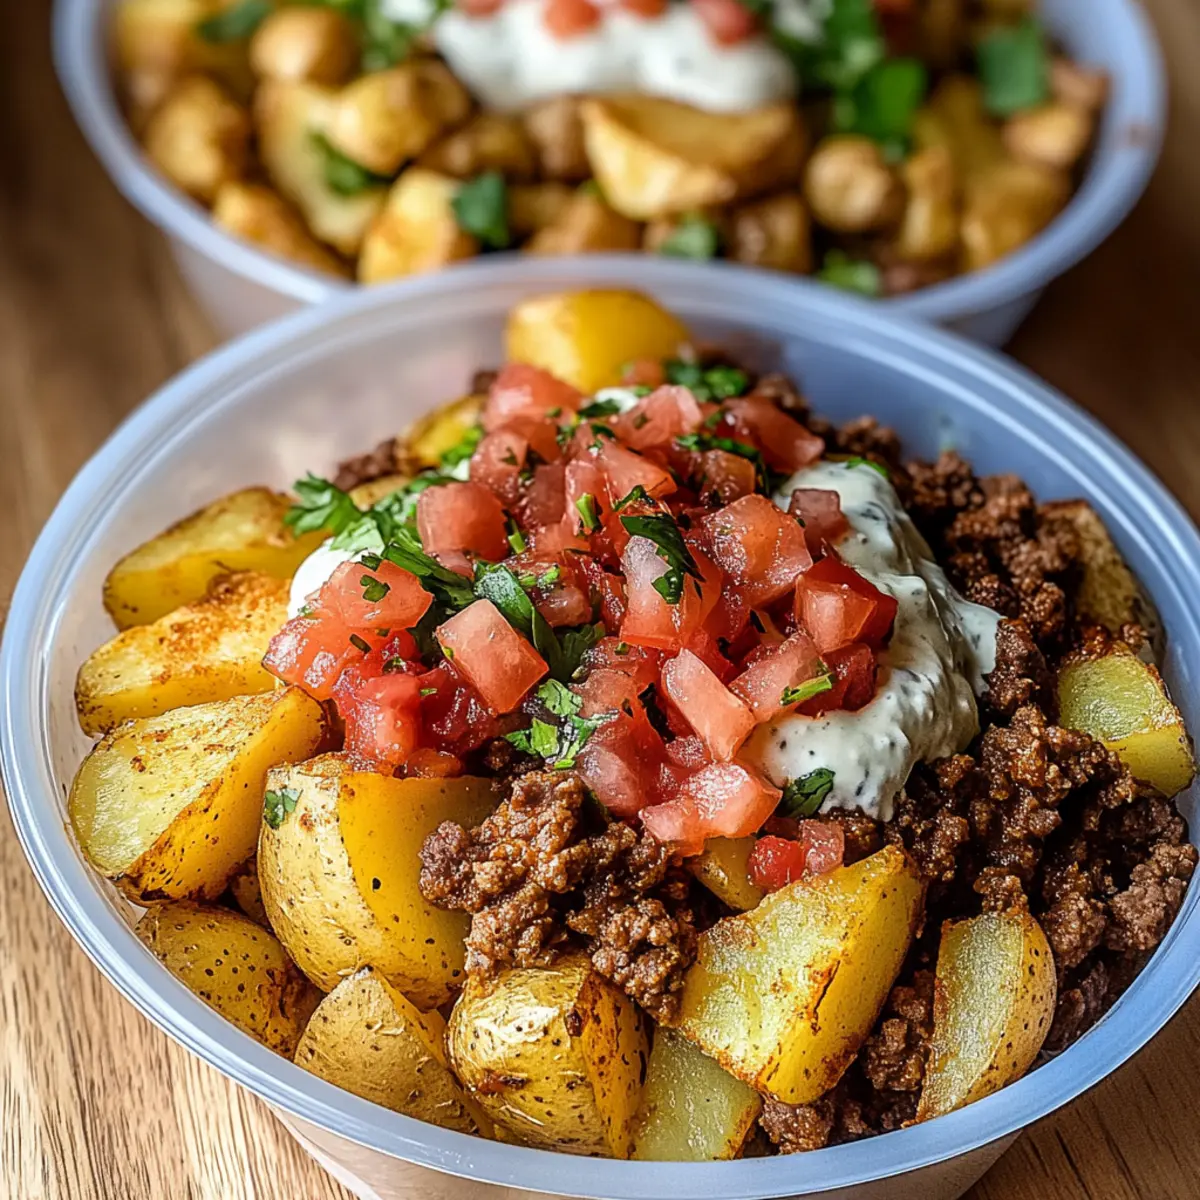
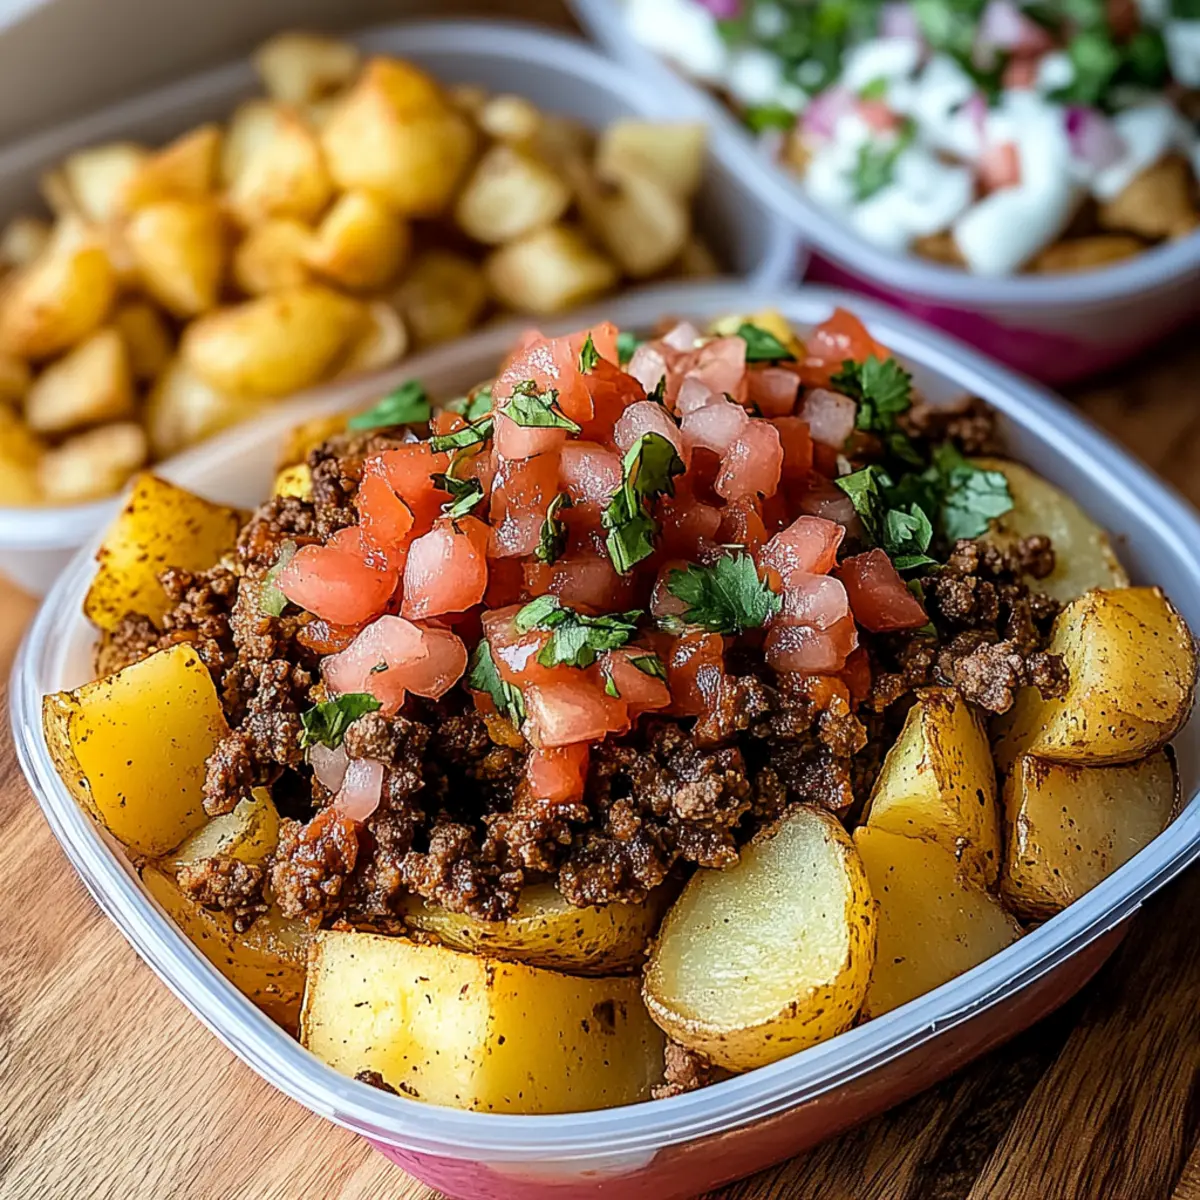
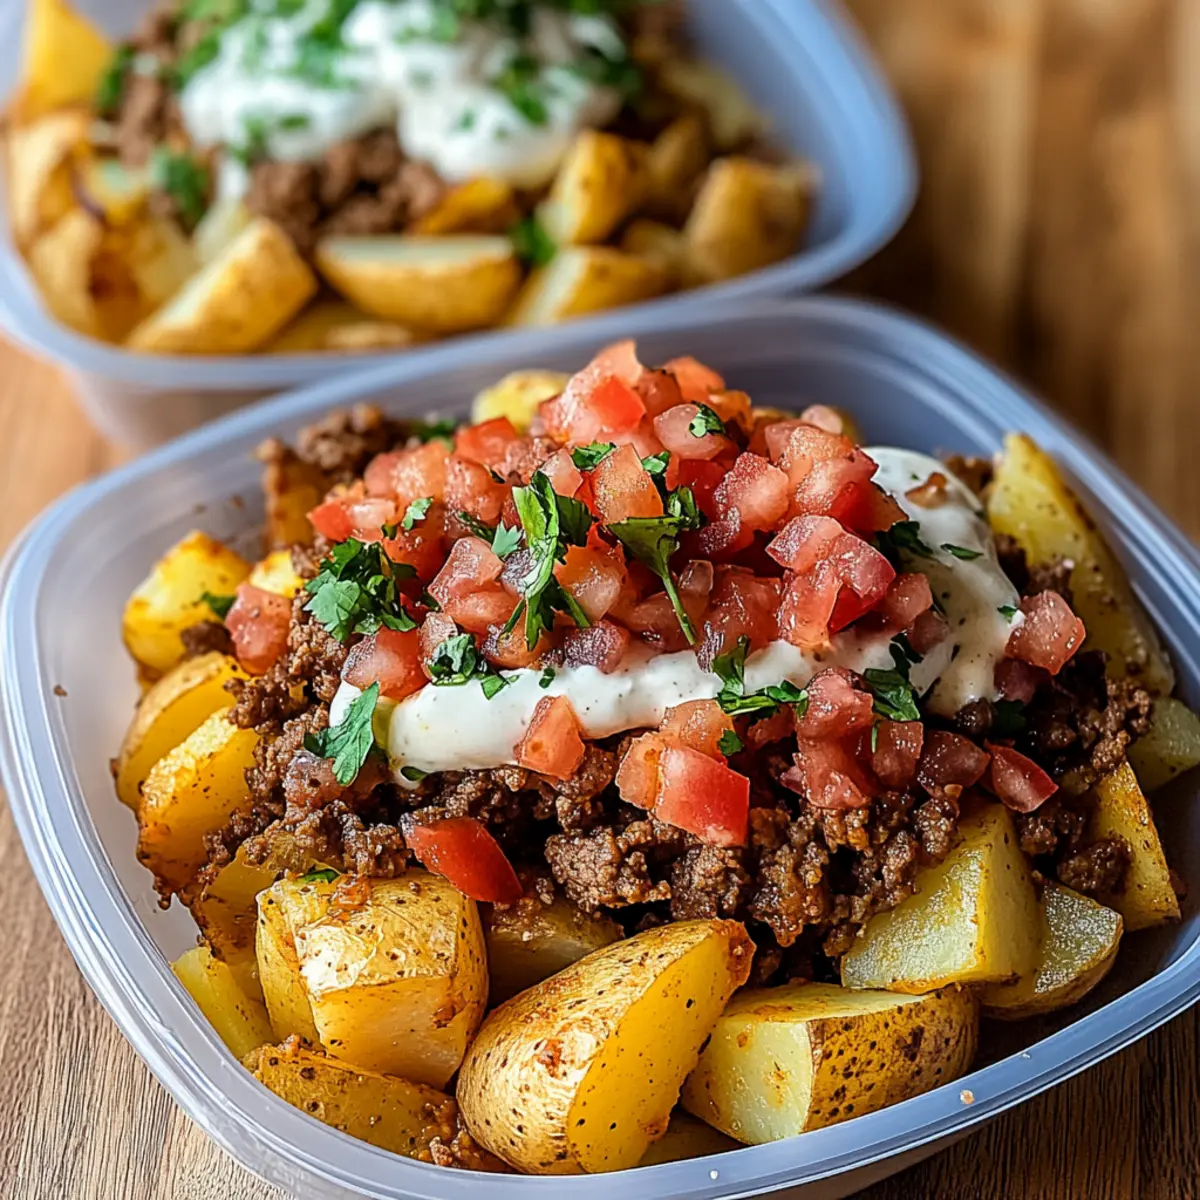
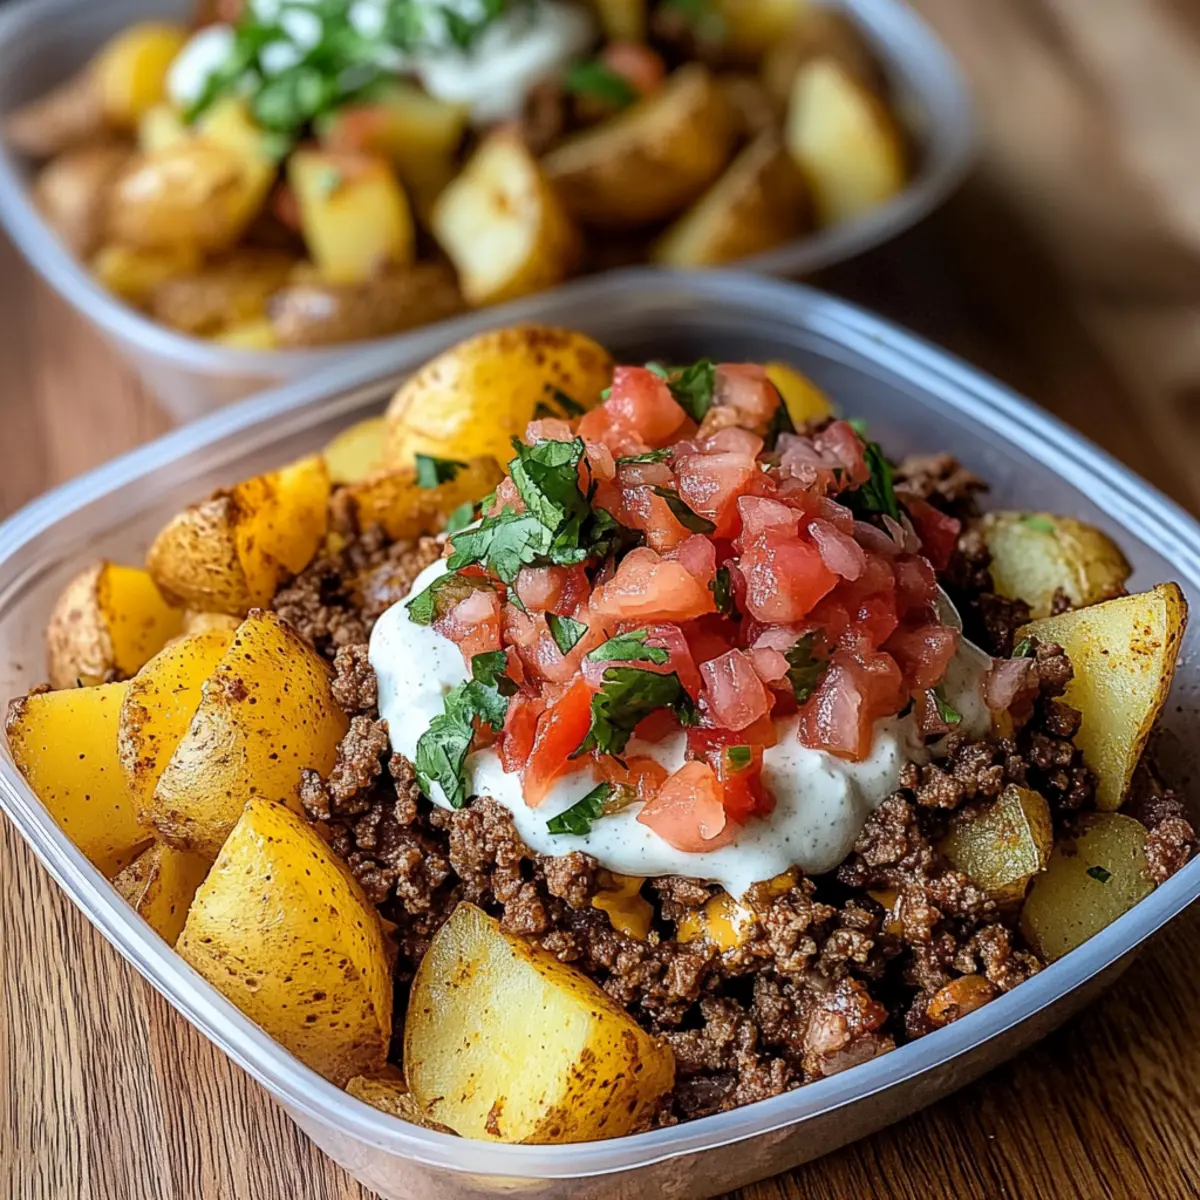
Nothing quite compares to the moment when a simple potato transforms into something extraordinary. In this adventure, we’re diving into the world of Loaded Potato Taco Bowls – a high-protein meal prep delight that’s perfect for dinner or a satisfying lunch. Picture crispy roasted potatoes layered with seasoned ground beef and a rainbow of fresh toppings, all mixed together for a dish that’s both comforting and customizable. Not only are these bowls a fantastic way to enjoy wholesome ingredients, but they also offer great versatility; you can easily modify the toppings to suit your cravings or dietary needs. Ready to elevate your meal prep game and indulge in a burst of flavor? Let’s create a taco night that’s impossible to resist!

Why Are These Taco Bowls So Irresistible?

Deliciously Customizable: No two taco bowls need to be the same! Mix and match your favorite toppings and proteins for endless flavor possibilities.

High-Protein Goodness: Packed with lean beef or your choice of protein, these bowls keep you full while satisfying hunger.

Easy Meal Prep: Perfect for busy weeknights, prepare these Loaded Potato Taco Bowls in advance! They’re ideal for grab-and-go lunches too.

Crispy & Flavorful: The roasted potatoes offer a delightful crunch complemented by savory taco seasoning, making every bite a delicious experience.

Vegetarian-Friendly Options: Looking for plant-based? Simply swap beef for lentils or beans to craft a satisfying vegetarian version.

With so much versatility and flavor packed in, you won’t be able to resist diving into these bowls! For more meal prep ideas, check out our Healthy Meal Prep Recipes that are just as easy to whip up.

Loaded Potato Taco Bowl Ingredients

For the Taco Meat

  • Lean Ground Beef – This is the main protein source; feel free to substitute with turkey or chicken for a lighter option.
  • Creole Seasoning (½ tsp) – Adds depth of flavor; Cajun seasoning is a good alternative if needed.
  • Cumin (½ tsp) – Enhances the overall flavor; omit it for a milder taste.
  • Ground Coriander (¼ tsp) – Provides warm notes; can be replaced with ground cumin if necessary.
  • Onion Powder (¼ tsp) – Adds savory depth; fresh chopped onion works well as an alternative.
  • Garlic Powder (¼ tsp) – Infuses aroma into your dish; fresh minced garlic can be used if you prefer.
  • Crushed Red Pepper (¼ tsp) – Gives the dish a nice kick; skip for a milder flavor.
  • Taco Seasoning (1 tbsp) – Customize according to your taste; make a homemade blend for extra kick.
  • Salt & Pepper – Essential for seasoning; adjust to suit your palate.

For the Roasted Potatoes

  • Potatoes (5–6 medium-large) – These are the base of the dish; sweet potatoes can be an amazing swap for a different flavor.
  • Olive Oil (1 tbsp) – Essential for roasting; any cooking oil can be used as a substitute.
  • Salt (1 tsp) – Crucial for enhancing flavors.
  • Oregano (1 tsp) – Adds a lovely herbaceous touch; Italian seasoning can work as a replacement.
  • Garlic Powder (1 tsp) – Adds additional flavor; fresh minced garlic is a delightful alternative.
  • Smoked Paprika (1.5 tsp) – Imparts a delicious smokiness; use regular paprika if you prefer a lighter flavor.

For the Pico de Gallo

  • Tomato (1 large) – Provides freshness for your pico de gallo; canned tomatoes can be used if fresh isn’t available.
  • Jalapeño (1) – Adds spice; remove seeds for a milder version.
  • Red Onion (½) – Offers crunch and flavor; white onion is a suitable substitute.
  • Lime Juice (½) – Adds zesty acidity; vinegar can serve as an alternative.
  • Chopped Cilantro (1 tbsp) – Brings brightness; omit if you’re not a fan of herbs.

For the Sriracha Mayo

  • Mayonnaise (½ cup) – Acts as a creamy base for the sauce; Greek yogurt can lighten it up as a substitute.
  • Sriracha (2 tbsp) – For a spicy kick; feel free to adjust according to your heat preference or omit it for a milder sauce.
  • Lemon Juice (¼ tbsp) – Adds brightness; can be replaced with lime juice for versatility.
  • Black Pepper (1 tsp) – Standard seasoning; freshly ground is preferred for the best flavor.

These Loaded Potato Taco Bowl Ingredients create a hearty and satisfying dish that’s customizable for every palate. Get your ingredients ready and let’s embark on this delicious culinary journey together!

Step‑by‑Step Instructions for Loaded Potato Taco Bowls

Step 1: Prepare Taco Meat
In a skillet over medium heat, add lean ground beef and cook until browned, about 5-7 minutes. Stir in Creole seasoning, cumin, ground coriander, onion powder, garlic powder, crushed red pepper, taco seasoning, salt, and pepper. Cook for an additional 3-5 minutes until all spices are well incorporated and the meat is thoroughly cooked, then remove from heat and set aside.

Step 2: Roast Potatoes
Preheat your oven to 425°F (220°C). Dice 5-6 medium to large potatoes and toss them in a large bowl with olive oil, salt, oregano, garlic powder, and smoked paprika until evenly coated. Spread the potatoes on a baking sheet in a single layer, ensuring they are not overcrowded. Roast for 25-30 minutes, flipping halfway through, until crispy and golden brown.

Step 3: Make Pico de Gallo
In a medium bowl, combine one diced large tomato, one seeded and chopped jalapeño, half a finely diced red onion, and the juice of half a lime. Add chopped cilantro, salt, and pepper, then mix everything together until well incorporated. This fresh pico de gallo will add a vibrant flavor to your Loaded Potato Taco Bowls.

Step 4: Prepare Sriracha Mayo
In a small mixing bowl, combine half a cup of mayonnaise, 2 tablespoons of Sriracha, and a drizzle of lemon juice. Add black pepper to taste and mix until smooth. This creamy Sriracha mayo brings a spicy kick to the Loaded Potato Taco Bowls, enhancing their overall flavor profile.

Step 5: Assemble Bowls
In serving bowls, start with a generous layer of the crispy roasted potatoes as the base. Top with an ample portion of the seasoned taco meat, followed by scoops of pico de gallo. Drizzle the delectable Sriracha mayo over the top for a finishing touch. Serve immediately for the best flavor, or refrigerate for meal prep to enjoy later.

How to Store and Freeze Loaded Potato Taco Bowls

Fridge: Store your Loaded Potato Taco Bowls in airtight containers for up to 4 days. This way, you can enjoy delicious leftovers anytime!

Freezer: For longer storage, freeze individual portions in airtight containers or freezer bags for up to 2 months. Thaw in the fridge before reheating.

Reheating: Reheat in the microwave for quick meals. For crispy potatoes, consider warming them in the oven at 350°F (175°C) for about 10-15 minutes.

Wrap-Up: Make sure to separate the components if possible (potatoes, meat, toppings) to maintain freshness and quality in your Loaded Potato Taco Bowls!

Make Ahead Options

These Loaded Potato Taco Bowls are a fantastic option for meal prep enthusiasts! You can prepare the taco meat and roast the potatoes up to 24 hours in advance for a quick weeknight dinner. Simply cook the ground beef with spices and store it in an airtight container in the refrigerator. Similarly, roast your potatoes, allow them to cool completely, and refrigerate to maintain their crispiness. When you’re ready to enjoy your meal, all you need to do is reheat the meat and potatoes in the oven or microwave, assemble them in bowls topped with fresh pico de gallo and Sriracha mayo, and savor a delicious homemade dish with minimal effort!

Expert Tips for Loaded Potato Taco Bowls

  • Perfect Potato Prep: Make sure to cut your potatoes into uniform pieces. This ensures they roast evenly and achieve that delightful crispiness without burning!

  • Seasoning Sensation: Don’t be afraid to adjust the spices in the taco meat! If you like it spicier, add more crushed red pepper or Sriracha to elevate the flavor profile of your Loaded Potato Taco Bowls.

  • Meal Prep Magic: Prepare extra taco meat and roasted potatoes to mix and match with different toppings throughout the week, making your meal prep easy and diverse!

  • Mayo Mastery: For a lighter option, swap out mayonnaise for Greek yogurt in the Sriracha mayo; it’s a healthy twist that still packs flavor without compromising texture.

  • Storage Strategy: Store leftovers in airtight containers to keep them fresh for up to 4 days. Reheat them in the microwave, but for the best texture, warm the potatoes in the oven!

Loaded Potato Taco Bowls Variations

Feel free to get creative with these Loaded Potato Taco Bowls and make them your own! Let your taste buds lead the way to a fun, flavorful experience.

  • Protein Swap: Substitute lean ground beef with shredded chicken, ground turkey, or even black beans for a plant-based option.

  • Sweet Potato Twist: Use sweet potatoes instead of Yukon Gold for a slightly sweeter and more nutrient-rich version. They add a beautiful color contrast too!

  • Fresh Toppings: Amp up the freshness by adding diced avocado, crumbled feta, or a medley of your favorite salsas for added flair. Consider our homemade salsa recipe for a zesty kick.

  • Cheese Lover’s Delight: Top with shredded cheese such as cheddar or pepper jack for a melty addition that creates a delicious, gooey experience.

  • Herb-Infused Flavor: Swap cilantro for fresh parsley or green onions to change up the herbaceous notes of your dish.

  • Creamy Alternatives: Instead of mayonnaise, try Greek yogurt or an avocado crema for a lighter and equally creamy topping option.

  • Heat Adjustment: If you like it spicy, mix in diced jalapeños or more Sriracha into the Sriracha mayo for an extra kick, or even try some chipotle in adobo for a smoky flavor.

  • Zesty Citrus: Replace lime juice with lemon juice for a slightly different citrus twist, or add both for a refreshing brightness.

Let these exciting variations inspire your kitchen creativity and take your Loaded Potato Taco Bowls to the next level! For more ideas, explore our guide on customizable meal options that make your cooking adventures even more enjoyable.

What to Serve with Loaded Potato Taco Bowls

Elevate your meal experience by pairing these hearty taco bowls with delicious sides and beverages that will tantalize your taste buds.

  • Creamy Guacamole:
    Rich and buttery, guacamole adds a smooth texture that complements the crispy potatoes, balancing flavors perfectly.

  • Mexican Street Corn Salad:
    This vibrant dish brings sweetness and crunch, with its lime and cilantro dressing enhancing the taco flavors of your bowls.

  • Cilantro Lime Rice:
    Fluffy rice infused with zesty lime and fresh cilantro offers a refreshing contrast to the savory ingredients of the taco bowls.

  • Roasted Veggies:
    Seasoned with olive oil and herbs, roasted veggies like bell peppers and zucchini add a colorful crunch, enhancing the nutritional value of your meal.

  • Spicy Black Bean Soup:
    A warm, hearty soup that packs protein and spices, it provides a comforting backdrop to the bold taco flavors, ensuring every bite is satisfying.

  • Chilled Horchata:
    This creamy, sweet rice drink is a cool complement that balances spicy dishes beautifully, making it a delightful beverage choice.

  • Churros with Chocolate Sauce:
    For dessert, indulge in crispy churros dusted with cinnamon sugar, served with a rich chocolate sauce that adds a sweet finish to your meal.

  • Lime-Water Spritzer:
    Refreshing and light, this energizing drink provides a zesty kick that cleanses the palate, making each bite of your taco bowl even more pleasurable.

Loaded Potato Taco Bowls Recipe FAQs

What type of potatoes are best for these taco bowls?
Absolutely! Yukon Gold or red potatoes work great due to their creamy texture when roasted. You can also use sweet potatoes for a deliciously sweet twist! Just ensure that whatever potatoes you choose are firm and free from dark spots.

How should I store leftovers of Loaded Potato Taco Bowls?
To store your Loaded Potato Taco Bowls, place them in airtight containers and refrigerate for up to 4 days, ensuring you can enjoy your delicious meal prep throughout the week. If you’ve assembled the bowls, consider keeping components like potatoes and toppings separate to maintain freshness.

Can I freeze Loaded Potato Taco Bowls?
Yes! To freeze your bowls, portion them into airtight containers or freezer bags, making sure to remove as much air as possible. They can be kept in the freezer for up to 2 months. Thaw the bowls in the fridge overnight before reheating. For best texture, warm the potatoes in the oven at 350°F (175°C) for 10-15 minutes instead of the microwave.

What if my roasted potatoes are not crispy?
If your roasted potatoes aren’t crispy, there are a couple of factors to consider. Ensure they are in a single layer on the baking sheet without overcrowding. If they are still mushy, try leaving them in the oven a bit longer, flipping them halfway through cooking for even browning. For extra crunch, you can spray them lightly with cooking oil before roasting!

Are Loaded Potato Taco Bowls suitable for a gluten-free diet?
Very! These Loaded Potato Taco Bowls can easily be made gluten-free. Just ensure you use a gluten-free taco seasoning and check that all other ingredients you’re using (like mayonnaise or any store-bought components) are certified gluten-free too. Enjoy your flavorful, satisfying meal without worry!

undefined

Loaded Potato Taco Bowls for Easy High-Protein Meals

Enjoy these Loaded Potato Taco Bowls, a customizable high-protein meal that combines roasted potatoes with lean meat and fresh toppings.
Prep Time 15 minutes
Cook Time 45 minutes
Total Time 1 hour
Servings: 4 bowls
Course: Dinner
Cuisine: Mexican
Calories: 600

Ingredients
  

For the Taco Meat
  • 1 lb Lean Ground Beef Can substitute with turkey or chicken.
  • 0.5 tsp Creole Seasoning Cajun seasoning is a good alternative.
  • 0.5 tsp Cumin Omit for a milder taste.
  • 0.25 tsp Ground Coriander Can be replaced with ground cumin.
  • 0.25 tsp Onion Powder Fresh chopped onion works well as an alternative.
  • 0.25 tsp Garlic Powder Fresh minced garlic can be used.
  • 0.25 tsp Crushed Red Pepper Skip for a milder flavor.
  • 1 tbsp Taco Seasoning Adjust according to your taste.
  • Salt & Pepper Essential for seasoning.
For the Roasted Potatoes
  • 5-6 medium-large Potatoes Sweet potatoes can be an amazing swap.
  • 1 tbsp Olive Oil Any cooking oil can be used as a substitute.
  • 1 tsp Salt Crucial for enhancing flavors.
  • 1 tsp Oregano Italian seasoning can work as a replacement.
  • 1 tsp Garlic Powder Fresh minced garlic is a delightful alternative.
  • 1.5 tsp Smoked Paprika Use regular paprika for a lighter flavor.
For the Pico de Gallo
  • 1 large Tomato Canned tomatoes can be used.
  • 1 Jalapeño Remove seeds for a milder version.
  • 0.5 Red Onion White onion is a suitable substitute.
  • 0.5 Lime Juice Vinegar can serve as an alternative.
  • 1 tbsp Chopped Cilantro Omit if you’re not a fan of herbs.
For the Sriracha Mayo
  • 0.5 cup Mayonnaise Greek yogurt can lighten it up.
  • 2 tbsp Sriracha Adjust according to your heat preference.
  • 0.25 tbsp Lemon Juice Can be replaced with lime juice.
  • 1 tsp Black Pepper Freshly ground is preferred.

Equipment

  • Skillet
  • Oven
  • Baking Sheet
  • Mixing bowls

Method
 

Step-by-Step Instructions
  1. In a skillet over medium heat, add lean ground beef and cook until browned, about 5-7 minutes. Stir in Creole seasoning, cumin, ground coriander, onion powder, garlic powder, crushed red pepper, taco seasoning, salt, and pepper. Cook for an additional 3-5 minutes until all spices are well incorporated and the meat is thoroughly cooked, then remove from heat and set aside.
  2. Preheat your oven to 425°F (220°C). Dice 5-6 medium to large potatoes and toss them in a large bowl with olive oil, salt, oregano, garlic powder, and smoked paprika until evenly coated. Spread the potatoes on a baking sheet in a single layer, ensuring they are not overcrowded. Roast for 25-30 minutes, flipping halfway through, until crispy and golden brown.
  3. In a medium bowl, combine one diced large tomato, one seeded and chopped jalapeño, half a finely diced red onion, and the juice of half a lime. Add chopped cilantro, salt, and pepper, then mix everything together until well incorporated.
  4. In a small mixing bowl, combine half a cup of mayonnaise, 2 tablespoons of Sriracha, and a drizzle of lemon juice. Add black pepper to taste and mix until smooth.
  5. In serving bowls, start with a generous layer of the crispy roasted potatoes as the base. Top with an ample portion of the seasoned taco meat, followed by scoops of pico de gallo. Drizzle the delectable Sriracha mayo over the top for a finishing touch.

Nutrition

Serving: 1bowlCalories: 600kcalCarbohydrates: 45gProtein: 30gFat: 30gSaturated Fat: 5gPolyunsaturated Fat: 1gMonounsaturated Fat: 3gCholesterol: 80mgSodium: 800mgPotassium: 800mgFiber: 8gSugar: 5gVitamin A: 1000IUVitamin C: 25mgCalcium: 60mgIron: 4mg

Notes

Store leftovers in airtight containers for up to 4 days. For crispy potatoes, warm them in the oven at 350°F (175°C) for about 10-15 minutes.

Tried this recipe?

Let us know how it was!

Garlic Butter Chicken with Bowtie Pasta for Cozy Nights

The warm, inviting scent of garlic and butter fills the kitchen, instantly transporting me to a cozy Italian trattoria. This Garlic Butter Chicken with Bowtie Pasta is my go-to recipe for those busy weeknights when I want to treat my family to a comforting meal without spending hours in the kitchen. Quick to prepare and incredibly satisfying, this dish features tender chicken enveloped in a silky garlic butter sauce that clings perfectly to the playful bowtie pasta. Plus, it’s a family-friendly favorite, making sure everyone sits down at the table with smiles on their faces. Ready to dive into a bowl of cozy deliciousness? Let’s get started on this delightful journey!

Why is this recipe a family favorite?

Ease of Preparation: In just 30 minutes, you can whip up this delicious meal, making it perfect for busy weeknights.

Flavors That Comfort: The rich garlic and buttery sauce envelops the chicken and pasta, creating a dish that warms the soul.

Flexible Ingredients: Use the chicken, shrimp, or tofu—it’s easily adaptable to fit any dietary need, making it a versatile choice for your family.

Crowd-Pleasing Appeal: With its delightful texture and satisfying taste, this recipe guarantees everyone will ask for seconds! Serve it with fresh veggies or a side salad for a complete meal.

For more quick and delicious meals, check out our easy pasta recipes or explore family-friendly dinner ideas!

Garlic Butter Chicken with Bowtie Pasta Ingredients

• Dive into the flavors of this Garlic Butter Chicken with Bowtie Pasta!

For the Chicken

  • Boneless, skinless chicken breasts – Tender and easy to cook, ensuring perfect texture in every bite.

For the Sauce

  • Fresh minced garlic – Offers a robust flavor that infuses the dish with warmth.
  • Butter – Provides a rich, savory base for the sauce; swap for olive oil if you prefer a lighter touch.

For the Pasta

  • Bowtie pasta – Fun and appealing for all ages; feel free to use any pasta shape you love.

Optional Cheesiness

  • Parmesan cheese – Grate over the top for an extra burst of flavor; nutritional yeast works as a dairy-free alternative.

Now you’re all set to create this delightful family favorite!

Step‑by‑Step Instructions for Garlic Butter Chicken with Bowtie Pasta

Step 1: Cook the Chicken
In a large skillet, melt 3 tablespoons of butter over medium heat. Once melted, add 4 minced garlic cloves and sauté until fragrant, about 1 minute. Next, add 1 pound of boneless, skinless chicken breasts. Cook for 7-10 minutes, turning occasionally, until the chicken is golden brown and reaches an internal temperature of 165°F. Remove from heat and set aside.

Step 2: Boil the Pasta
While the chicken cooks, bring a pot of salted water to a boil. Add 8 ounces of bowtie pasta and cook according to package instructions until al dente, about 9-11 minutes. Once cooked, drain the pasta in a colander and return it to the pot. Drizzle with a bit of olive oil to prevent sticking, and cover to keep warm.

Step 3: Combine Ingredients
With the chicken still in the skillet, slice it into bite-sized pieces. Add the cooked bowtie pasta into the skillet, along with any remaining garlic butter sauce. Toss gently to coat the pasta and chicken evenly, allowing the flavors to meld together for about 2 minutes on low heat. The dish should look glossy and inviting.

Step 4: Serve and Garnish
Spoon the Garlic Butter Chicken with Bowtie Pasta onto plates and sprinkle with freshly grated Parmesan cheese, if desired. For an extra touch, garnish with a sprinkle of chopped fresh parsley for color. Serve warm with your favorite steamed vegetables or a fresh salad on the side to create a comforting family meal that everyone will love.

Garlic Butter Chicken with Fun Twists

Feel free to unleash your creativity with this recipe and customize it to match your taste buds!

  • Seafood Swap: Use shrimp instead of chicken for a delightful twist. The garlic butter sauce pairs beautifully with tender shrimp, adding a touch of sweetness.

  • Veggie Delight: Toss in seasonal vegetables like bell peppers or zucchini for extra nutrition. This addition not only boosts flavor but also brings vibrant colors to your plate.

  • Pasta Options: Switch the bowtie pasta for whole wheat or gluten-free options. This makes it easier for everyone in the family to enjoy this comforting meal, regardless of dietary preferences.

  • Herb Blend: Enhance the flavor by incorporating fresh herbs like basil or thyme. A pinch of these aromatic herbs elevates the dish to a gourmet level, making your kitchen smell heavenly.

  • Slow Cooker Method: Use the slow cooker for effortless preparation. Combine all ingredients and cook on low for 4-6 hours for a fuss-free family dinner.

  • Air Fryer Crunch: For a crispy finish, air fry the chicken pieces for 10-12 minutes before combining with pasta. This gives a crunchy texture that contrasts beautifully with the buttery sauce.

  • Heat Level: Spice things up with a dash of red pepper flakes or a few slices of jalapeños. A little heat enhances the flavors, making each bite even more exciting.

  • Nutritional Yeast: Replace Parmesan cheese with nutritional yeast for a dairy-free option. This will still provide a cheesy flavor, perfect for vegans or those with lactose intolerance.

For additional inspiration, you might want to explore our easy pasta recipes or check out some family-friendly dinner ideas for further culinary adventures!

What to Serve with Garlic Butter Chicken with Bowtie Pasta

Elevate your meal experience with delightful sides that enhance the rich flavors of this comforting dish.

  • Steamed Broccoli: Adds a vibrant green crunch, balancing the buttery sauce with a fresh element. Its slight bitterness pairs perfectly with the sweetness of garlic.

  • Caesar Salad: Crisp romaine lettuce and creamy dressing create a refreshing contrast to the hearty pasta, making each bite a delightful surprise.

  • Garlic Bread: A classic choice, the warm, crunchy bread soaked in garlic butter complements the dish beautifully and is ideal for mopping up any sauce.

  • Roasted Seasonal Vegetables: Roasting brings out the natural sweetness of vegetables like carrots and bell peppers, providing colorful accents alongside the pasta dish.

  • Creamy Coleslaw: The crunchy and tangy slaw balances the richness of the garlic butter chicken, adding a refreshing bite with every forkful.

  • Lemonade Spritzer: A zesty drink that cleanses the palate with its citrusy taste, making it a refreshing companion to this hearty meal.

  • Chocolate Chip Cookies: End on a sweet note! These warm, gooey cookies offer a nostalgic comfort, perfect for rounding off a family dinner.

  • Herb-Infused Quinoa: This light and fluffy option brings a nutty flavor to the table while providing a nutritious grain alternative alongside the pasta.

Make Ahead Options

Preparing Garlic Butter Chicken with Bowtie Pasta ahead of time is a breeze and perfect for busy weeknights! You can cook the chicken and prepare the garlic butter sauce up to 24 hours in advance; simply refrigerate the cooked chicken in an airtight container. The bowtie pasta can also be boiled and stored, but do drizzle a bit of olive oil to prevent sticking. When you’re ready to serve, just reheat the chicken and sauce on low heat until warmed through, then toss with the pasta for a quick finish. With these make ahead options, you’ll enjoy a flavorful meal that’s just as delicious, while saving valuable time during the week!

How to Store and Freeze Garlic Butter Chicken

Fridge: Store leftovers in an airtight container for up to 3 days. This helps maintain the rich flavors of your garlic butter chicken while keeping it fresh and safe.

Freezer: For longer storage, freeze individual portions of the garlic butter chicken in sealed freezer bags for up to 3 months. Just be sure to remove as much air as possible before sealing!

Reheating: When you’re ready to enjoy your meal again, thaw in the refrigerator overnight. Reheat gently in a skillet over low heat, adding a splash of water or broth to restore the creamy sauce.

Make-Ahead: You can prepare this comforting dish ahead of time, refrigerating it before baking. Just be mindful of storing it properly, ensuring it lasts and tastes great!

Expert Tips for Garlic Butter Chicken

  • Perfectly Cooked Chicken: Ensure chicken is golden brown and reaches an internal temperature of 165°F. Undercooking can lead to food safety issues.

  • Garlic Timing: Sauté minced garlic just until fragrant—don’t let it burn! Overcooked garlic can impart a bitter taste to your garlic butter chicken.

  • Pasta Cooking: Aim for al dente when boiling bowtie pasta. It will continue to cook slightly after combining with the sauce, ensuring the perfect texture.

  • Balancing Flavors: Season your dish at every stage. Add a pinch of salt to the pasta water and taste before serving—adjusting seasoning can elevate your garlic butter chicken.

  • Garnish with Freshness: A sprinkle of fresh herbs like parsley not only adds color but also a burst of freshness, making the dish visually appealing and delicious.

Garlic Butter Chicken with Bowtie Pasta Recipe FAQs

What type of chicken should I use?
I recommend using boneless, skinless chicken breasts for this recipe, as they are easy to work with and cook quickly. If you’re feeling adventurous, you can also use chicken thighs for a richer flavor, just remember to adjust the cooking time to ensure they reach an internal temperature of 165°F.

How should I store leftovers?
To keep your Garlic Butter Chicken with Bowtie Pasta fresh, store leftovers in an airtight container in the refrigerator for up to 3 days. When you’re ready to enjoy them, simply reheat gently in a skillet over low heat with a splash of water or broth to loosen the sauce.

Can I freeze this dish?
Absolutely! To freeze your Garlic Butter Chicken with Bowtie Pasta, let it cool completely after cooking, then portion it into freezer-safe bags or containers. It can be stored for up to 3 months. Just press out as much air as possible before sealing. When you’re ready to eat, thaw in the refrigerator overnight and reheat on low heat to enjoy your cozy meal again.

What should I do if the garlic burns while cooking?
If your garlic starts to burn, it can give the dish an unpleasant bitter flavor. Next time, be sure to keep an eye on it while sautéing and lower the heat if necessary. If it does burn, I suggest starting a new batch of garlic butter sauce as it’s best to avoid any burnt bits from affecting the overall flavor of your dish.

Is this recipe suitable for those with dairy allergies?
Definitely! To make this dish dairy-free, substitute the butter with a light olive oil and replace Parmesan cheese with nutritional yeast for a cheesy flavor without the dairy. Always check ingredient labels to ensure all your items are dairy-free, especially pre-packaged products.

Can I add vegetables to this dish?
Very! You can add seasonal vegetables to your Garlic Butter Chicken with Bowtie Pasta to enhance its nutritional value and color. Simply sauté vegetables like broccoli or spinach in the garlic butter sauce after the chicken is cooked, then combine them with the pasta for a delightful, veggie-filled feast.

undefined

Garlic Butter Chicken with Bowtie Pasta for Cozy Nights

This Garlic Butter Chicken with Bowtie Pasta is a family favorite, perfectly blending rich garlic and buttery flavors.
Prep Time 10 minutes
Cook Time 30 minutes
Total Time 40 minutes
Servings: 4 servings
Course: Dinner
Cuisine: Italian
Calories: 450

Ingredients
  

For the Chicken
  • 1 pound Boneless, skinless chicken breasts Tender and easy to cook
For the Sauce
  • 3 tablespoons Butter Provides a rich flavor base
  • 4 cloves Fresh minced garlic Robust flavor infusion
For the Pasta
  • 8 ounces Bowtie pasta Use any pasta shape you love
Optional Cheesiness
  • 1/4 cup Parmesan cheese Grate over the top for flavor

Equipment

  • Skillet
  • Pot
  • Colander

Method
 

Step-by-Step Instructions
  1. Melt 3 tablespoons of butter in a skillet over medium heat and sauté 4 minced garlic cloves until fragrant.
  2. Add 1 pound of chicken breasts and cook for 7-10 minutes until golden brown and reaches 165°F.
  3. In boiling salted water, cook 8 ounces of bowtie pasta until al dente, about 9-11 minutes.
  4. Slice cooked chicken and combine with pasta in the skillet, tossing to coat with remaining garlic butter sauce for 2 minutes.
  5. Serve with freshly grated Parmesan cheese and optionally garnish with parsley.

Nutrition

Serving: 1plateCalories: 450kcalCarbohydrates: 45gProtein: 35gFat: 18gSaturated Fat: 10gPolyunsaturated Fat: 1gMonounsaturated Fat: 6gCholesterol: 100mgSodium: 600mgPotassium: 600mgFiber: 2gSugar: 2gVitamin A: 500IUVitamin C: 2mgCalcium: 150mgIron: 2mg

Notes

Perfectly cooked chicken should reach an internal temperature of 165°F. Avoid burning the garlic.

Tried this recipe?

Let us know how it was!

Fresh and Easy Vietnamese Noodle Salad You’ll Crave Today

In a bustling Vietnamese market, the air is filled with aromas of fresh herbs and savory dishes—an absolute feast for the senses! Guided by that vibrant energy, I set out to create a delightful Fresh Vietnamese Noodle Salad with Tangy Dressing. This salad captures the essence of that lively scene, featuring tender vermicelli noodles tossed with a medley of crisp vegetables like cucumbers and vibrant carrots. Perfect for busy evenings, this recipe emphasizes quick preparation, allowing you to whip up a light, healthy meal in minutes. Not only is it a wonderful vegetarian option, but it also serves as a stunning side for grilled meats. Ready to dive into the bright, fresh flavors of this dish? Let’s get started!

Why is this salad a must-try?

Vibrant, Fresh Ingredients: This noodle salad bursts with crisp, colorful veggies that not only look beautiful but also offer nutritional benefits.

Quick Preparation: In just 15 minutes or less, you’ll have a light meal ready, perfect for busy weeknights or spontaneous gatherings.

Versatile Pairing: It shines as a standalone lunch or an ideal side dish to grilled proteins like chicken, shrimp, or even tofu.

Bold, Tangy Flavor: The zesty dressing made with fish sauce, lime, and garlic elevates every bite, making it a flavor sensation.

Healthy and Satisfying: As a low-calorie, high-fiber meal, this salad is a guilt-free choice that will keep you feeling energized and satisfied.

Give this recipe a try, and if you’re looking for more quick ideas, don’t miss out on my favorite quick dinner recipes.

Fresh Vietnamese Noodle Salad Ingredients

For the Salad
Thin Asian vermicelli noodles – These are the backbone of the salad, providing a tender base when soaked properly.
Carrots – Shredded for better texture, they add a refreshing sweetness that complements the other ingredients.
Cucumbers – Seeded and shredded, they deliver a juicy crunch, elevating the fresh aspect of this Vietnamese noodle salad.
Green onions – These provide a subtle, mild onion flavor and a lovely pop of green color to your dish.
Fresh bean sprouts – Essential for authentic taste, they contribute a satisfying crunch that enhances the salad’s texture.
Cilantro – Bursting with aromatic freshness, this herb offers a delightful flavor that can be substituted with parsley if needed.

For the Dressing
Fish sauce – Use high-quality fish sauce as it imparts the necessary umami flavor that is key to this noodle salad.
Seasoned rice vinegar – This adds a perfect blend of tanginess and sweetness; regular rice vinegar can be used with some sugar adjustment.
Sugar – To balance the tang of the dressing, adjust to your taste preferences; it’s crucial for a well-rounded flavor.
Garlic – Fresh minced garlic amplifies the depth of flavor in your dressing; avoid pre-packaged if you can.
Crushed red pepper – Adds a touch of heat; adjust the amount according to your spice tolerance.
Lime – Freshly squeezed lime juice brightens up your salad, bringing all the flavors together beautifully.

Feel free to mix and match the toppings or add some of your favorite ingredients to make this dish uniquely yours! Happy cooking!

Step‑by‑Step Instructions for Fresh Vietnamese Noodle Salad with Tangy Dressing

Step 1: Soak the Vermicelli Noodles
In a large bowl, pour boiling water over the thin Asian vermicelli noodles and let them soak for 3-4 minutes, or until they become tender yet still firm to the bite. Drain the noodles using a colander and rinse them under cold water to halt the cooking process, ensuring they remain pliable for your fresh Vietnamese noodle salad.

Step 2: Prepare the Vegetables
While the noodles cool, julienne or shred the carrots and cucumbers, ensuring they are crisp and fresh. Chop the green onions finely and gather the fresh bean sprouts and cilantro. In a large mixing bowl, combine the cooled vermicelli, shredded carrots, cucumbers, bean sprouts, and cilantro, allowing the colors and textures to come together beautifully.

Step 3: Whisk the Dressing
In a separate bowl or jar, mix together the fish sauce, seasoned rice vinegar, sugar, minced garlic, and crushed red pepper. Whisk or shake until the sugar dissolves completely and everything is well combined, creating a tangy and aromatic dressing that will elevate your fresh Vietnamese noodle salad to new heights.

Step 4: Combine Salad and Dressing
Pour about three-quarters of the prepared dressing over the noodle and vegetable mixture. Toss gently with tongs or a large spoon, making sure all ingredients are well-coated in that zesty sauce. Taste and add more dressing if desired, ensuring every bite bursts with flavor yet remains light and refreshing.

Step 5: Garnish Before Serving
For an extra pop of flavor, sprinkle additional chopped cilantro and sliced green onions on top of the salad. Squeeze fresh lime juice over the entire dish, enhancing the tangy notes of the dressing and making it visually inviting. Serve immediately or chill slightly to let the flavors mingle.

Step 6: Make-Ahead Tips
If preparing ahead, assemble the salad without the dressing and store it in the fridge to keep the veggies crisp. Add the dressing just before serving, allowing the fresh Vietnamese noodle salad to shine in terms of taste and texture, making it an ideal choice for effortless entertaining or lunches on the go.

What to Serve with Fresh Vietnamese Noodle Salad?

This salad is a delightful centerpiece, perfectly complemented by a variety of enticing sides and beverages.

  • Grilled Chicken Skewers: The smokiness of grilled chicken enhances the fresh flavors, creating a balanced and satisfying meal. Perfect for a summer barbecue!

  • Shrimp Spring Rolls: These light and refreshing rolls harmonize with the noodle salad, providing a crispy texture that contrasts deliciously with the soft noodles.

  • Crispy Tofu: Marinated and pan-fried tofu adds a savory element that pairs beautifully with the tangy dressing, making for a delightful vegetarian option.

  • Vietnamese Egg Coffee: For a unique drink experience, this creamy and sweet coffee will delight your palate, rounding off your meal with a touch of indulgence.

  • Mango Sorbet: A light, fruity dessert that cleanses the palate and mirrors the salad’s bright flavors, making it a refreshing end to your dining experience.

  • Chilled Green Tea: A soothing beverage that nicely complements the meal, its gentle flavors will leave you feeling refreshed.

Elevate your dining experience with these pairings, and enjoy every bite of your Fresh Vietnamese Noodle Salad!

Variations & Substitutions for Fresh Vietnamese Noodle Salad

Feel free to make this fresh Vietnamese noodle salad your own with these delightful twists and substitutions!

  • Gluten-Free Noodles:
    Use rice noodles to ensure everyone can enjoy this dish while keeping it gluten-free.

  • Extra Crunch:
    Substitute shredded red cabbage for a crunchier texture and added color that’ll surprise your guests.

  • Herb Swap:
    Explore fresh herbs by swapping cilantro with mint or Thai basil, introducing a unique and aromatic layer.

  • Veggie Mix-Up:
    Replace bean sprouts with julienned bell peppers or snap peas for a delightful variety of flavors and textures.

  • Protein Boost:
    Add shredded chicken or grilled shrimp for a heartier salad that’s perfect as a filling main dish.

  • Spice It Up:
    Increase crushed red pepper or add a dash of Sriracha for a bolder kick that will set your taste buds tingling.

  • Zesty Vinaigrette:
    Experiment with lime juice and zest in the dressing for a brighter, more vibrant flavor profile.

  • Sweet and Savory:
    Drizzle honey or agave nectar into the dressing if you prefer a touch more sweetness to balance the tanginess.

Get creative and enjoy the process of customizing this salad to suit your tastes! If you’re looking to spice up your dinner routine, don’t miss out on my favorite quick dinner recipes for more inspiration!

How to Store and Freeze Fresh Vietnamese Noodle Salad

Fridge: Store the assembled noodle salad in an airtight container for up to 2 days. Keep the dressing separate until ready to serve to maintain the freshness of the vegetables.

Freezer: Freezing is not recommended as the texture of the noodles and vegetables may change upon thawing. However, if you must, freeze the unassembled salad (without dressing) for up to 1 month.

Make-Ahead Tips: You can prepare the salad a day in advance; simply keep the dressing separate. Combine everything just before serving to keep the flavors and textures vibrant.

Reheating: If using leftovers, gently toss the salad with a splash of fresh lime juice to revive the flavors before serving. Enjoy your fresh Vietnamese noodle salad even on busy days!

Make Ahead Options

These Fresh Vietnamese Noodle Salads are perfect for busy weeknights! You can prep the noodle and vegetable mixture up to 24 hours in advance, storing it in an airtight container in the refrigerator to keep everything crisp. To maintain quality, avoid adding the dressing until you’re ready to serve—this prevents the vegetables from becoming soggy. Just before serving, mix in the refreshing dressing and garnish with additional cilantro and lime juice. This way, you’ll enjoy a flavorful and vibrant salad that tastes just as delicious as when made fresh—saving you time and making your meal prep a breeze!

Expert Tips for Vietnamese Noodle Salad

  • Watch the Noodles: Don’t over-soak the vermicelli noodles as they may become mushy. Aim for a tender, slightly chewy texture to enhance your fresh Vietnamese noodle salad.

  • Quality Matters: Use high-quality fish sauce to impart authentic umami flavor. A good fish sauce elevates this dish, creating a delightful taste experience.

  • Vinegar Confusion: Distinguish between seasoned rice vinegar and rice wine vinegar; they have different flavors. Ensure you’re using seasoned rice vinegar for the ideal balance in your dressing.

  • Customize Wisely: While the recipe is delicious as is, feel free to swap in various vegetables. Just be mindful of their textures to maintain crunch in your salad.

  • Dressing Dynamics: Start with less dressing and adjust according to your taste. Keeping it light ensures that the fresh flavors of your Vietnamese noodle salad shine through beautifully.

Fresh Vietnamese Noodle Salad Recipe FAQs

What type of noodles should I use for the salad?
Absolutely! For this salad, I recommend stick-type thin Asian vermicelli noodles, which provide a tender yet slightly chewy texture once soaked. You can also use rice stick or mung bean noodles if needed. Just keep an eye on the soaking time to achieve the perfect tenderness!

How should I store leftovers of the noodle salad?
You can store the assembled noodle salad in an airtight container in the fridge for up to 2 days. However, it’s best to keep the dressing separate until you’re ready to enjoy it. This helps maintain the freshness and crunchiness of those vibrant veggies!

Can I freeze the Vietnamese noodle salad?
Freezing is not typically recommended for this noodle salad, as the texture of the noodles and vegetables may become undesirable upon thawing. However, if you prefer to freeze it, I suggest freezing the unassembled salad (without dressing) for up to 1 month. This way, when you’re ready to eat, just thaw it and add fresh dressing and herbs!

What if my noodles become too soft after soaking?
If you accidentally over-soaked the vermicelli noodles and they’ve turned mushy, try this quick fix: rinse them under cold water immediately after draining to stop the cooking process. If they’re still too soft, consider tossing them into a stir-fry or soup instead; that way, you won’t waste them!

Are there any dietary considerations for this recipe?
Yes! While this salad is vegetarian-friendly, note that it contains fish sauce, which isn’t suitable for vegans. If you need a substitute, you can replace fish sauce with a combination of soy sauce and a dash of lime juice for a similar umami flavor. Additionally, be mindful of any allergies, particularly if you’re using herbs or sauces with potential allergens.

How can I make this salad spicier?
If you love a kick, you can easily adjust the spice level! Increase the amount of crushed red pepper in the dressing, or toss in some thinly sliced red chili peppers right before serving. Remember, it’s always easier to add more spice than to take it away, so start slowly and taste as you go!

undefined

Fresh and Easy Vietnamese Noodle Salad You’ll Crave Today

A vibrant and healthy Vietnamese noodle salad featuring fresh ingredients and a tangy dressing, perfect for quick meals.
Prep Time 15 minutes
Total Time 15 minutes
Servings: 4 servings
Course: Salad
Cuisine: Vietnamese
Calories: 150

Ingredients
  

For the Salad
  • 8 oz Thin Asian vermicelli noodles
  • 2 medium Carrots shredded
  • 1 medium Cucumbers seeded and shredded
  • 4 stalks Green onions finely chopped
  • 1 cup Fresh bean sprouts
  • 1/2 cup Cilantro chopped
For the Dressing
  • 3 tbsp Fish sauce high-quality
  • 2 tbsp Seasoned rice vinegar
  • 1 tbsp Sugar to taste
  • 2 cloves Garlic minced
  • 1/2 tsp Crushed red pepper adjust to taste
  • 1 medium Lime freshly squeezed

Equipment

  • bowl
  • Colander
  • whisk

Method
 

Step‑by‑Step Instructions
  1. Soak the vermicelli noodles in boiling water for 3-4 minutes until tender, then drain and rinse under cold water.
  2. Prepare the vegetables by julienning or shredding the carrots and cucumbers, and chopping the green onions and cilantro.
  3. Mix the cooled noodles with the shredded carrots, cucumbers, bean sprouts, and cilantro in a large bowl.
  4. Whisk together the fish sauce, seasoned rice vinegar, sugar, minced garlic, and crushed red pepper to make the dressing.
  5. Combine the noodle and vegetable mixture with three-quarters of the dressing, tossing gently to coat.
  6. Garnish with additional cilantro and green onions, and squeeze fresh lime juice over the salad before serving.
  7. For make-ahead options, store the salad without dressing in the fridge and combine just before serving.

Nutrition

Serving: 1servingCalories: 150kcalCarbohydrates: 27gProtein: 4gFat: 2gSaturated Fat: 0.5gSodium: 800mgPotassium: 150mgFiber: 2gSugar: 3gVitamin A: 500IUVitamin C: 10mgCalcium: 20mgIron: 1mg

Notes

Customize the salad with additional vegetables while maintaining their textures for crunch. High-quality ingredients enhance the overall flavor experience.

Tried this recipe?

Let us know how it was!

Quick & Healthy Mediterranean Chicken Stir Fry Delight

As I sliced into the tender chicken, the enticing aroma of sun-dried tomatoes and garlic instantly transformed my kitchen into a Mediterranean oasis. This Quick and Wholesome Mediterranean Chicken Stir Fry is not just another dinner option; it’s a delightful escape that brings fresh, vibrant flavors to your table in under 30 minutes. Packed with crisp vegetables and topped with a zesty lemon and feta finish, this dish is perfect for those busy evenings when time is tight but flavor is non-negotiable. Plus, it’s a low-carb wonder, making it an ideal choice for anyone looking to indulge without the guilt. Ready to bring this burst of sunshine into your dinner routine? Let’s get cooking!

Why Is This Stir Fry So Irresistible?

Quick Cooking Time: In just 30 minutes, you can whip up this delicious dish, making it a perfect weeknight dinner choice.

Flavor Explosion: The harmony of sun-dried tomatoes, garlic, and lemon juice transports you to a Mediterranean paradise with every bite.

Healthy Ingredients: Loaded with lean protein and fresh veggies, it’s a wholesome meal you can feel good about.

Low-Carb Delight: For those watching their carbs, this recipe satisfies cravings without guilt, perfect for any diet plan.

Crowd-Pleasing Appeal: Whether it’s a family dinner or a gathering with friends, this vibrant stir fry is sure to impress your guests!

Embrace the simplicity of homemade cooking and discover more quick dinner ideas that will spice up your menu!

Mediterranean Chicken Stir Fry Ingredients

• Here’s what you need for this zesty dish!

For the Chicken

  • Chicken breasts – Provides lean protein; cut into uniform pieces for even cooking.

For the Vegetables

  • Extra virgin olive oil – Enhances flavor; use liberally for a rich taste.
  • Zucchini – Adds texture and freshness; yellow squash can be used as a substitute.
  • Red bell pepper – Contributes sweetness and color; any sweet pepper variety works.
  • Red onion – Offers sharpness; yellow or white onions can be substituted.
  • Cherry tomatoes – Freshness and juiciness; canned diced tomatoes are a convenient alternative.
  • Kalamata olives – Adds a briny flavor; green olives can be a substitute.
  • Garlic – Essential for flavor; fresh minced garlic is recommended for the best taste.
  • Sun-dried tomatoes – Delivers a concentrated tomato flavor; use additional fresh tomatoes if unavailable.

For the Seasoning

  • Dried oregano, basil, thyme – Contribute aromatic herbal notes; fresh herbs may elevate the dish further.
  • Lemon juice – Brightens the dish; must be added at the end of cooking.
  • Feta cheese – Provides creaminess and a tangy contrast; omit for a dairy-free version.
  • Fresh parsley – Optional garnish; adds color and a fresh flavor.

Now you have everything you need for this bright Mediterranean Chicken Stir Fry that’s sure to liven up your dinner routine!

Step-by-Step Instructions for Quick and Wholesome Mediterranean Chicken Stir Fry

Step 1: Prep Ingredients
Begin by gathering all your ingredients for the Mediterranean Chicken Stir Fry. Chop the chicken breasts into uniform bite-sized pieces and set aside. Next, prepare the vegetables by slicing the zucchini, red bell pepper, and red onion into similar-sized pieces for even cooking. Mince the garlic and cut the cherry tomatoes in half, ensuring everything is ready to go before you start cooking.

Step 2: Sear Chicken
Heat half of the extra virgin olive oil in a large skillet or wok over medium-high heat. Once the oil shimmers, add the chicken pieces in a single layer and sear for about 7-8 minutes, or until they turn golden brown and are cooked through. Stir occasionally to ensure even browning. Once done, remove the chicken from the skillet and set it aside on a plate.

Step 3: Sauté Vegetables
In the same skillet, add the remaining olive oil and heat over medium-high heat. Toss in the red onion and minced garlic, sautéing for about 1-2 minutes until fragrant. Then, add the zucchini and red bell pepper, continuing to sauté for 3-4 minutes until they soften but retain their vibrant color. The vegetables should be tender yet still crisp when done.

Step 4: Combine Ingredients
Return the cooked chicken to the skillet with the sautéed vegetables. Add the halved cherry tomatoes, chopped sun-dried tomatoes, Kalamata olives, and sprinkle in the dried oregano, basil, thyme, along with salt and pepper to taste. Stir everything together, cooking for an additional 2-3 minutes until heated through, allowing the flavors to meld beautifully.

Step 5: Finish Dish
Remove the skillet from heat and drizzle fresh lemon juice over the Mediterranean Chicken Stir Fry, mixing gently. Finally, crumble feta cheese on top, if desired, and give it another light toss to combine flavors. Let it sit for a minute to enhance the vibrant aroma before serving, and enjoy the delightful burst of Mediterranean flavors!

How to Store and Freeze Mediterranean Chicken Stir Fry

Fridge: Store any leftovers in airtight containers for up to 3-4 days. This will keep the flavors fresh and the chicken tender.

Freezer: For long-term storage, freeze the cooked stir fry in airtight containers for up to 2 months. Just be sure to cool it completely before freezing to maintain quality.

Reheating: When ready to enjoy, thaw overnight in the fridge and reheat in a skillet over medium heat until warmed through. The Mediterranean Chicken Stir Fry will taste just as delicious!

Meal Prep: You can also prep your ingredients in advance; chop vegetables and marinate the chicken up to 24 hours ahead for a quick dinner option.

Expert Tips for Mediterranean Chicken Stir Fry

  • Uniform Chicken Size: Cut chicken breasts into evenly sized pieces to ensure they cook through simultaneously and achieve a golden crust.

  • Avoid Overcrowding: When sautéing vegetables, avoid overcrowding the pan. This helps them stay crisp and vibrant. Sauté in batches if necessary.

  • Toast Dried Herbs: Briefly toasting your dried oregano, basil, and thyme in the skillet before adding other ingredients can intensify their flavors and elevate the dish.

  • Add Lemon Last: Always add lemon juice after removing the skillet from heat. This preserves its fresh tang, ensuring your Mediterranean Chicken Stir Fry bursts with bright flavor.

  • Feta Substitution: If you’re going dairy-free, simply omit the feta cheese. The dish will still shine with its vibrant taste and texture!

  • Prep Ahead: For quicker cooking on busy nights, chop vegetables and marinate the chicken up to 24 hours in advance to infuse flavors.

What to Serve with Mediterranean Chicken Stir Fry

Elevate your meal experience with delicious pairings that bring out the vibrant flavors of the Mediterranean.

  • Quinoa Salad: This nutty and fluffy salad adds a wholesome touch, complementing the rich flavors of the stir fry with its fresh herbs and veggies.
  • Tzatziki Sauce: A cool, creamy dip made of yogurt, cucumber, and garlic, tzatziki is perfect for balancing the dish’s zesty notes and enhancing its Mediterranean flair.
  • Garlic Bread: Soft and crispy, garlic bread is a delightful companion; its buttery and garlicky goodness serves as the perfect vessel for scooping up flavorsome bits.
  • Roasted Vegetables: An assortment of seasonal veggies roasted to perfection infuses sweetness and depth, enhancing the freshness of the stir fry while adding delightful texture.
  • Cauliflower Rice: For a low-carb alternative, light and fluffy cauliflower rice serves as an ideal base to soak up the stir fry’s rich flavors, keeping your meal light yet satisfying.
  • Greek Olives Platter: Bring a variety of olives to the side for a salty contrast. Their briny bite perfectly complements the chicken and vegetables, making each bite memorable!
  • Red Wine: A glass of chilled red wine, like a fruity Merlot, enhances the meal, providing a perfect contrast to the savory flavors on the plate.
  • Baklava: Finish on a sweet note with this flaky pastry; its honeyed layers add a delightful end to your Mediterranean meal, echoing the dish’s sunny origins.

Make Ahead Options

These Quick and Wholesome Mediterranean Chicken Stir Fry ingredients are perfect for meal prep enthusiasts! You can chop the chicken and vegetables, like zucchini and bell pepper, up to 24 hours in advance. Simply store them in airtight containers in the refrigerator to keep everything fresh and vibrant. Additionally, marinate the chicken in olive oil and herbs for enhanced flavor. When you’re ready to serve, just sear the chicken and sauté the veggies, adding in the remaining ingredients as per the recipe instructions. This method ensures you will have a delicious, time-saving meal ready in a flash, just as delightful as if you had made it from scratch!

Variations & Substitutions for Mediterranean Chicken Stir Fry

Feel free to explore these delicious twists that will make this dish truly yours; let’s get creative in the kitchen!

  • Protein Swap: Use shrimp or tofu instead of chicken for a delightful twist, adding a different texture and flavor profile. Both options are just as tasty and provide a unique spin, ensuring everyone at the table finds something they love.

  • Low-Carb Boost: Substitute cauliflower rice for regular rice to keep it low-carb while adding a great texture. This swap lets you enjoy a hearty meal without the extra carbs, making it a perfect option for those following a keto diet.

  • Veggie Medley: Replace zucchini with seasonal vegetables like asparagus or broccoli for an updated seasonal flair. Each veggie adds its unique flavor, combining well with the zesty ingredients of the stir fry.

  • Extra Creaminess: Toss in some avocado slices right before serving for a creamy richness. Avocado complements the Mediterranean flavors beautifully, creating a luxurious texture.

  • Spice It Up: Add cracked red pepper flakes for a kick of heat that enhances the overall flavor. Just a pinch can transform the dish, taking it to a new level of excitement that’s sure to please spice lovers!

  • Herb Variations: Experiment with fresh herbs such as basil or cilantro instead of dried oregano and thyme for a vibrant pop of flavor. Fresh herbs elevate the entire dish, making each bite aromatic and fresh.

  • Cheese Alternatives: If you’re looking to ditch the feta, consider using goat cheese or nutritional yeast for a dairy-free option. Each will still provide a tangy contrast that works wonderfully with the other flavors.

  • Add More Crunch: Incorporate slivered almonds or pistachios right before serving for an added crunch and nutty flavor. This delightful textural contrast will keep everyone coming back for more!

Explore these variations and find your family’s favorite rendition of the Mediterranean Chicken Stir Fry! For more ideas, check out my delicious tzatziki sauce or consider pairing this dish with a refreshing quinoa salad for a complete Mediterranean experience.

Mediterranean Chicken Stir Fry Recipe FAQs

How do I choose the right ripeness of vegetables for stir fry?
Absolutely! For the Mediterranean Chicken Stir Fry, look for firm zucchini and bell peppers with vibrant colors. The zucchini should be smooth without dark spots or soft areas, and the red bell pepper should have a shiny, taut skin. This ensures you’ll get the crunch and freshness that makes the dish pop!

How should I store leftovers from the stir fry?
Very! Store your Mediterranean Chicken Stir Fry in airtight containers in the refrigerator for up to 3-4 days. Ensure the leftovers are completely cooled before sealing to prevent excess moisture from making them soggy. When reheating, gently warm them in a skillet to maintain the dish’s flavor and texture.

Can I freeze Mediterranean Chicken Stir Fry?
Absolutely! You can freeze the cooked stir fry for up to 2 months. To maintain quality, let it cool completely before transferring it to airtight freezer-safe containers. When you’re ready to enjoy it, thaw overnight in the fridge, then reheat in a skillet over medium heat for the best results.

What if my chicken isn’t cooking evenly?
No worries! To prevent uneven cooking, make sure your chicken is cut into uniform pieces. If you’re still facing issues, consider searing in batches instead of overcrowding the pan, which can lower the temperature. This way, each piece gets the perfect amount of heat to become beautifully golden brown.

Are there any dietary considerations for this recipe?
Sure! If you have a dairy sensitivity, simply omit the feta cheese to make the dish dairy-free. Additionally, people with olive allergies can replace Kalamata olives with a suitable alternative, like capers or skip them altogether. It’s always great to enjoy food that caters to various dietary needs!

How can I prep ingredients ahead for this stir fry?
I often make life easier by preparing ingredients in advance! You can chop vegetables and marinate the chicken up to 24 hours before cooking. Store each in separate airtight containers in the fridge. When you’re ready to cook, everything will be ready to toss straight into the skillet, making dinner a breeze!

undefined

Quick & Healthy Mediterranean Chicken Stir Fry Delight

This Quick and Healthy Mediterranean Chicken Stir Fry offers vibrant flavors and lean protein in under 30 minutes, perfect for a quick dinner.
Prep Time 10 minutes
Cook Time 20 minutes
Total Time 30 minutes
Servings: 4 servings
Course: Dinner
Cuisine: Mediterranean
Calories: 350

Ingredients
  

For the Chicken
  • 1 lb chicken breasts cut into uniform pieces
For the Vegetables
  • 2 Tbsp extra virgin olive oil use liberally
  • 1 cup zucchini sliced
  • 1 cup red bell pepper sliced
  • 1 cup red onion sliced
  • 1 cup cherry tomatoes halved
  • 1/2 cup Kalamata olives pitted
  • 3 cloves garlic minced
  • 1/2 cup sun-dried tomatoes
For the Seasoning
  • 1 tsp dried oregano
  • 1 tsp dried basil
  • 1 tsp dried thyme
  • 2 Tbsp lemon juice added at end of cooking
  • 1/2 cup feta cheese optional
  • 2 Tbsp fresh parsley optional garnish

Equipment

  • Large skillet
  • Knife
  • Cutting board

Method
 

Step-by-Step Instructions
  1. Gather all your ingredients. Chop the chicken into uniform bite-sized pieces. Slice the zucchini, red bell pepper, and red onion.
  2. Heat half of the olive oil in a large skillet over medium-high heat. Add chicken pieces and sear for 7-8 minutes until golden brown.
  3. In the same skillet, add the remaining olive oil. Sauté red onion and garlic for 1-2 minutes. Add zucchini and red bell pepper, sauté for 3-4 minutes.
  4. Return the cooked chicken to the skillet. Add halved cherry tomatoes, sun-dried tomatoes, olives, and herbs. Stir and cook for an additional 2-3 minutes.
  5. Remove from heat, drizzle lemon juice, and crumble feta cheese on top. Let sit for a minute before serving.

Nutrition

Serving: 1servingCalories: 350kcalCarbohydrates: 15gProtein: 30gFat: 20gSaturated Fat: 5gPolyunsaturated Fat: 3gMonounsaturated Fat: 10gCholesterol: 80mgSodium: 600mgPotassium: 700mgFiber: 3gSugar: 5gVitamin A: 1500IUVitamin C: 50mgCalcium: 150mgIron: 2mg

Notes

For quicker cooking, chop vegetables and marinate the chicken up to 24 hours in advance.

Tried this recipe?

Let us know how it was!

Zesty Shrimp Tacos with Creamy Cilantro Lime Twist

The moment I take that first bite of a shrimp taco, I’m transported to sun-soaked beaches and the sound of waves crashing against the shore. These Juicy Shrimp Tacos with Creamy Cilantro Lime Sauce are not just a meal; they’re a mini vacation in your kitchen. Quick and easy to whip up, this recipe makes dinner a breeze, especially on those busy weeknights when fast food seems like the only option. Plus, with every bite, you get a burst of healthy goodness packed into a low-calorie delight that feels indulgent yet light. As the zesty lime and creamy sauce mingle with the spicy shrimp and crunchy slaw, I can’t help but wonder—what toppings will you choose to make this dish uniquely yours?

Why are shrimp tacos so irresistible?

Quick & Easy: This recipe comes together in no time, making it perfect for those hectic evenings when you need a flavorful meal fast.
Bursting with Flavor: The blend of spices, lime, and creamy sauce elevates these shrimp tacos to new heights of deliciousness.
Healthy Choice: With approximately 158 calories per taco, you can enjoy a satisfying meal without the guilt.
Customizable: From fresh avocado to zesty mango salsa, the topping options ensure a unique twist every time you prepare them. Love exploring variations? Check out our other delicious taco recipes for inspiration!
Crowd-Pleaser: Whether it’s a cozy family dinner or a lively gathering, these tacos will impress everyone at your table.

Zesty Shrimp Taco Ingredients

For the Shrimp

  • Shrimp – Choose large or jumbo shrimp, peeled and deveined, to create a juicy base for each taco.
  • Olive Oil – This helps in cooking the shrimp evenly while adding moisture.
  • Chili Powder – A must for bringing the warmth and depth to these shrimp tacos.
  • Ground Chipotle Chili Pepper – For a smoky flavor; adjust to your heat preferences!
  • Ground Cumin – Adds an earthy note that complements the shrimp beautifully.
  • Kosher Salt – Enhances the natural flavors of the shrimp; don’t forget to taste!

For the Base

  • Tortillas – Use corn for a gluten-free option or flour depending on your taste.
  • Cabbage – Adds a nice crunch; pre-packaged slaw mix can save you time!

For the Creamy Sauce

  • Greek Yogurt – Forms the creamy base for the sauce; substitute with sour cream if needed.
  • Garlic – Provides a lovely aromatic flavor to the sauce.
  • Jalapeno – Adds some heat; feel free to adjust or leave it out altogether.
  • Cilantro – Brightens the creamy sauce with a fresh burst of flavor.
  • Lime Zest & Juice – Essential for that zesty kick in your shrimp taco sauce.

These Zesty Shrimp Taco ingredients promise a delightful fusion of textures and flavors that will transport your taste buds on a mini getaway! Enjoy the quick preparation while you savor the tasty goodness of a homemade meal.

Step-by-Step Instructions for Juicy Shrimp Tacos with Creamy Cilantro Lime Sauce

Step 1: Prep the Shrimp
Begin by rinsing and patting dry your large shrimp to ensure they are moisture-free. In a mixing bowl, combine the shrimp with olive oil, chili powder, ground chipotle chili pepper, ground cumin, and kosher salt. Toss the shrimp until evenly coated, then let them rest for about 15 minutes, allowing the flavors to meld while you prepare the rest of the dish.

Step 2: Prepare the Creamy Sauce
In a food processor, add Greek yogurt, olive oil, garlic, jalapeno, cilantro, salt, lime zest, and lime juice. Blend until you achieve a smooth and creamy consistency, approximately 30 seconds. Taste the sauce and adjust the seasoning if necessary. This sauce will add a delightful zing to your juicy shrimp tacos, creating a delightful balance of flavors.

Step 3: Toss the Slaw
In a separate bowl, take shredded cabbage and add a few tablespoons of the creamy cilantro lime sauce to it. Mix gently until the cabbage is well-coated, providing a delicious crunch that complements the shrimp. This fresh slaw will be a vibrant addition to your tacos, enhancing both taste and texture.

Step 4: Cook the Shrimp
Heat a skillet over medium-high heat and add a splash of olive oil. Once hot, add the marinated shrimp in a single layer, making sure not to overcrowd the pan. Sauté for about 2-3 minutes per side until the shrimp are pink, firm, and opaque. Remove from heat to prevent overcooking, ensuring they remain juicy for your tacos.

Step 5: Warm the Tortillas
If desired, warm your tortillas in a dry skillet over low heat for about 30 seconds on each side until they are soft and pliable. You can also wrap them in foil and place them in a preheated oven at 350°F (175°C) for a few minutes. Warm tortillas will serve as the perfect vessel to hold your succulent shrimp and crunchy slaw.

Step 6: Assemble the Tacos
To assemble your zesty shrimp tacos, place a few shrimp in the warmed tortilla and top with the cabbage slaw. Drizzle extra creamy cilantro lime sauce over the top for an added burst of flavor. Feel free to add any additional toppings you like, such as avocado or mango salsa. Enjoy each taco immediately for the best taste experience!

Expert Tips for Juicy Shrimp Tacos

  • Avoid Overcooking: Keep an eye on the shrimp while cooking; they should only take about 4 minutes to become perfectly firm and opaque.

  • Customize Spice Levels: Adjust the chili powder and jalapeno to your preference. You can easily make these shrimp tacos milder or spicier to suit your taste.

  • Use Fresh Ingredients: Fresh cilantro, lime, and cabbage really elevate the flavors in this dish. Don’t skimp on quality to truly showcase this tasty recipe.

  • Make Ahead: You can prep the sauce and slaw a day in advance. Just store separately in the fridge to maintain crispness and freshness for your tacos.

  • Tortilla Tip: If you’re gluten-free, stick with corn tortillas, which work wonderfully with these juicy shrimp tacos for a satisfying crunch.

Make Ahead Options

These Zesty Shrimp Tacos are perfect for meal prep, saving you precious time on busy weeknights! You can prepare the shrimp marinade and store it in the refrigerator for up to 24 hours, allowing the flavors to deepen. The creamy cilantro lime sauce can be made ahead and kept in an airtight container for up to 5 days, ensuring it stays fresh and zesty. For an added crunch, toss the cabbage slaw in the sauce and refrigerate it for up to 2 days. When you’re ready to serve, simply sauté the marinated shrimp, warm your tortillas, and assemble the tacos for delicious results with minimal effort. Enjoy flavorful, homemade meals without the last-minute rush!

How to Store and Freeze Shrimp Tacos

Fridge: Keep leftover shrimp tacos in an airtight container for up to 3 days. Reheat the shrimp separately on the stove or microwave to maintain their texture.

Slaw Storage: Store the cabbage slaw in a separate container, where it can remain crisp for up to 2 days. Add the creamy sauce just before serving.

Freezer: While it’s not recommended to freeze assembled tacos, you can freeze cooked shrimp for up to 2 months. Thaw before reheating.

Reheating: For best results, reheat shrimp in a skillet to restore their juiciness, and serve with fresh tortillas for the perfect shrimp taco experience!

Variations & Substitutions for Zesty Shrimp Tacos

Feel free to get creative and make these shrimp tacos your own; the possibilities are endless!

  • Chicken or Tofu: Substitute shrimp with diced chicken breast or firm tofu for a tasty variation on proteins. Both options will soak up the flavors beautifully!

  • Avocado Delight: Add fresh avocado slices or a guacamole dollop to your tacos for a creamy texture that complements the spiciness of the shrimp. It enhances richness in every bite!

  • Mango Salsa: Try swapping some slaw for a bright mango salsa. The sweetness of the mango will harmonize flawlessly with the zesty lime and shrimp.

  • Spicy Kick: Increase the heat by adding sliced fresh jalapeños on top of your tacos or using a spicier hot sauce. A little extra heat can elevate your taste experience!

  • Gluten-Free Option: To make your tacos gluten-free, stick to corn tortillas. They are just as delicious and perfect for holding all the flavorful fillings.

  • Dairy-Free Sauce: Instead of Greek yogurt, blend soaked cashews with lime juice to create a creamy, dairy-free sauce. This swap still brings that rich, smooth texture!

  • Herb Boost: Want to explore more flavor? Toss in some fresh diced basil or mint alongside the cilantro for an aromatic twist. The herbs will brighten the overall dish!

  • Sweet Mango Chutney: Drizzle sweet mango chutney over your tacos for a delightful, unexpected sweetness that complements the spicy shrimp beautifully. It adds a fun layer of flavor!

Customize each taco to your heart’s content and enjoy these delightful flavor experiments that make every meal feel a bit more special! If you’re interested in exploring other taco variations, don’t forget to check out our other delicious taco recipes for more inspiration!

What to Serve with Juicy Shrimp Tacos with Creamy Cilantro Lime Sauce

Looking to elevate your meal experience? These vibrant flavors of fresh shrimp tacos pair wonderfully with a variety of sides and drinks to complete your dining adventure.

  • Cilantro Lime Rice: A fragrant, zesty side that mirrors the fresh flavors of the tacos, enhancing each bite with its citrusy notes. This fluffy rice adds a lovely texture that balances out the crunch from the slaw.

  • Black Bean Salad: This protein-packed salad brings a hearty yet refreshing aspect to your meal. Tossed with lime vinaigrette, it’s perfect for complementing the spicy shrimp without overwhelming the palate.

  • Grilled Corn on the Cob: The sweetness of grilled corn pairs beautifully with the smoky flavors of the shrimp. Brush it with lime and chili powder for an extra kick that harmonizes with the tacos.

  • Pineapple Salsa: This fruity topping offers a sweet and tangy contrast to the savory shrimp, enhancing flavor. The refreshing burst of pineapple is delightful on its own or served alongside the tacos.

  • Avocado Slices: Creamy avocado brings richness to each taco while also adding a refreshing layer. Whether served on the side or right on top, it mellows the spiciness and adds soothing texture.

  • Margaritas: A classic accompaniment, this citrusy drink complements tacos deliciously. The tartness of lime in margaritas enhances the flavors of the shrimp while offering a festive touch to any meal.

  • Churros: For dessert, indulge in warm, cinnamon-sugar-coated churros. Their crunchy exterior and soft interior create a delightful sweet ending to your taco feast, perfect for those looking for a touch of sweetness.

  • Garden Salad: A light, crisp salad with fresh greens, tomatoes, and your favorite dressing can balance the richness of the tacos. It’s refreshing and adds a bit of crunch to each bite.

Embrace these options, and watch how they transform your juicy shrimp tacos into a culinary celebration!

Zesty Shrimp Tacos with Creamy Cilantro Lime Sauce Recipe FAQs

What type of shrimp should I use?
I recommend using large or jumbo shrimp for these tacos, as they provide a juicy and meaty texture. Be sure to use peeled and deveined shrimp for optimal ease when cooking. If you’re using frozen shrimp, it’s best to thaw them completely in the refrigerator overnight or by placing them in a bowl of cold water for about 20-30 minutes before preparing your tacos.

How long can I store leftover shrimp tacos?
Leftover shrimp tacos can be stored in an airtight container in the refrigerator for up to 3 days. To maintain the best texture, it’s wise to reheat the shrimp separately before assembling your tacos again. This way, you fully enjoy that succulent shrimp taste without compromising on juiciness!

Can I freeze cooked shrimp for later use?
Absolutely! If you want to make your prep even quicker during busy nights, you can freeze cooked shrimp for up to 2 months. Just let them cool down, then place in a freezer-safe container or bag. When you’re ready to use them, thaw overnight in the fridge or in a bowl of cold water, then reheat in a skillet for the best results.

What should I do if my shrimp are overcooked?
If you accidentally overcook your shrimp, they might turn out a bit rubbery. Unfortunately, there’s not much you can do to save them, but you can repurpose them in a different recipe where their texture isn’t as crucial, like a shrimp salad or adding them to a stir-fry. Next time, aim for a cooking time of just 2-3 minutes per side.

Are there any dietary considerations for this recipe?
Yes! This recipe can easily be made gluten-free by using corn tortillas. You also have options to adjust spiciness by modifying jalapeno or chipotle pepper levels. If you or your guests have any allergies—like to shellfish—substituting shrimp with grilled chicken or tofu can work beautifully! Always check ingredient labels for any potential allergies if in doubt.

How long does the creamy cilantro lime sauce last?
The creamy cilantro lime sauce can be stored in an airtight container in the refrigerator for up to 5 days. To keep the flavors vibrant, make sure to store it separately from the slaw and shrimp until you’re ready to assemble your tacos. A quick stir should bring it back to life before serving!

undefined

Zesty Shrimp Tacos with Creamy Cilantro Lime Twist

Enjoy a burst of flavor with these Zesty Shrimp Tacos, featuring a creamy cilantro lime sauce, perfect for quick dinners and customizable for everyone.
Prep Time 15 minutes
Cook Time 10 minutes
Resting Time 15 minutes
Total Time 40 minutes
Servings: 4 tacos
Course: Dinner
Cuisine: Mexican
Calories: 158

Ingredients
  

For the Shrimp
  • 1 pound large shrimp peeled and deveined
  • 2 tablespoons olive oil
  • 1 tablespoon chili powder
  • 1 teaspoon ground chipotle chili pepper adjust to taste
  • 1 teaspoon ground cumin
  • 1 teaspoon kosher salt
For the Base
  • 8 tortillas corn or flour
  • 2 cups cabbage shredded
For the Creamy Sauce
  • 1 cup Greek yogurt or sour cream
  • 2 cloves garlic
  • 1/4 cup cilantro fresh, chopped
  • 1 lime zest & juice for added flavor

Equipment

  • Mixing Bowl
  • Food Processor
  • Skillet

Method
 

Step-by-Step Instructions
  1. Prep the Shrimp: Rinse and pat dry large shrimp. In a mixing bowl, combine shrimp with olive oil, chili powder, ground chipotle, ground cumin, and kosher salt. Toss until coated and let rest for 15 minutes.
  2. Prepare the Creamy Sauce: In a food processor, blend Greek yogurt, olive oil, garlic, jalapeno, cilantro, salt, lime zest, and lime juice until smooth.
  3. Toss the Slaw: In a bowl, mix shredded cabbage with a few tablespoons of creamy sauce until well-coated.
  4. Cook the Shrimp: Heat a skillet over medium-high heat with olive oil. Add marinated shrimp in a single layer and sauté for 2-3 minutes per side until pink and firm.
  5. Warm the Tortillas: Optionally warm tortillas in a skillet over low heat for about 30 seconds on each side or wrap in foil and place in a preheated oven at 350°F.
  6. Assemble the Tacos: Place shrimp in warmed tortillas, top with cabbage slaw, and drizzle extra creamy sauce over the top. Enjoy immediately!

Nutrition

Serving: 1tacoCalories: 158kcalCarbohydrates: 20gProtein: 15gFat: 5gSaturated Fat: 1gPolyunsaturated Fat: 0.5gMonounsaturated Fat: 3gCholesterol: 120mgSodium: 400mgPotassium: 250mgFiber: 2gSugar: 1gVitamin A: 500IUVitamin C: 15mgCalcium: 50mgIron: 1mg

Notes

Customize your tacos with additional toppings like avocado or mango salsa for added flavor and variety.

Tried this recipe?

Let us know how it was!

Savor Quick Potsticker Noodle Bowls for 30-Minute Bliss

As the clock ticks towards dinner time, I can’t help but feel a tiny rush of excitement at the thought of those frozen potstickers lying in the freezer — the secret ingredient for one of my absolute favorite meals: Potsticker Noodle Bowls. In just 30 minutes, this Asian Fusion one-pan dinner transforms a chaotic weeknight into a breezy culinary experience filled with juicy dumplings, chewy noodles, and vibrant veggies, all coated in a rich umami sauce. Not only is it quick to whip up, but it’s also entirely customizable; you can tailor it to whatever ingredients you have on hand or your dietary needs. Whether you’re looking for a comforting meal or a fun twist on takeout, these noodle bowls deliver on all fronts. Are you ready to dive into this delightful dish with me?

Why are these noodle bowls a must-try?

Quick and Easy: This recipe comes together in just 30 minutes—perfect for busy weeknights when takeout seems tempting.

Flavor Explosion: Enjoy the delightful blend of garlic, sesame, and umami, ensuring every bite is packed with flavor.

Customizable Ingredients: Use what you have at home! Swap in different proteins or veggies for a personalized touch.

One-Pan Wonder: Minimal cleanup is required since everything cooks together in one pan; your dinner routine just got simpler!

Crowd Pleaser: Both kids and adults love the combination of crispy potstickers and chewy noodles, making it ideal for family dinners.

Healthy Option Available: Opt for vegetarian potstickers and additional greens to create a nutritious meal that suits all dietary preferences.

These Potsticker Noodle Bowls are sure to become a new favorite in your household!

Potsticker Noodle Bowls Ingredients

• Perfect ingredients for flavorful bowls!

For the Noodles

  • Frozen Potstickers (16 oz) – A hearty base; choose pork, chicken, or veggie for versatility.
  • Lo Mein Noodles or Spaghetti (8 oz) – Provides a chewy texture; substitute with rice noodles for a gluten-free option.

For the Stir-Fry

  • Sesame Oil (1 tbsp) – Infuses nutty flavor that elevates the dish.
  • Garlic (2 cloves, minced) – Essential for a fragrant flavor base.
  • Shredded Carrots (1 cup) – Adds sweetness and bright color to the dish.
  • Shredded Red Cabbage (1 cup) – Crunchy and nutritious, perfect for balancing textures.
  • Spinach or Bok Choy (2 cups) – Offers freshness and a healthy green element.

For the Sauces

  • Soy Sauce (2 tbsp) – The star seasoning that brings umami depth to your potstickers.
  • Oyster Sauce (1 tbsp, optional) – Deepens flavor; can be skipped for vegetarian bowls.
  • Rice Vinegar (1 tsp) – Adds a touch of acidity for balance.
  • Sugar (1 tsp) – Sweetens and counteracts the saltiness.
  • Black Pepper (1/2 tsp) – Introduces mild heat and enhances overall flavor.

For Garnishing

  • Green Onions (3, sliced) – Adds a zesty pop and visual appeal.
  • Sesame Seeds (for garnish, optional) – Gives a nice crunch and attractive finish.

These ingredients combine beautifully to create a comforting bowl filled with the rich flavors of Potsticker Noodle Bowls—your quick Asian Fusion dinner awaits!

Step‑by‑Step Instructions for Easy Potsticker Noodle Bowls

Step 1: Cook the Potstickers
In a large skillet, heat a drizzle of oil over medium heat. Add frozen potstickers and cook for about 5-7 minutes, turning occasionally, until they are golden brown and crispy on the outside. Then, add a splash of water to the pan and cover it with a lid for another 5 minutes, allowing the potstickers to steam until fully cooked. Remove and set aside.

Step 2: Boil the Noodles
In a separate saucepan, bring salted water to a rolling boil. Once boiling, add your lo mein noodles or spaghetti and cook for about 4-6 minutes, or until they reach an al dente texture. Drain the noodles carefully, and while still warm, toss them with sesame oil to prevent sticking. Set the noodles aside as you prepare the stir-fry.

Step 3: Stir-Fry the Vegetables
Return the large skillet to the heat and add 1 tablespoon of sesame oil. Once hot, add minced garlic, shredded carrots, and red cabbage. Sauté for about 2-3 minutes, stirring frequently, until the vegetables are tender yet still crisp. You should see bright colors and a fragrant aroma starting to fill the kitchen as you stir-fry.

Step 4: Add the Greens
Next, incorporate the spinach or bok choy into the skillet. Stir occasionally for about 1-2 minutes until the greens are wilted and vibrant. This will enhance the freshness of your Easy Potsticker Noodle Bowls while adding a beautiful splash of color to the dish.

Step 5: Mix the Sauces
In a small bowl, whisk together soy sauce, oyster sauce (if using), rice vinegar, sugar, and black pepper until well blended. Pour this savory sauce over your stir-fried vegetables in the skillet and stir to coat evenly. The rich umami notes will deepen the flavor profile of the potsticker noodle bowls, creating a delicious base for the next step.

Step 6: Combine Noodles and Sauce
Add the prepared noodles to the skillet with the vegetables and sauce. Toss everything together gently for about 1-2 minutes, ensuring each noodle is coated with the flavors. The warmth of the pan will help everything meld beautifully, creating a delightful mixture that’s ready for the potstickers.

Step 7: Add the Potstickers
Finally, return the cooked potstickers to the skillet. Carefully mix everything together, ensuring the crispy potstickers are evenly distributed among the noodles and vegetables. Cook for an additional minute to heat everything through while maintaining the textures of your Easy Potsticker Noodle Bowls.

Step 8: Garnish and Serve
To finish, sprinkle sliced green onions and sesame seeds over the top for garnish. Serve your Potsticker Noodle Bowls hot, allowing the vibrant colors and savory aromas to entice your family to the table. Enjoy the harmonious blend of textures and flavors as a perfect weeknight meal!

What to Serve with Easy Potsticker Noodle Bowls

Elevate your weeknight dinner with delightful sides and beverages that beautifully complement the vibrant flavors of your noodle bowls.

  • Chilled Cucumber Salad: A refreshing counterpart that balances the savory noodle bowls with crunch and coolness, enhancing your meal experience.
  • Miso Soup: This warm, umami-rich soup offers a soothing and flavorful start to your meal, harmonizing perfectly with the potstickers.
  • Crispy Air-Fried Egg Rolls: Serve these golden-brown delights alongside your noodle bowls for a satisfying crunch that echoes the potstickers’ texture.
  • Sesame Green Beans: Tossed lightly in sesame oil, these tender green beans add yet another layer of nutty flavor and vibrant color to your table.
  • Garlic Edamame: Enjoy the pop of flavor from these tender soybeans sprinkled with sea salt; they provide a protein-packed snack to share.
  • Sparkling Green Tea: Refreshing and lightly sweet, this drink elevates your dining experience, balancing the richness of the noodle bowls beautifully.
  • Mango Sticky Rice: Indulge your sweet tooth with this luscious dessert; the sweet mango and creamy coconut perfectly round out your Asian-inspired meal.

These pairings not only elevate the Easy Potsticker Noodle Bowls but create a memorable dining experience filled with diverse textures and flavors!

Quick Potsticker Noodle Bowl Variations

Feel free to mix and match ingredients to create a bowl that speaks to your taste buds!

  • Vegetarian Delight: Swap in vegetable potstickers and load up on more greens for a hearty plant-based meal.
    With colorful bell peppers or snap peas, your dish can really shine with nutrition!

  • Spicy Twist: Add some Sriracha or chili garlic sauce to the mix for a flavorful kick.
    A little heat can elevate your bowl from comforting to exciting in no time!

  • Noodle Options: Substitute lo mein with rice noodles or avocado noodles for a gluten-free version.
    You might even explore zucchini noodles for an additional veggie boost!

  • Protein Variety: Experiment with different potsticker fillings—try shrimp or tofu for new flavors!
    Each protein brings its own unique texture and taste that can change the whole meal experience.

  • Nutty Additions: Toss in a handful of crushed peanuts or cashews for an extra crunch.
    They’ll bring a delightful texture and nutty flavor, complementing the noodles perfectly!

  • Herb Infusion: Brighten the dish with fresh herbs like cilantro or basil for an aromatic touch.
    Just a sprinkle can elevate your bowl into a fragrant feast bursting with freshness!

  • Mushroom Magic: Add sliced shiitake or cremini mushrooms to the stir-fry for earthiness and depth.
    The umami notes will harmonize beautifully with the other ingredients, enriching the flavor profile.

  • Crispy Toppings: Finish off with crispy fried shallots or garlic for a crunchy topping.
    This simple addition can transform your bowl into a gourmet delicacy with minimal effort!

With these variations in mind, your Potsticker Noodle Bowls can evolve week after week, keeping every dinner fresh and delightful! For other exciting dishes, don’t forget to check out my easy homemade dumplings or explore the savory world of Asian-inspired stir-fries!

How to Store and Freeze Potsticker Noodle Bowls

Fridge: Store leftovers in an airtight container in the refrigerator for up to 3 days to maintain freshness.

Freezer: For longer storage, freeze portions in airtight containers or freezer bags for up to 2 months. Just remember to label them!

Reheating: When ready to enjoy, thaw in the fridge overnight, then reheat in a skillet with a splash of water or soy sauce for optimal texture.

Customizable Options: Feel free to store components separately if you want to keep the potstickers crispy and the noodles tender for an even better experience when reheated.

Make Ahead Options

These Potsticker Noodle Bowls are a fantastic choice for meal prep, making weeknight dinners effortless! You can prepare the stir-fried vegetables (like shredded carrots, cabbage, and greens) up to 3 days in advance and store them in an airtight container in the refrigerator. The cooked noodles can also be made ahead and refrigerated for up to 24 hours; just toss them with a bit of sesame oil to keep them from sticking. When you’re ready to serve, simply reheat the veggies and noodles in a skillet, add the cooked potstickers, and drizzle with the sauce to enjoy a delicious meal that tastes fresh and vibrant!

Expert Tips for Potsticker Noodle Bowls

  • Crispy Potstickers: For an extra layer of texture, pan-fry your frozen potstickers for a few minutes before steaming them. This gives them a delightful crunch.
  • Veggie Vibrancy: Be mindful not to overcook your vegetables; keep them slightly crisp to maintain their vibrant colors and nutrients.
  • Perfecting Noodles: Toss your cooked noodles with sesame oil immediately after draining to prevent them from sticking together.
  • Sauce Balance: Adjust the soy sauce and sugar to your taste; it’s essential to strike the right savory-sweet balance for the best potsticker noodle bowls!
  • Don’t Skip the Garnish: Adding green onions and sesame seeds not only enhances flavor but also elevates the visual appeal of your dish.
  • Reheating Tips: When reheating leftovers, add a splash of water or soy sauce for moisture and to keep your noodles from drying out.

Potsticker Noodle Bowls Recipe FAQs

How do I choose the best frozen potstickers?
Absolutely! When selecting frozen potstickers, look for those with minimal frost and a good balance of protein and vegetables. Check for visible fillers or preservatives. If possible, choose brands that show a clear ingredient list for the best quality.

What’s the best way to store leftover potstickers and noodles?
You can keep leftover potstickers and noodles in an airtight container in the refrigerator for up to 3 days. This way, they will maintain their flavors best. Make sure to separate them if possible to keep the potstickers from becoming soggy.

Can I freeze the Potsticker Noodle Bowls?
Certainly! To freeze, place cooled portions in airtight containers or freezer bags, ensuring to remove as much air as possible. These can last in the freezer for up to 2 months. When you’re ready to enjoy, thaw them in the fridge overnight and reheat in a skillet with a splash of water or soy sauce to retain moisture.

What should I do if my noodles stick together after cooking?
Very few things can disturb a great dish, but don’t worry! If your noodles are sticking together, simply reheat them in a pan with a little sesame oil or water, tossing gently until they become loose and ready to mix back into your dish.

Are these noodle bowls suitable for vegetarian diets?
Yes, indeed! You can easily customize these Potsticker Noodle Bowls for vegetarian diets by choosing vegetable potstickers and boosting with additional veggies like bell peppers for a hearty meal. Plus, avoiding the oyster sauce will keep it plant-based!

Can I make these noodle bowls gluten-free?
Absolutely! Simply swap out the lo mein noodles with rice noodles, and ensure your potstickers are gluten-free as well. This enables everyone to join in on this delicious meal without worries about dietary restrictions!

undefined

Savor Quick Potsticker Noodle Bowls for 30-Minute Bliss

Enjoy these customizable potsticker noodle bowls in just 30 minutes, featuring crispy dumplings, chewy noodles, and vibrant veggies in a rich umami sauce.
Prep Time 10 minutes
Cook Time 20 minutes
Total Time 30 minutes
Servings: 4 bowls
Course: Dinner
Cuisine: Asian Fusion
Calories: 450

Ingredients
  

For the Noodles
  • 16 oz Frozen Potstickers Choose pork, chicken, or veggie for versatility.
  • 8 oz Lo Mein Noodles or Spaghetti Substitute with rice noodles for a gluten-free option.
For the Stir-Fry
  • 1 tbsp Sesame Oil Infuses nutty flavor.
  • 2 cloves Garlic Minced, essential for flavor.
  • 1 cup Shredded Carrots Adds sweetness and color.
  • 1 cup Shredded Red Cabbage Crunchy and nutritious.
  • 2 cups Spinach or Bok Choy Fresh green element.
For the Sauces
  • 2 tbsp Soy Sauce Brings umami depth.
  • 1 tbsp Oyster Sauce Optional, deepens flavor.
  • 1 tsp Rice Vinegar Adds acidity.
  • 1 tsp Sugar Sweetens and balances.
  • 1/2 tsp Black Pepper Introduces mild heat.
For Garnishing
  • 3 Green Onions Sliced, for garnish.
  • Sesame Seeds For garnish, optional.

Equipment

  • Large skillet
  • Saucepan
  • Mixing Bowl

Method
 

Step-by-Step Instructions
  1. In a large skillet, heat a drizzle of oil over medium heat. Add frozen potstickers and cook for about 5-7 minutes, turning occasionally, until golden brown. Add a splash of water and cover for another 5 minutes to steam.
  2. In a separate saucepan, bring salted water to a rolling boil. Add noodles and cook for about 4-6 minutes until al dente. Drain, toss with sesame oil, and set aside.
  3. Return the large skillet to the heat and add 1 tablespoon of sesame oil. Once hot, add minced garlic, shredded carrots, and red cabbage. Sauté for 2-3 minutes until tender yet crisp.
  4. Incorporate spinach or bok choy into the skillet. Stir for 1-2 minutes until wilted.
  5. Whisk together soy sauce, oyster sauce (if using), rice vinegar, sugar, and black pepper. Pour over stir-fried vegetables and coat evenly.
  6. Add prepared noodles to the skillet with the vegetables and sauce. Toss gently for 1-2 minutes, ensuring noodles are coated.
  7. Return cooked potstickers to the skillet, mixing everything together. Cook for an additional minute to heat through.
  8. Sprinkle with green onions and sesame seeds for garnish. Serve hot.

Nutrition

Serving: 1bowlCalories: 450kcalCarbohydrates: 55gProtein: 15gFat: 20gSaturated Fat: 3gPolyunsaturated Fat: 5gMonounsaturated Fat: 10gCholesterol: 30mgSodium: 800mgPotassium: 400mgFiber: 4gSugar: 5gVitamin A: 3000IUVitamin C: 35mgCalcium: 80mgIron: 2mg

Notes

Customize ingredients based on your preferences. Ideal for busy weeknights.

Tried this recipe?

Let us know how it was!

Miso Salmon Recipe with Quick Garlic Noodles You’ll Love

As the aroma of sweet miso fills the kitchen, I can almost hear my taste buds squealing in anticipation. This Miso-Glazed Salmon with Garlic Noodles isn’t just another easy dinner—it’s a symphony of Japanese flavors that transports me straight to my favorite sushi restaurant. What I adore about this recipe is how it transforms busy weeknights into culinary adventures, allowing us to savor every bite while keeping prep time short and sweet. Plus, it’s easily made ahead, perfect for those nights when time seems to evaporate. So why settle for takeout when you can whip up this vibrant dish that’s not only delicious but also packed with healthful ingredients? Ready to discover how to bring this delightful meal to your table? Let’s dive in!

Why is Miso Salmon a Dinner Favorite?

Quick and Easy: This dish can be prepared in under 30 minutes, making it a perfect go-to for busy weeknights. Flavorful Delight: The miso glaze adds a rich, umami flavor that elevates simple salmon into a culinary masterpiece. Make Ahead: With the ability to marinate the salmon in advance, it’s great for meal prep. Versatile Pairing: Serve it over garlic noodles, or switch it up with steamed veggies to keep things fresh. Crowd-Pleasing: Perfect for family dinners or casual gatherings, it’s sure to impress everyone at the table. Healthy Choice: Bursting with omega-3 fatty acids and antioxidants, this meal is as nutritious as it is satisfying.

Miso Salmon Ingredients

Note: Gather these essentials for a delectable miso salmon experience.

  • For the Miso Glaze

  • Mirin – Sweet rice wine that adds a touch of sweetness; substitute with a mix of white wine and sugar.

  • Rice Vinegar – Provides acidity to balance out the sweetness; apple cider vinegar can be used as an alternative.

  • Miso Paste – Fermented soybean paste that gives depth and umami; any variety works, but white or yellow is best for sweetness.

  • Brown Sugar – Adds natural sweetness and caramelizes the salmon skin; honey can be used for an alternate sweetness profile.

  • Soy Sauce – Enhances the umami flavor in the marinade; choose low-sodium for a lighter option.

  • For the Salmon

  • Salmon Fillets (500g) – The star ingredient, packed with omega-3 fatty acids; consider trout or mackerel as good substitutes.

  • For the Garlic Noodles

  • Sesame Oil – Adds a rich, nutty flavor for sautéing; can be swapped with olive oil if needed.

  • Garlic Cloves (4, crushed) – Aromatic component that deepens the flavor of the dish.

  • Spring Onion (1 cup, finely chopped) – Adds freshness and a mild onion flavor; regular onions are a fine alternative.

  • Cooked Noodles (500g) – The base for the dish; any noodle type works, like egg or rice noodles.

  • For Garnish

  • Sesame Seeds (2 tbsp) – Adds a lovely crunch; substitute with chopped nuts if you prefer.

  • Coriander/Cilantro – A fresh herb that enhances brightness; omit or replace with parsley if desired.

  • Fresh Chillies – Optional for a touch of heat; adjust according to your taste.

With these ingredients in hand, you’re ready to create a dish that’s not just a meal, but an experience worth savoring—perfect for those who dare to cook delicious homemade food rather than settle for fast food. Enjoy your culinary journey!

Step‑by‑Step Instructions for Miso-Glazed Salmon with Garlic Noodles

Step 1: Prepare the Miso Glaze
In a saucepan, combine mirin, rice vinegar, miso paste, brown sugar, and soy sauce. Heat the mixture over medium heat for about 5 minutes, stirring constantly until everything is well blended and the sugar is dissolved. You’ll know it’s ready when the glaze is smooth and fragrant, giving off an aromatic sweetness.

Step 2: Cool the Glaze
Once combined, remove the saucepan from heat and strain the mixture through a fine-mesh sieve to eliminate any lumps. Allow the strained glaze to cool at room temperature for about 15 minutes. The glaze should be thick yet pourable, perfect for coating your salmon fillets.

Step 3: Marinate the Salmon
Place the salmon fillets in a shallow dish and pour the cooled miso glaze over them. Ensure each fillet is well-coated and then cover the dish with plastic wrap. For best results, marinate in the refrigerator for at least 30 minutes, or ideally overnight, to let the flavors penetrate the salmon thoroughly.

Step 4: Sauté the Aromatics
In a large skillet, heat 2 tablespoons of sesame oil over medium heat. Once hot, add the finely chopped spring onions and crushed garlic, sautéing for about 2-3 minutes until fragrant and softened. Be careful not to let the garlic burn; it should be lightly golden to ensure a delicious base for the noodles.

Step 5: Create the Noodle Sauce
To the sautéed aromatics, add 2 tablespoons of soy sauce, 1 tablespoon of rice vinegar, and 1 tablespoon of brown sugar, stirring well. Pour in ½ cup of water and let the mixture simmer gently for about 3-4 minutes until the sugar has fully dissolved. The sauce should be glossy and fragrant, enhancing the garlic noodles.

Step 6: Toss the Noodles
Add the cooked noodles to the skillet, tossing them gently to coat with the sauce. Cook for another 2-3 minutes over low heat, ensuring the noodles are heated through and well integrated with the flavors. The noodles should be glossy and flavorful, ready to cradle the succulent salmon.

Step 7: Preheat the Oven
While you finish up the noodles, preheat your oven to 220°C (430°F). This high temperature is crucial for achieving that beautifully caramelized exterior on your miso-glazed salmon.

Step 8: Bake the Salmon
Line a baking dish with parchment paper, and arrange your marinated salmon fillets inside, skin side down. Bake in the preheated oven for 7-10 minutes, or until the salmon is cooked through and caramelized on top. It should flake easily with a fork, signaling that it’s done and will be packed with that delicious miso flavor.

Step 9: Plate and Garnish
To serve, place a generous portion of the garlic noodles on each plate and top with a piece of miso-glazed salmon. Garnish with a sprinkle of sesame seeds, chopped coriander, and finely sliced chillies for an extra pop of flavor and color. The vibrant presentation will make your homemade Miso-Glazed Salmon shine on the table.

How to Store and Freeze Miso Salmon

Fridge: Keep cooked miso salmon covered in an airtight container for up to 3 days. This way, you can enjoy the flavors without losing quality.

Freezer: If you want to save it for later, freeze cooked salmon for up to 2 months in a freezer-safe container. Thaw overnight in the fridge before reheating.

Reheating: For the best results, reheat the salmon gently in the oven at 180°C (350°F) for about 10 minutes, or until warmed through, ensuring it stays moist and tender.

Marinade Storage: If you have leftover miso marinade, store it in the fridge for up to a week and use it to marinate other proteins or vegetables, maximizing the use of that delicious miso flavor!

Miso Salmon Variations You’ll Love

Feel free to get creative with this recipe and make it your own; the flavors will shine through no matter how you twist it!

  • Spicy Twist: Add extra fresh chillies or a splash of Sriracha to the noodle sauce for a delightful kick. Spice aficionados will love the added warmth!
  • Chicken Alternative: Swap the salmon with chicken breast for a different protein option; just adjust the cooking time accordingly for juicy results.
  • Vegan Delight: Use firm tofu instead of salmon, marinating it the same way to soak up that fantastic flavor. A wonderful option for plant-based meals!
  • Veggie Boost: Toss in steamed broccoli or bell peppers before serving; they will add vibrant color and nutrition to your plate.
  • Noodle Variety: Switch out the cooked noodles for zucchini noodles or whole wheat pasta for a healthier twist while keeping it hearty.
  • Flavor Infusion: Experiment with different miso types: red miso yields a bolder flavor, while white miso stays sweet—perfect for your personal taste!
  • Nutty Upgrade: Toasted pine nuts or chopped walnuts can replace sesame seeds for an extra crunch and rich flavor.
  • Citrus Zing: A squeeze of fresh lime juice over the finished dish brightens the flavors and adds a refreshing touch.

Each of these variations not only transforms the dish but keeps your dining experience exciting! If you’re considering a healthier option, you might enjoy exploring vegan alternatives to traditional proteins. Simply canvas your kitchen for what’s available, and let your creativity flourish!

Make Ahead Options

These Miso-Glazed Salmon with Garlic Noodles are perfect for meal prep enthusiasts! You can marinate the salmon fillets in the miso glaze up to 24 hours in advance, allowing the flavors to deeply penetrate the fish for a more delicious result. Simply cover the fillets tightly with plastic wrap and refrigerate until you’re ready to cook. The garlic noodles can be prepared up to 3 days in advance; just store them in an airtight container in the fridge. When you’re ready to serve, reheat the noodles gently, then bake the marinated salmon for about 7-10 minutes until perfectly caramelized. This way, you’ll have a restaurant-quality meal on the table with minimal effort, making those busy weeknights much easier!

Expert Tips for Miso Salmon

  • Marinate Overnight: For deeper flavor, marinate your salmon in the miso glaze overnight. This allows the umami flavors to fully penetrate the fish.

  • Watch Cooking Time: While baking, keep a close eye on the salmon to avoid overcooking. It should flake easily when done—perfectly tender and juicy!

  • Alternative Ingredients: If you don’t have miso paste, try tahini or nut butter for a unique twist. Experimenting can lead to your perfect miso salmon recipe.

  • Serve with Greens: Boost your meal’s nutrition by serving the salmon alongside steamed veggies. This balances the rich flavors and adds color to the plate.

  • Adjust Spice Levels: If you like a kick, feel free to add more fresh chillies to the noodles. Tailoring the spice to your preference keeps meals exciting!

What to Serve with Miso-Glazed Salmon with Garlic Noodles

Elevate your dinner experience with perfect pairings that balance flavors and textures with this vibrant salmon dish.

  • Steamed Broccoli: A classic pairing that adds a fresh, crunch contrast to the rich and tender salmon, enhancing both flavors and nutrition.
  • Cucumber Salad: Light and refreshing, this crisp salad adds brightness to your meal, cleansing the palate and complementing the miso’s sweetness.
  • Miso Soup: This warm, umami-rich soup echoes the flavors in your main course, making it a comforting side that completes your Japanese-inspired dinner.
  • Pickled Ginger: A zesty addition that brings a zing to your plate, refreshing your taste buds between bites of rich salmon.
  • Sesame Green Beans: Tossed in a savory dressing, these beans add a nutty crunch that harmonizes perfectly with the creamy garlic noodles.
  • Chilled Sake: This traditional drink pairs wonderfully with the nuanced flavors of miso, enhancing the overall dining experience with its smoothness.
  • Chocolate Mochi Ice Cream: For dessert, the chewy texture and rich chocolate flavor create a delightful end to your flavorful meal, providing a sweet balance against the savory salmon.

Miso-Glazed Salmon with Garlic Noodles Recipe FAQs

What type of miso should I use for the glaze?
I recommend using white or yellow miso for a sweeter profile that complements the salmon beautifully. These types offer a mild flavor, making them perfect for glazing without overpowering the dish. You can experiment with red miso for a bolder taste, but be cautious as it can be quite strong!

How should I store leftover miso salmon?
Store your cooked miso salmon in an airtight container in the fridge for up to 3 days. To keep it fresh, make sure it’s well-covered to prevent it from drying out. This way, you can enjoy a delicious leftover meal easily without losing the delightful flavors.

Can I freeze miso salmon and how?
Absolutely! To freeze your cooked miso salmon, let it cool completely and then place it in a freezer-safe container. It will keep well for up to 2 months. When you’re ready to enjoy it again, thaw it overnight in the fridge for the best results. Reheat gently in the oven at 180°C (350°F) for about 10 minutes to retain its moisture.

How do I know when my salmon is fully cooked?
Monitor the salmon closely while it bakes. It’s done when it flakes easily with a fork and looks opaque throughout. Usually, this takes about 7-10 minutes at 220°C (430°F). If you find any dark spots on the fish, that could indicate overcooking, so keep a watchful eye!

Are there any dietary considerations for miso salmon?
If you’re cooking for someone with soy allergies, you can use coconut aminos as a soy sauce substitute, and opt for chickpea miso or other soy-free miso types. For pet owners, remember that while salmon is safe for dogs in small amounts, avoid feeding them miso directly as it may contain too much sodium or other ingredients that are harmful.

undefined

Miso Salmon Recipe with Quick Garlic Noodles You’ll Love

Delight in this Miso-Glazed Salmon with Garlic Noodles, a healthy and flavorful dinner option that's easy to prepare.
Prep Time 15 minutes
Cook Time 15 minutes
Marinating Time 30 minutes
Total Time 1 hour
Servings: 4 servings
Course: Dinner
Cuisine: Japanese
Calories: 400

Ingredients
  

For the Miso Glaze
  • 1/4 cup Mirin Sweet rice wine that adds a touch of sweetness; substitute with a mix of white wine and sugar.
  • 2 tbsp Rice Vinegar Provides acidity to balance out the sweetness; apple cider vinegar can be used as an alternative.
  • 1/4 cup Miso Paste Fermented soybean paste that gives depth and umami; any variety works, but white or yellow is best for sweetness.
  • 2 tbsp Brown Sugar Adds natural sweetness and caramelizes the salmon skin; honey can be used for an alternate sweetness profile.
  • 2 tbsp Soy Sauce Enhances the umami flavor in the marinade; choose low-sodium for a lighter option.
For the Salmon
  • 500 g Salmon Fillets The star ingredient, packed with omega-3 fatty acids; consider trout or mackerel as good substitutes.
For the Garlic Noodles
  • 2 tbsp Sesame Oil Adds a rich, nutty flavor for sautéing; can be swapped with olive oil if needed.
  • 4 cloves Garlic Crushed, aromatic component that deepens the flavor of the dish.
  • 1 cup Spring Onion Finely chopped, adds freshness and a mild onion flavor; regular onions are a fine alternative.
  • 500 g Cooked Noodles The base for the dish; any noodle type works, like egg or rice noodles.
For Garnish
  • 2 tbsp Sesame Seeds Adds a lovely crunch; substitute with chopped nuts if you prefer.
  • Coriander/Cilantro A fresh herb that enhances brightness; omit or replace with parsley if desired.
  • Fresh Chillies Optional for a touch of heat; adjust according to your taste.

Equipment

  • Saucepan
  • Skillet
  • baking dish
  • Sieve
  • Measuring cups
  • Measuring spoons
  • Plastic Wrap

Method
 

Cooking Instructions
  1. In a saucepan, combine mirin, rice vinegar, miso paste, brown sugar, and soy sauce. Heat the mixture over medium heat for about 5 minutes, stirring constantly until everything is well blended and the sugar is dissolved.
  2. Once combined, remove the saucepan from heat and strain the mixture through a fine-mesh sieve to eliminate any lumps. Allow the strained glaze to cool at room temperature for about 15 minutes.
  3. Place the salmon fillets in a shallow dish and pour the cooled miso glaze over them. Cover the dish with plastic wrap and marinate in the refrigerator for at least 30 minutes.
  4. In a large skillet, heat 2 tablespoons of sesame oil over medium heat. Add the finely chopped spring onions and crushed garlic, sautéing for about 2-3 minutes until fragrant.
  5. To the sautéed aromatics, add 2 tablespoons of soy sauce, 1 tablespoon of rice vinegar, and 1 tablespoon of brown sugar, stirring well. Pour in ½ cup of water and let the mixture simmer for about 3-4 minutes.
  6. Add the cooked noodles to the skillet, tossing them gently to coat with the sauce. Cook for another 2-3 minutes over low heat.
  7. Preheat your oven to 220°C (430°F). This high temperature is crucial for achieving a beautifully caramelized exterior on your salmon.
  8. Line a baking dish with parchment paper and arrange your marinated salmon fillets inside, skin side down. Bake for 7-10 minutes.
  9. To serve, place a generous portion of garlic noodles on each plate and top with a piece of miso-glazed salmon. Garnish with sesame seeds, chopped coriander, and sliced chillies.

Nutrition

Serving: 1servingCalories: 400kcalCarbohydrates: 30gProtein: 35gFat: 15gSaturated Fat: 3gPolyunsaturated Fat: 5gMonounsaturated Fat: 5gCholesterol: 70mgSodium: 800mgPotassium: 800mgFiber: 3gSugar: 10gVitamin A: 5IUVitamin C: 8mgCalcium: 3mgIron: 10mg

Notes

For deeper flavor, marinate your salmon in the miso glaze overnight. Watch cooking time closely to avoid overcooking.

Tried this recipe?

Let us know how it was!

Crispy Hawaiian Garlic Shrimp for a Flavorful Dinner Delight

As I stood by the kitchen window, the tantalizing aroma of sizzling garlic danced through the air, whisking me away to the vibrant food trucks of Hawaii. This Crispy Hawaiian Garlic Shrimp recipe brings that beachside magic right into your home, all in just 25 minutes! With a perfect balance of crispy texture and rich garlic butter sauce, it’s a quick seafood delight that’s sure to impress your family and friends. Not only does it make for an incredible main course, but it can also shine as an appetizer for any gathering. Made from simple ingredients, you’ll be amazed at how easy it is to transform your dinner into a flavorful island experience. Curious to discover how to achieve that restaurant-quality crunch? Let’s get cooking!

Why is this shrimp recipe so special?

Quick and Easy: With just 25 minutes of cooking time, this dish is perfect for busy weeknights or impromptu gatherings.

Crispy Perfection: Each shrimp is coated to achieve an unforgettable crunch, reminiscent of beachside food trucks.

Flavor Explosion: The combination of aromatic garlic butter and zesty lemon elevates the taste, creating a delightful symphony of flavors.

Versatile Ingredient: Whether served as a main course or an appetizer, this recipe is ideal for any occasion. Consider pairing it with a refreshing salad or rice for a complete meal.

No-Fuss Cooking: With simple ingredients and easy-to-follow steps, anyone can master this delightful dish. For more quick and flavorful meal ideas, check out our Seafood Recipes.

Crispy Hawaiian Garlic Shrimp Ingredients

  • For the Shrimp
    Shrimp – Use fresh or thawed shrimp, preferably shell-on for added texture.
    Neutral Oil – Choose a cooking fat like canola, which can be easily substituted with olive or avocado oil.

  • For the Coating
    Potato/Corn Starch – Excellent for creating a crispy coating; opt for cornstarch for a gluten-free option.
    Paprika – Adds beautiful color and a mild flavor; smoked paprika can give it a different twist.
    Onion Powder – This helps provide depth to the shrimp’s seasoning.
    Garlic Powder – Enhances the garlic profile of the dish; fresh garlic can also elevate the flavor.
    Salt & Pepper – Essential seasonings to taste; feel free to adjust according to your preference.

  • For the Garlic Butter Sauce
    Butter – Key for richness in the sauce; use unsalted for better control over seasoning.
    Garlic (minced) – The heart of the dish; adjust the quantity based on personal preference for garlic flavor.

  • For Serving
    Lemon Wedges – Brightens and enhances the dish; fresh lemon is highly recommended for that zesty finish.

Enjoy making this Crispy Hawaiian Garlic Shrimp that delights the palate and transforms your dinner into a mini tropical getaway!

Step‑by‑Step Instructions for Crispy Hawaiian Garlic Shrimp

Step 1: Prepare the Shrimp
Begin by cleaning and deveining the shrimp, ensuring to keep the shells on for extra crunch. Rinse them under cold water and pat dry with a paper towel to remove excess moisture. This important step sets the foundation for that crispy outer texture you’ll crave in your Crispy Hawaiian Garlic Shrimp.

Step 2: Make the Coating
In a mixing bowl, combine potato or corn starch, paprika, onion powder, garlic powder, salt, and pepper. Mix these dry ingredients thoroughly to ensure an even distribution of flavors. Toss the cleaned shrimp into this mixture, coating each piece thoroughly. The goal is to create a crispy layer that will fry up beautifully.

Step 3: Heat the Oil
Heat a generous amount of neutral oil in a wide skillet over medium heat, ensuring the oil can cover the bottom of the pan. You’ll know it’s ready when it shimmers and a drop of water sizzles upon contact. This step is crucial for achieving that golden-brown crust as you prepare your Crispy Hawaiian Garlic Shrimp.

Step 4: Fry the Shrimp
Carefully add the coated shrimp to the hot oil in batches, making sure not to overcrowd the pan. Fry them for about 2-3 minutes on each side until they are golden brown and crispy, then transfer them to a paper towel-lined plate to drain any excess oil. This step allows the shrimp to develop an irresistible crunch.

Step 5: Prepare the Garlic Butter Sauce
Lower the heat slightly after frying, keeping a couple of tablespoons of the oil in the pan. Add unsalted butter to the retained oil and let it melt slowly, stirring frequently. This step creates a rich base for your garlic butter sauce that will complement your shrimp perfectly.

Step 6: Add the Garlic
Stir in the minced garlic and cook for 3-4 minutes, stirring constantly until fragrant but not browned. The aroma will fill your kitchen, enhancing the dish’s overall flavor profile. Be careful not to overcook the garlic, as burnt garlic can turn bitter and ruin your Crispy Hawaiian Garlic Shrimp.

Step 7: Combine and Serve
Once the garlic is fragrant, fold the fried shrimp into the garlic butter sauce, ensuring each piece is well-coated. Serve the delicious shrimp immediately, accompanied by fresh lemon wedges and rice for a complete meal. Your homemade Crispy Hawaiian Garlic Shrimp is ready to be enjoyed with loved ones!

Make Ahead Options

These Crispy Hawaiian Garlic Shrimp are a fantastic option for meal prep! You can clean and devein the shrimp up to 24 hours in advance; just store them covered in the refrigerator to prevent drying out. Additionally, you can mix the coating ingredients (potato/corn starch, paprika, onion powder, garlic powder, salt, and pepper) and keep it in an airtight container for up to 3 days. On cooking day, simply toss the shrimp in the coating, fry them as directed, and finish with the garlic butter sauce. This way, you’ll enjoy restaurant-quality shrimp with minimal effort on busy weeknights, all while maintaining that delightful crispiness!

How to Store and Freeze Crispy Hawaiian Garlic Shrimp

  • Fridge: Store leftovers in an airtight container for up to 2 days. Reheat gently in a skillet to maintain the crispy texture of the shrimp.

  • Freezer: If you need to store for longer, place the cooked shrimp in a single layer on a baking sheet to freeze for 1-2 hours before transferring to a freezer-safe bag. They’ll keep well for up to 2 months.

  • Reheating: To reheat frozen shrimp, thaw in the fridge overnight, then warm in a skillet over low heat. To revitalize crispiness, consider pan-frying them briefly.

  • Room Temperature: Avoid leaving the shrimp out at room temperature for more than 2 hours to prevent any food safety concerns. Enjoy your Crispy Hawaiian Garlic Shrimp safely!

Expert Tips for Crispy Hawaiian Garlic Shrimp

  • Choose Quality Shrimp: Start with fresh or high-quality thawed shrimp for the best flavor and texture. Avoid using pre-cooked shrimp; freshness is key to achieving that crispy finish.

  • Maintain Oil Temperature: Fry shrimp in batches to keep the oil hot. If the oil temperature drops, you risk soggy shrimp that won’t get that delightful crunch.

  • Adjust Garlic Levels: If you adore garlic’s rich taste, feel free to increase the minced garlic amount in the sauce. This enhances the overall flavor profile of the Crispy Hawaiian Garlic Shrimp.

  • Use Starch Wisely: Coating the shrimp thoroughly in potato or corn starch is crucial for crispiness. Don’t rush this step; an even coating leads to a perfectly crunchy result.

  • Serve Fresh: Enjoy this dish right after preparation for the best experience. The shrimp can lose their crispiness if left too long before serving, so bring your family to the table pronto!

Variations & Substitutions for Crispy Hawaiian Garlic Shrimp

Feel free to customize this delightful shrimp recipe to suit your taste or dietary needs, making every bite a unique experience!

  • Dairy-Free: Replace butter with vegan butter or olive oil for a delicious, dairy-free garlic sauce.
  • Spicy Twist: Add a pinch of red pepper flakes to the garlic butter sauce for a delightful kick, elevating the flavor profile of your dish.
  • Vegetarian Option: Swap shrimp for crispy tofu cubes for a fun, plant-based alternative that’s equally satisfying.
  • Crispier Shrimp: For an even crunchier finish, double-coat the shrimp by dipping in egg before the starch coating, ensuring maximum crisp!
  • Zesty Variation: Incorporate a splash of soy sauce or a squeeze of lime juice into the garlic butter sauce for a tangy upgrade. This adds a lovely umami flavor that harmonizes beautifully with the garlic.
  • Herb Infusion: Enhance the aroma by adding fresh herbs, such as parsley or cilantro, to the garlic sauce right before serving. It brings freshness that brightens each bite.
  • Mixed Seafood Medley: Combine shrimp with other seafood like squid or fish filets for a delightful seafood platter that diversifies textures and flavors.
  • Crispy Vegetable Addition: Toss in some bell peppers or broccoli florets while frying for an exciting texture twist and healthier option. It’s a satisfying way to incorporate vegetables into your meal!

By exploring these variations, you’ll open up a world of flavor possibilities. Want to dive deeper into savory seafood options? Check out our Seafood Recipes for more inspiration!

What to Serve with Crispy Hawaiian Garlic Shrimp?

This dish captures the carefree spirit of the islands; pair it with delightful sides for a complete culinary experience.

  • Steamed White Rice: A classic pairing that absorbs the savory garlic butter sauce, providing a neutral base for the shrimp. The fluffy texture compliments the crispy shrimp wonderfully.

  • Crisp Green Salad: Refreshing greens with a light vinaigrette offer a burst of freshness to balance the rich flavors of the dish. Include ingredients like cucumber and cherry tomatoes for added crunch.

  • Roasted Veggies: Colorful roasted bell peppers and zucchini add warmth and complement the shrimp beautifully. Their natural sweetness offsets the garlicky kick, creating a delightful contrast.

  • Coleslaw: A tangy, crunchy coleslaw adds a refreshing twist and slight acidity that cuts through the richness of the garlic butter sauce. The crunchiness enhances the overall texture of your meal.

  • Lemon Wedges: Essential for squeezing over the shrimp, they bring a zesty brightness that enhances the flavors and makes every bite pop.

  • Mango Salsa: A sweet and spicy salsa adds a tropical touch, elevating your dinner into an island fête. The freshness of the mango pairs beautifully with the crispy shrimp.

  • Sparkling Coconut Water: For a refreshing drink, sparkly coconut water pairs perfectly with the meal, offering hydration with a subtle sweetness that complements the dish.

  • Pineapple Upside-Down Cake: End your meal on a sweet note with this classic dessert, balancing the savory elements of the shrimp with its moist and fruity flavors—a true Hawaiian touch!

Crispy Hawaiian Garlic Shrimp Recipe FAQs

What kind of shrimp should I use?
Absolutely! For the best results, use fresh or properly thawed shrimp, preferably shell-on for that extra crunch. Shell-on shrimp tends to retain more moisture and flavor during cooking, enhancing the overall experience of this delicious dish.

How do I store leftover Crispy Hawaiian Garlic Shrimp?
Leftovers can be stored in an airtight container in the fridge for up to 2 days. To maintain the crispy texture, reheat them gently in a skillet over medium-low heat. This prevents the shrimp from becoming soggy and ensures you enjoy them just as much as when they were fresh!

Can I freeze Crispy Hawaiian Garlic Shrimp?
Sure! To freeze, first let the cooked shrimp cool completely. Then, place them in a single layer on a baking sheet and freeze for 1-2 hours. Once frozen, transfer the shrimp to a freezer-safe bag, ensuring you remove as much air as possible. They can be stored for up to 2 months. To reheat, thaw overnight in the fridge, then warm gently in a skillet or oven to restore their delicious crispiness.

How can I keep the shrimp crispy when reheating?
To maintain that crispy texture during reheating, I highly recommend re-frying the shrimp in a bit of oil over low heat. This helps revive the crunch while warming them through. Simply add a splash of neutral oil to your skillet and reheat gently, turning to crisp all sides evenly.

Can I make this recipe gluten-free?
Very! Just swap out the potato starch for cornstarch, which is naturally gluten-free. Ensure that any other ingredients you may use (like sauces) are also labeled gluten-free. This way, everyone can enjoy the delightful flavors of your Crispy Hawaiian Garlic Shrimp without worries!

Is this dish safe for pets?
Generally, shrimp are safe for dogs in moderation, but it’s best to serve them plain without the garlic butter sauce, as garlic can be toxic to pets. Always check with your vet before introducing new foods to your pet’s diet to be on the safe side.

undefined

Crispy Hawaiian Garlic Shrimp for a Flavorful Dinner Delight

This Crispy Hawaiian Garlic Shrimp recipe brings beachside magic to your table in just 25 minutes!
Prep Time 10 minutes
Cook Time 15 minutes
Total Time 25 minutes
Servings: 4 servings
Course: Dinner
Cuisine: Hawaiian
Calories: 300

Ingredients
  

For the Shrimp
  • 1 pound Shrimp preferably shell-on
  • 1/4 cup Neutral Oil like canola, olive, or avocado oil
For the Coating
  • 1/2 cup Potato/Corn Starch opt for cornstarch for gluten-free
  • 1 teaspoon Paprika smoked paprika for a different twist
  • 1 teaspoon Onion Powder
  • 1 teaspoon Garlic Powder or fresh garlic
  • to taste Salt
  • to taste Pepper
For the Garlic Butter Sauce
  • 1/2 cup Butter use unsalted
  • 4 cloves Garlic minced
For Serving
  • 1 whole Lemon Wedges fresh for zesty finish

Equipment

  • Skillet

Method
 

Step-by-Step Instructions for Crispy Hawaiian Garlic Shrimp
  1. Begin by cleaning and deveining the shrimp, ensuring to keep the shells on for extra crunch. Rinse under cold water and pat dry with a paper towel.
  2. In a mixing bowl, combine potato or corn starch, paprika, onion powder, garlic powder, salt, and pepper. Toss the cleaned shrimp into this mixture.
  3. Heat a generous amount of neutral oil in a skillet over medium heat until it shimmers.
  4. Carefully add the coated shrimp to the hot oil in batches, frying for about 2-3 minutes on each side until golden brown.
  5. After frying, lower the heat, add unsalted butter to the remaining oil, and let melt stirring frequently.
  6. Stir in the minced garlic and cook for 3-4 minutes until fragrant but not browned.
  7. Fold the fried shrimp into the garlic butter sauce, serve immediately with lemon wedges.

Nutrition

Serving: 1servingCalories: 300kcalCarbohydrates: 20gProtein: 18gFat: 18gSaturated Fat: 10gPolyunsaturated Fat: 2gMonounsaturated Fat: 4gCholesterol: 150mgSodium: 600mgPotassium: 300mgFiber: 1gVitamin A: 500IUVitamin C: 20mgCalcium: 100mgIron: 2mg

Notes

Enjoy your Crispy Hawaiian Garlic Shrimp immediately for the best texture and flavor!

Tried this recipe?

Let us know how it was!

Grilled Shrimp Bowl: Fresh, Flavorful & Satisfying Summer Meal

As I watched the sun dip below the horizon, the smoky aroma of grilled shrimp filled the air, turning my backyard into a summer haven. This Grilled Shrimp Bowl with Avocado, Corn Salsa & Creamy Sauce captures the essence of warm evenings spent with friends, offering a delightful mix of flavors and textures that make dinner feel special without the fuss. The juicy shrimp, fresh corn salsa, and creamy avocado meld perfectly, making it not just a meal, but a celebration of summer’s bounty. Plus, it’s a fantastic way to level up your healthy eating game while still enjoying a hearty dish. Intrigued yet? Let’s dive into this delicious recipe and discover how you can customize it to suit your taste!

Why Is This Shrimp Bowl Irresistible?

Bold flavors: The grilled shrimp is infused with smoky spices that elevate every bite, making it a standout dish.
Fresh ingredients: Crisp corn salsa and creamy avocado add a refreshing twist, transforming a simple meal into a vibrant experience.
Easy to customize: Easily swap shrimp for chicken or tofu, ensuring everyone at your table is satisfied.
Perfect for summer: This dish captures the essence of warm evenings, making it an ideal choice for outdoor gatherings or cozy nights in.
Quick prep: With just a few simple steps, you’ll have a delicious meal on the table in no time—perfect for busy weeknights!
Crowd-pleaser: Whether you’re entertaining guests or enjoying a family meal, this bowl is sure to impress and become a go-to favorite.

Grilled Shrimp Bowl Ingredients

For the Shrimp Marinade

  • Shrimp – Protein powerhouse that holds smoky flavors when grilled. (Use peeled and deveined shrimp for ease.)
  • Olive Oil – Distributes spices and prevents sticking on the grill. (Can substitute with avocado oil.)
  • Smoked Paprika – Adds smoky aroma and flavor to the shrimp. (Sweet paprika can be used for milder taste.)
  • Garlic Powder – Enhances the savory notes. (Fresh garlic can substitute, but use less as it’s more potent.)
  • Onion Powder – Offers sweetness and depth to the marinade.
  • Cayenne Pepper – Introduces warmth and heat. (Adjust according to spice preference.)
  • Salt & Pepper – Essential to elevate all flavors. (Use sea salt for better flavor.)

For the Rice Base

  • Cooked Rice (White/Brown) – Forms a neutral base to soak up juices.

For the Corn Salsa

  • Fresh Corn Kernels – Adds sweetness and crunch to the salsa. (Can substitute with canned corn if needed.)
  • Cherry Tomatoes – Provide juiciness and color to the salsa.
  • Red Onion – Adds sharpness and texture. (Green onions can be milder alternative.)
  • Jalapeño – Offers a spicy kick; seeds can be removed for less heat.
  • Cilantro – Brightens the dish with its fresh flavor.
  • Lime Juice – Adds acidity, balancing richness. (Fresh lime juice is preferable over bottled.)

For the Creamy Sauce

  • Greek Yogurt – Provides a creamy base for the sauce with added protein. (Can substitute with sour cream for similar texture.)
  • Mayonnaise – Adds richness and mouthfeel. (Light mayo can be used for lower calories.)
  • Hot Sauce (Optional) – For additional heat in the sauce.

For Serving

  • Avocado – Offers creaminess that complements the dish. (Consider using ripe avocados for best flavor.)
  • Lime Wedges – Served on the side for extra zest.
  • Additional Cilantro Leaves – Garnish for freshness.

Step‑by‑Step Instructions for Grilled Shrimp Bowl with Avocado, Corn Salsa & Creamy Sauce

Step 1: Marinate the Shrimp
In a medium bowl, combine olive oil, smoked paprika, garlic powder, onion powder, cayenne pepper, salt, and pepper. Add the peeled and deveined shrimp, ensuring they’re well coated in the marinade. Let the shrimp marinate at room temperature for at least 15 minutes, allowing the flavors to develop and intensify while you prepare the corn salsa.

Step 2: Prepare the Corn Salsa
In another bowl, combine the fresh corn kernels, halved cherry tomatoes, diced red onion, minced jalapeño, chopped cilantro, lime juice, and a pinch of salt and pepper. Stir until well mixed, and set aside to let the flavors meld together. This vibrant corn salsa will add a refreshing crunch to your Grilled Shrimp Bowl.

Step 3: Make the Creamy Sauce
In a small mixing bowl, whisk together Greek yogurt, mayonnaise, lime juice, hot sauce (if using), and a pinch of salt and pepper. Taste and adjust seasoning if needed. This creamy sauce will provide a delightful finishing touch to your Grilled Shrimp Bowl, enhancing both flavor and texture.

Step 4: Preheat the Grill
Preheat your grill to medium-high heat, around 400°F (200°C). While the grill heats up, thread the marinated shrimp onto skewers, making sure they’re not overcrowded for even cooking. This step sets the stage for perfectly grilled shrimp, as you want them to cook quickly over direct heat.

Step 5: Grill the Shrimp
Once the grill reaches the desired temperature, place the shrimp skewers on the grill. Cook for about 2-3 minutes on each side or until the shrimp turn opaque and curl into a “C” shape. Keep an eye on them to avoid overcooking, which can lead to a rubbery texture.

Step 6: Assemble the Bowls
To assemble your Grilled Shrimp Bowls, start with a base of cooked rice in each bowl. Next, layer on the juicy grilled shrimp, followed by a generous scoop of corn salsa and sliced avocado. This combination creates a beautiful and satisfying meal that captures the essence of summer.

Step 7: Drizzle the Sauce and Garnish
Finally, drizzle your creamy sauce over each bowl to add richness and flavor. Garnish with extra cilantro leaves and lime wedges for a burst of freshness. Serve immediately and enjoy the colorful and delicious Grilled Shrimp Bowl, perfect for a summer dinner with family or friends.

What to Serve with Grilled Shrimp Bowl with Avocado, Corn Salsa & Creamy Sauce

Elevate your summer dining experience with delightful sides that perfectly complement this vibrant grilled shrimp bowl.

  • Crispy Tortilla Chips: A crunchy addition that pairs beautifully with the creamy sauce and fresh salsa, perfect for scooping up flavors.
  • Zesty Lime Quinoa Salad: The lightness of quinoa tossed with lime and fresh veggies adds a refreshing contrast to the rich shrimp and avocado.
  • Grilled Vegetables: Smoky, charred veggies like zucchini and bell peppers enhance the outdoor grilling vibe and add nutritional vitality to your meal.
  • Corn on the Cob: Juicy and sweet, corn on the cob complements the corn salsa while ramping up that summer-fresh flavor.
  • Light Green Salad: A crisp salad with arugula, cucumber, and a citrus vinaigrette adds brightness, balancing the richness of the flavorful shrimp bowl.
  • Margaritas: A refreshing drink option, margaritas bring a festive spirit that pairs wonderfully with grilled shrimp and a summer atmosphere.
  • Mango Sorbet: For dessert, this fruity treat cleanses the palate, leaving a sweet, tropical finishing touch after a savory meal.
  • Chilled White Wine: A glass of crisp, chilled Sauvignon Blanc complements the shrimp’s smokiness and brings out the vibrant flavors of the corn salsa.

Grilled Shrimp Bowl Variations & Substitutions

Feel free to explore and customize your Grilled Shrimp Bowl to match your personal palate or dietary needs!

  • Chicken or Tofu: Replace shrimp with grilled chicken or marinated tofu for a delightful protein twist. Both options mirror the flavor profile while catering to different tastes.

  • Vegetable Boost: Add diced bell peppers, cucumbers, or even zucchini to your corn salsa for extra crunch and nutrition. This can transform your bowl into a veggie-packed delight that bursts with flavor!

  • Quinoa Base: Swap the rice for quinoa or cauliflower rice for a lighter option. These bases provide a nutritious twist, keeping your meal refreshing and wholesome.

  • Spicier Kick: If you love heat, toss in some diced serrano peppers or extra jalapeños to the salsa. They’ll elevate the flavor and excite your taste buds while keeping that fresh vibe.

  • Sweet and Smoky: Drizzle a touch of honey over the sauce or salsa to create a beautiful sweet and smoky balance. This unexpected twist can surprise your guests in the best way!

  • Herb Variations: Experiment with different herbs like dill or parsley instead of cilantro for a unique take. Each herb will impart its own flavor profile, transforming the dish subtly.

  • Creamy Alternatives: Swap Greek yogurt for a vegan yogurt or cashew cream for a dairy-free creamy sauce. This keeps the dish rich and delicious without compromising on taste!

  • Frozen Shrimp: Don’t hesitate to use frozen shrimp! Just ensure they’re fully thawed before marinating. It’s quick and perfect for when you’re short on time but still crave something homemade.

By incorporating these variations, you can personalize your bowl and keep meal times exciting, even on the busiest of days!

Expert Tips for the Best Grilled Shrimp Bowl

  • Perfect Shrimp Color: Ensure shrimp turn opaque and curl into a “C” shape while grilling. This indicates they’re just right—overcooking can lead to a rubbery texture.

  • Marinating Time: Allow shrimp to marinate for at least 15 minutes to really soak in flavors. Don’t skip this step, as it enhances the smoky taste.

  • Customize Your Salsa: Feel free to mix in diced bell peppers or zucchini to your corn salsa for added crunch and nutritional benefits, keeping your Grilled Shrimp Bowl exciting!

  • Rice Alternatives: If you want a lighter option, substitute traditional rice with quinoa or cauliflower rice, giving you a healthier base while keeping it delicious.

  • Storage Savvy: Keep components of the bowl stored separately in airtight containers to maintain texture. Add lime juice to the avocado to prevent browning and keep it fresh longer.

Storage Tips for Grilled Shrimp Bowl

Room Temperature: Enjoy your Grilled Shrimp Bowl fresh for optimal flavor and texture. If left out, consume within 2 hours to stay safe.

Fridge: Store leftover shrimp, salsa, and creamy sauce in separate airtight containers in the fridge for up to 3 days, ensuring each component maintains its delicious texture.

Freezer: For longer storage, freeze cooked shrimp separately in an airtight bag for up to 2 months. Thaw in the fridge overnight before grilling again for the best results.

Reheating: When ready to eat, gently reheat shrimp in a skillet over low heat for a few minutes, or in a microwave to warm through, avoiding overcooking.

Make Ahead Options

These Grilled Shrimp Bowls with Avocado, Corn Salsa & Creamy Sauce are perfect for meal prep enthusiasts! You can marinate the shrimp up to 24 hours in advance for enhanced flavor, storing them in an airtight container in the fridge. Additionally, prepare the corn salsa and creamy sauce ahead of time; both can be refrigerated for up to 3 days. To maintain freshness, toss avocado slices with a bit of lime juice before serving to prevent browning. When you’re ready to enjoy, simply grill the marinated shrimp for 2-3 minutes on each side, assemble the bowls with rice, salsa, and avocado, and drizzle with the creamy sauce for a delicious, stress-free meal!

Grilled Shrimp Bowl with Avocado, Corn Salsa & Creamy Sauce Recipe FAQs

How do I choose the best shrimp for my Grilled Shrimp Bowl?
Absolutely! When selecting shrimp, look for those that are firm to the touch, have a mild ocean scent, and are free from black spots. Fresh shrimp should ideally be translucent and have a slight shine. If you’re using frozen shrimp, make sure they are peeled, deveined, and thawed properly before marinating.

How should I store leftovers from my Grilled Shrimp Bowl?
To maintain the best flavor and texture, I recommend storing the shrimp, corn salsa, and creamy sauce in separate airtight containers in the fridge. These can last for up to 3 days. For the best experience, make sure to keep the avocado separate to prevent browning. You can add a splash of lime juice over the cut avocado to help with this!

Can I freeze my Grilled Shrimp Bowl components?
Yes! You can definitely freeze the components of your Grilled Shrimp Bowl. I suggest freezing cooked shrimp and corn salsa in airtight freezer bags for up to 3 months. To freeze, lay the shrimp in a single layer on a baking sheet until firm, then transfer them to a bag. Thaw overnight in the fridge when you’re ready to enjoy again.

What if my shrimp turns out rubbery or tough?
Very! Overcooked shrimp is a common issue. To avoid this, ensure you grill the shrimp only until they turn opaque and curl into a “C” shape—typically 2-3 minutes per side, depending on size. If you do find your shrimp overcooked, you could consider using them in a seafood pasta dish or salad instead since they still provide flavor.

Are there any dietary considerations for this recipe?
Absolutely! This Grilled Shrimp Bowl can be adapted for various dietary needs. If anyone at your table is allergic to shellfish, you can substitute shrimp with grilled chicken or even firm tofu. Additionally, the recipe can be made gluten-free by ensuring your sauces and marinades are gluten-free certified. If you like it spicy, feel free to adjust the jalapeño or hot sauce to suit your preference!

How can I customize the corn salsa?
The more the merrier! You can easily add more vegetables to the corn salsa to suit your taste. Diced bell peppers, zucchini, or even cucumber can add extra crunch and color. I often mix in some black beans for added protein and fiber, making it a more filling side dish!

undefined

Grilled Shrimp Bowl: Fresh, Flavorful & Satisfying Summer Meal

Delight in this Grilled Shrimp Bowl featuring smoky shrimp, fresh corn salsa, and creamy avocado, perfect for a summer dinner.
Prep Time 15 minutes
Cook Time 6 minutes
Marinating Time 15 minutes
Total Time 36 minutes
Servings: 4 bowls
Course: Dinner
Cuisine: American
Calories: 550

Ingredients
  

For the Shrimp Marinade
  • 1 pound Shrimp (peeled and deveined) Protein powerhouse that holds smoky flavors when grilled.
  • 2 tablespoons Olive Oil Distributes spices and prevents sticking on the grill.
  • 1 teaspoon Smoked Paprika Adds smoky aroma and flavor to the shrimp.
  • 1 teaspoon Garlic Powder Enhances the savory notes.
  • 1 teaspoon Onion Powder Offers sweetness and depth to the marinade.
  • 1/4 teaspoon Cayenne Pepper Introduces warmth and heat.
  • 1 teaspoon Salt Essential to elevate all flavors.
  • 1/2 teaspoon Black Pepper Essential to elevate all flavors.
For the Rice Base
  • 2 cups Cooked Rice (White/Brown) Forms a neutral base to soak up juices.
For the Corn Salsa
  • 1 cup Fresh Corn Kernels Adds sweetness and crunch to the salsa.
  • 1 cup Cherry Tomatoes (halved) Provide juiciness and color to the salsa.
  • 1/2 cup Red Onion (diced) Adds sharpness and texture.
  • 1 medium Jalapeño (minced) Offers a spicy kick; seeds can be removed for less heat.
  • 1/4 cup Cilantro (chopped) Brightens the dish with its fresh flavor.
  • 2 tablespoons Lime Juice Adds acidity, balancing richness.
For the Creamy Sauce
  • 1/2 cup Greek Yogurt Provides a creamy base for the sauce with added protein.
  • 2 tablespoons Mayonnaise Adds richness and mouthfeel.
  • 1 teaspoon Hot Sauce (optional) For additional heat in the sauce.
For Serving
  • 1 medium Avocado (sliced) Offers creaminess that complements the dish.
  • 2 wedges Lime Served on the side for extra zest.
  • 1/4 cup Additional Cilantro Leaves Garnish for freshness.

Equipment

  • Grill
  • Mixing bowls
  • skewers

Method
 

Preparation
  1. In a medium bowl, combine olive oil, smoked paprika, garlic powder, onion powder, cayenne pepper, salt, and pepper. Add the shrimp, ensuring they're well coated in the marinade. Let the shrimp marinate for at least 15 minutes.
  2. In another bowl, combine corn kernels, cherry tomatoes, red onion, jalapeño, cilantro, lime juice, and a pinch of salt and pepper. Stir until well mixed, and set aside to let the flavors meld together.
  3. In a small mixing bowl, whisk together Greek yogurt, mayonnaise, lime juice, hot sauce (if using), and a pinch of salt and pepper. Taste and adjust seasoning if needed.
  4. Preheat your grill to medium-high heat. While the grill heats up, thread the marinated shrimp onto skewers, making sure they’re not overcrowded for even cooking.
  5. Once the grill reaches the desired temperature, place the shrimp skewers on the grill. Cook for about 2-3 minutes on each side or until the shrimp turn opaque and curl into a 'C' shape.
  6. To assemble your Grilled Shrimp Bowls, start with a base of cooked rice in each bowl. Next, layer on the grilled shrimp, followed by a scoop of corn salsa and sliced avocado.
  7. Drizzle your creamy sauce over each bowl and garnish with extra cilantro leaves and lime wedges. Serve immediately and enjoy.

Nutrition

Serving: 1bowlCalories: 550kcalCarbohydrates: 50gProtein: 30gFat: 25gSaturated Fat: 4gPolyunsaturated Fat: 2gMonounsaturated Fat: 8gCholesterol: 200mgSodium: 700mgPotassium: 800mgFiber: 6gSugar: 5gVitamin A: 700IUVitamin C: 20mgCalcium: 120mgIron: 3mg

Notes

Allow shrimp to marinate for at least 15 minutes to enhance flavors. Store components separately to maintain texture.

Tried this recipe?

Let us know how it was!

Garlic Parmesan Roasted Shrimp That Will Wow Your Taste Buds

There’s something magical about garlic roasting in the oven, its aroma wafting through the air and calling everyone to the kitchen. Enter my Garlic Parmesan Roasted Shrimp—an effortless yet luxurious dish that you can whip up in just 20 minutes! This recipe is perfect for any weeknight dinner, bringing elegance to your table without the fuss. With succulent shrimp enveloped in a crispy, cheesy coating, it’s not just a feast for the eyes but also a delightful solution to your craving for homemade food. Plus, it’s gluten-free, allowing everyone to savor this delicious creation. Whether you’re feeding a crowd or treating yourself to something special, this easy shrimp recipe is sure to win hearts. Ready to make your home smell heavenly while impressing your family or guests? Let’s dive in!

What Makes This Shrimp Recipe Special?

Simplicity: This quick recipe allows you to create a gourmet meal without elaborate steps or hard-to-find ingredients.

Succulent Shrimp: Enjoy juicy shrimp paired with a crispy, cheesy crust that’s simply irresistible.

Flavor Explosion: The combination of garlic and Parmesan offers a rich, savory taste that will keep everyone coming back for more.

Meal Versatility: Serve it as an elegant appetizer, over pasta, or alongside fresh salad for a delightful dinner.

Gluten-Free Delight: Perfect for anyone looking to savor homemade food without worrying about gluten, making it suitable for various dietary needs.

With just 20 minutes and a few ingredients, this Garlic Parmesan Roasted Shrimp is your ticket to impressive home-cooked dinners!

Garlic Parmesan Roasted Shrimp Ingredients

For the Shrimp
Large or Jumbo Shrimp – The star of this dish, providing sweetness and protein; fresh or frozen will work, but be sure to thaw properly.

For the Coating
Parmesan Cheese – Adds a rich, nutty flavor and creates that irresistible crispy topping; substitute with Grana Padano for a different twist.
Garlic – Central to this dish, offering depth and savory notes; fresh garlic is a must for the best flavor.
Butter – Brings creaminess to the coating; for a dairy-free version, feel free to swap it with olive oil.
Olive Oil – Helps with roasting and adds extra flavor; avocado oil is a great alternative if needed.
Paprika – Enhances the dish’s flavor profile; use smoked paprika for a deeper taste or chili powder for some heat.
Fresh Parsley – Provides a fresh herb note for garnish; chopped chives or basil can also be delightful alternatives.

For Serving
Lemon – Brightens and balances flavors beautifully; an essential accompaniment to serve with your garlic Parmesan roasted shrimp.

This simple ingredient list features everything needed to whip up your glorious Garlic Parmesan Roasted Shrimp, making it the perfect go-to for a quick dinner that doesn’t compromise on flavor!

Step‑by‑Step Instructions for Garlic Parmesan Roasted Shrimp

Step 1: Prep the Shrimp
Begin by carefully thawing your large or jumbo shrimp if they’re frozen, then rinse them under cold water. Pat the shrimp dry using paper towels; this is crucial for ensuring they roast properly without excess moisture. Place the prepared shrimp in a bowl and set aside while you mix the coating, ready to transform them into your delicious Garlic Parmesan Roasted Shrimp.

Step 2: Make the Coating
In a medium-sized mixing bowl, combine freshly grated Parmesan cheese, minced garlic, melted butter, and olive oil. Add paprika and chopped fresh parsley to this mixture, stirring until fully combined. The blend should have a creamy consistency, perfect for coating the shrimp. Ensure every ingredient is mixed well to create that irresistible garlicky and cheesy flavor that defines Garlic Parmesan Roasted Shrimp.

Step 3: Coat the Shrimp
Take the prepared shrimp and add them to the garlic-Parmesan mixture. Gently toss the shrimp in the coating using your hands or a spatula, ensuring each piece is fully covered in the creamy and cheesy goodness. The shrimp should glisten with a generous layer of the mixture, ready to be roasted to crispy perfection. Preheat your oven to 400°F as you prepare for the next step.

Step 4: Roast
Spread the coated shrimp out evenly on a baking sheet lined with parchment paper. Make sure the shrimp are not overlapping to ensure even roasting. Place the baking sheet in the preheated oven and roast for about 8-10 minutes. The shrimp should turn opaque and the cheese should be nicely golden brown, indicating they are done cooking. Keep an eye on them to avoid overcooking.

Step 5: Serve
Once your Garlic Parmesan Roasted Shrimp are perfectly roasted, remove them from the oven and allow them to cool slightly. Transfer the shrimp to a serving platter and garnish with extra chopped parsley and wedges of lemon. Enjoy this savory dish while it’s hot, and consider serving it alongside a fresh salad or over pasta for a delicious and satisfying meal that will wow your taste buds!

Garlic Parmesan Roasted Shrimp Variations

Feel free to get creative and adapt this delicious dish to suit your taste or dietary needs!

  • Dairy-Free: Replace Parmesan and butter with nutritional yeast and olive oil for a luscious, vegan-friendly alternative. The result is a cheesy, savory flavor without dairy.

  • Spicy Kick: Add a pinch of red pepper flakes to the coating for a delightful heat that enhances the overall flavor. This slight twist can wake up your taste buds in the best way!

  • Herb Mix: Experiment with different fresh herbs, such as thyme or basil, to change the flavor profile. Each herb brings its own characteristic, offering a fresh touch to your shrimp.

  • Citrus Zing: Squeeze some orange or lime juice over the shrimp before serving for a bright, zesty finish. The citrus will beautifully complement the garlic and Parmesan while refreshing your palate.

  • Breadcrumb Crunch: Mix in a handful of Panko breadcrumbs with the Parmesan to add an extra crunch to your coating. This variation gives a satisfying texture that beautifully contrasts the tender shrimp.

  • Smoked Flavor: Swap regular paprika with smoked paprika for a rich, smoky depth. If you’re grilling the shrimp, this adds an exciting BBQ essence reminiscent of summer cookouts.

  • Asian Influence: Incorporate soy sauce and ginger into the coating for a delicious fusion. This twist lends an exotic flavor to your shrimp, and serves perfectly over jasmine rice!

  • Pesto Infusion: Blend in some store-bought or homemade pesto into your coating for an aromatic, herby burst. This will take your garlic Parmesan shrimp to the next level, adding vibrant color and flavor.

Each of these variations opens up new avenues for delightful experiences at your dinner table—so go ahead and choose your favorite! And if you’d like to explore other shrimp creations, why not check out our easy shrimp tacos or shrimp salad recipes? Happy cooking!

Make Ahead Options

These Garlic Parmesan Roasted Shrimp are perfect for meal prep enthusiasts looking to save time on busy weeknights! You can prepare the garlic-Parmesan coating up to 24 hours in advance; simply mix together the Parmesan, garlic, butter, olive oil, paprika, and parsley, then refrigerate it in an airtight container. The shrimp can also be cleaned and thawed ahead of time, stored in the fridge for up to 3 days. When you’re ready to enjoy this dish, just coat the shrimp with the mixture and roast as directed. Following these steps ensures that the shrimp remain juicy and the coating is just as delicious!

Expert Tips for Garlic Parmesan Roasted Shrimp

  • Thaw Shrimp Properly: Make sure your shrimp are fully thawed and patted dry. Excess moisture can lead to a soggy texture instead of crispy shrimp.

  • Use Quality Ingredients: Freshly grated Parmesan and garlic elevate the dish significantly. Avoid pre-grated cheese for the best flavor and texture in your garlic Parmesan roasted shrimp.

  • Watch Cooking Time: Overcooking shrimp can cause them to become rubbery. Aim for a cooking time of just 8-10 minutes until the shrimp are opaque and the cheese is golden.

  • Enhance Flavor: For an extra luxurious touch, drizzle some garlic butter over your shrimp right before serving, intensifying the flavor even more.

  • Garnish Wisely: Fresh parsley adds a pop of color and flavor. Consider adding other herbs for a personalized twist to your garlic Parmesan roasted shrimp!

How to Store and Freeze Garlic Parmesan Roasted Shrimp

Fridge: Store cooked shrimp in an airtight container in the refrigerator for up to 3 days. Reheat gently in the microwave or on the stovetop to preserve texture.

Freezer: For longer storage, freeze the cooked Garlic Parmesan Roasted Shrimp in a single layer on a baking sheet, then transfer to a freezer-safe bag for up to 2 months.

Thawing: When ready to eat, thaw the shrimp overnight in the fridge, or use the microwave’s defrost setting before reheating.

Reheating: Reheat thawed shrimp at 350°F in the oven for 10-15 minutes or until heated through to maintain the crispy texture.

What to Serve with Garlic Parmesan Roasted Shrimp

Bring your dinner to life with vibrant side dishes that complement the rich flavors of this delightful shrimp recipe.

  • Lemon Garlic Pasta: Adding a pasta side dressed in lemon and garlic mirrors the shrimp’s flavors while offering a comforting texture.

  • Fresh Green Salad: A crisp, refreshing salad with mixed greens and a light vinaigrette enhances the garlic cheese without overwhelming the palate.

  • Crusty Baguette: Perfect for sopping up any remaining garlic butter, a warm, crusty baguette creates an irresistible pairing that delights at every bite.

  • Roasted Asparagus: Tender asparagus brings a lovely contrast with its green crunch and a touch of olive oil, adding balance to the meal.

  • Garlic Bread: Amplify the garlic love with crunchy, buttery garlic bread—it’s always a hit and a nice nod to the dish.

  • Sparkling White Wine: A chilled glass of sparkling white wine or Prosecco refreshes the taste buds and elevates your dining experience.

  • Lemon Sorbet: Finish on a sweet note with a light, zesty lemon sorbet that cleanses the palette and complements the shrimp beautifully.

Garlic Parmesan Roasted Shrimp Recipe FAQs

How do I choose the best shrimp?
Absolutely! When selecting shrimp, look for large or jumbo sizes for a succulent bite. Fresh shrimp should be translucent and slightly firm to the touch, with no dark spots or strong odors. If using frozen shrimp, ensure they’re completely thawed before cooking; give them a rinse and pat dry for the best results.

How should I store leftover Garlic Parmesan Roasted Shrimp?
Very! Store your cooked shrimp in an airtight container in the refrigerator for up to 3 days. To reheat, gently warm them in the microwave or on the stovetop over low heat, as this will help maintain their juicy texture and flavor.

Can I freeze Garlic Parmesan Roasted Shrimp?
Absolutely! To freeze, place the cooked shrimp in a single layer on a baking sheet and freeze until solid. Transfer them to a freezer-safe bag or container and store for up to 2 months. For reheating, thaw in the fridge overnight or use the microwave’s defrost setting before warming in the oven.

What should I do if my shrimp turned out rubbery?
No worries! If your shrimp ended up rubbery, it could be due to overcooking. Aim for that sweet spot of 8-10 minutes in the oven, watching closely until they turn opaque and the cheese is golden. To salvage rubbery shrimp, consider adding them to a stir-fry or pasta dish with a sauce to help mask the texture.

Is this recipe suitable for people with dietary restrictions?
Absolutely! This Garlic Parmesan Roasted Shrimp is gluten-free, making it a delightful option for many. If you have dairy allergies, substitute the butter and Parmesan with a dairy-free olive oil or dairy-free cheese alternative. Always check ingredient labels for any potential allergens.

undefined

Garlic Parmesan Roasted Shrimp That Will Wow Your Taste Buds

Savor the delicious flavors of Garlic Parmesan Roasted Shrimp in this easy, gluten-free recipe that impresses in just 20 minutes.
Prep Time 10 minutes
Cook Time 10 minutes
Total Time 20 minutes
Servings: 4 servings
Course: Dinner
Cuisine: American
Calories: 250

Ingredients
  

For the Shrimp
  • 1 pound Large or Jumbo Shrimp fresh or frozen, thaw properly
For the Coating
  • 1 cup Parmesan Cheese freshly grated, can substitute with Grana Padano
  • 4 cloves Garlic minced, fresh is best
  • 4 tablespoons Butter melted, can substitute with olive oil for dairy-free
  • 2 tablespoons Olive Oil or avocado oil as an alternative
  • 1 teaspoon Paprika use smoked paprika for a deeper taste
  • 2 tablespoons Fresh Parsley chopped, for garnish
For Serving
  • 1 whole Lemon cut into wedges for serving

Equipment

  • Oven
  • Baking Sheet
  • Mixing Bowl
  • paper towels

Method
 

Prep
  1. Thaw large or jumbo shrimp if frozen, rinse under cold water, and pat dry using paper towels.
  2. Place the prepared shrimp in a bowl and set aside.
Make the Coating
  1. In a mixing bowl, combine Parmesan cheese, garlic, melted butter, and olive oil.
  2. Add paprika and chopped parsley, stir until fully combined.
Coat the Shrimp
  1. Add the shrimp to the coating and gently toss until fully covered.
  2. Preheat the oven to 400°F.
Roast
  1. Spread the coated shrimp evenly on a baking sheet lined with parchment paper.
  2. Roast for about 8-10 minutes until shrimp are opaque and cheese is golden brown.
Serve
  1. Transfer the shrimp to a serving platter, garnish with parsley and lemon wedges, and serve hot.

Nutrition

Serving: 4servingsCalories: 250kcalCarbohydrates: 5gProtein: 20gFat: 18gSaturated Fat: 10gPolyunsaturated Fat: 1gMonounsaturated Fat: 6gCholesterol: 150mgSodium: 600mgPotassium: 500mgFiber: 1gSugar: 1gVitamin A: 5IUVitamin C: 6mgCalcium: 200mgIron: 2mg

Notes

Thaw shrimp properly and use quality ingredients for the best results. Watch the cooking time to prevent rubbery shrimp.

Tried this recipe?

Let us know how it was!

Stay Connected

Get recipes via email: