Get my cookbooks

Halloween Oreo Cookie Boo Brownies: Chewy Delight for Spooky Fun

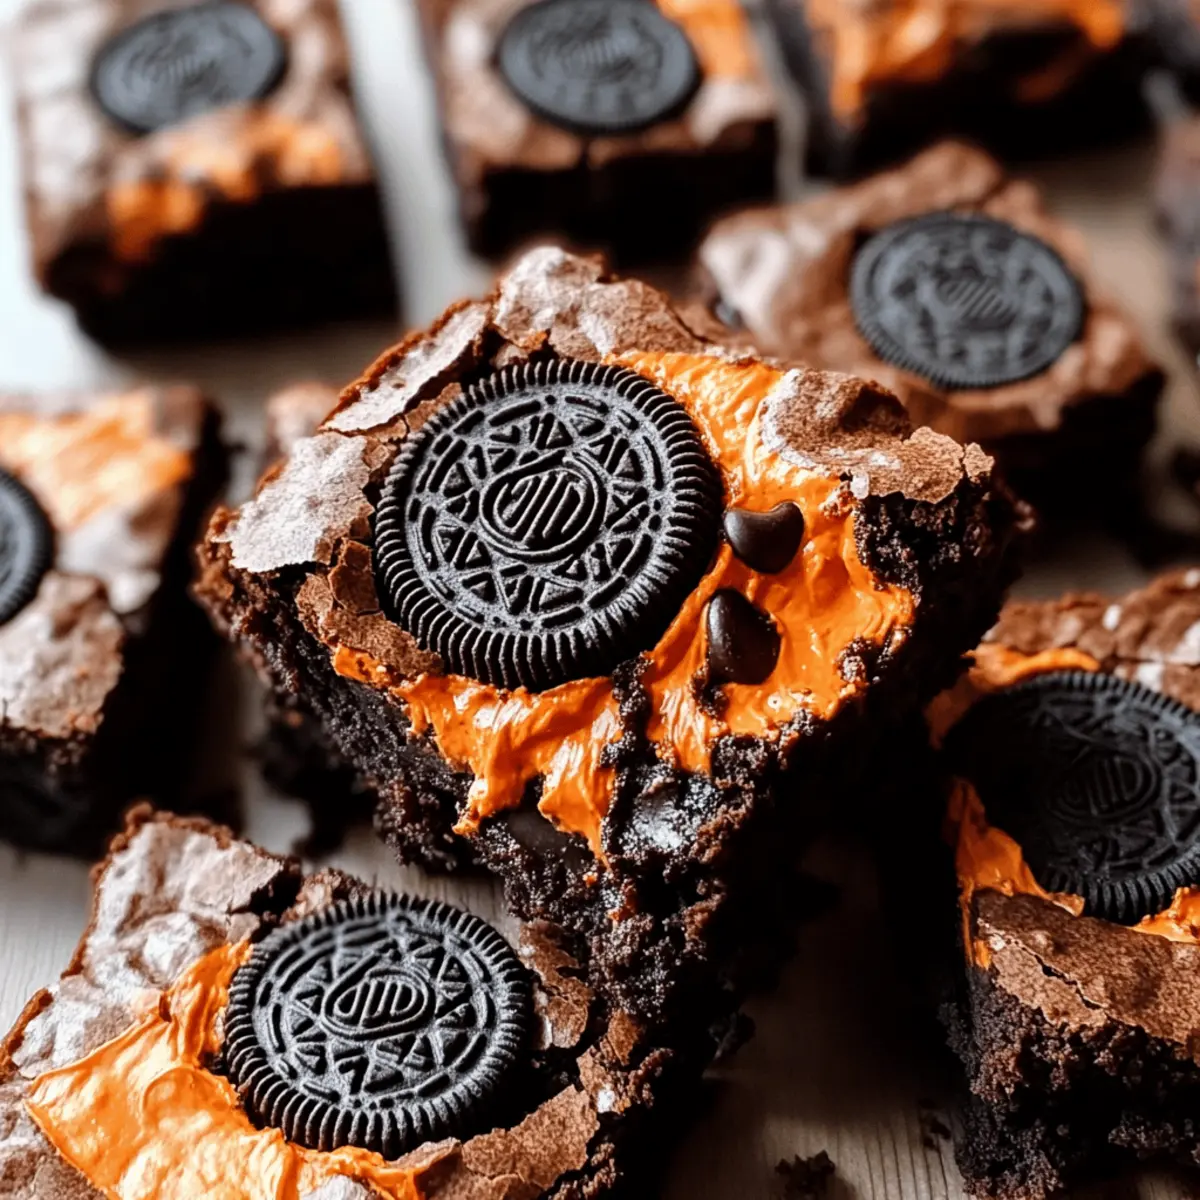
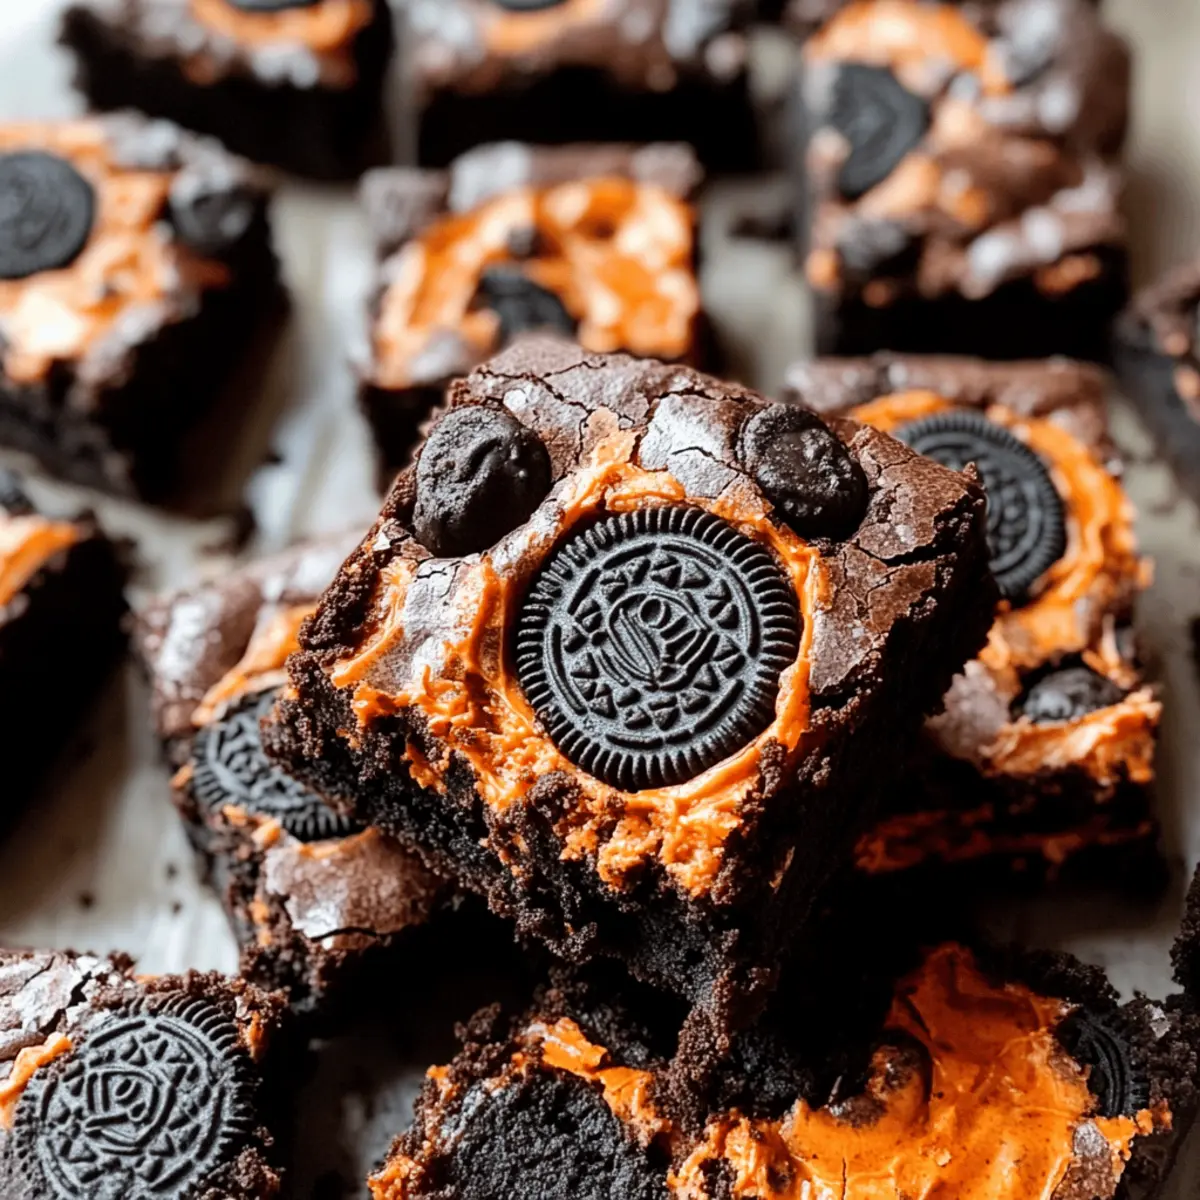
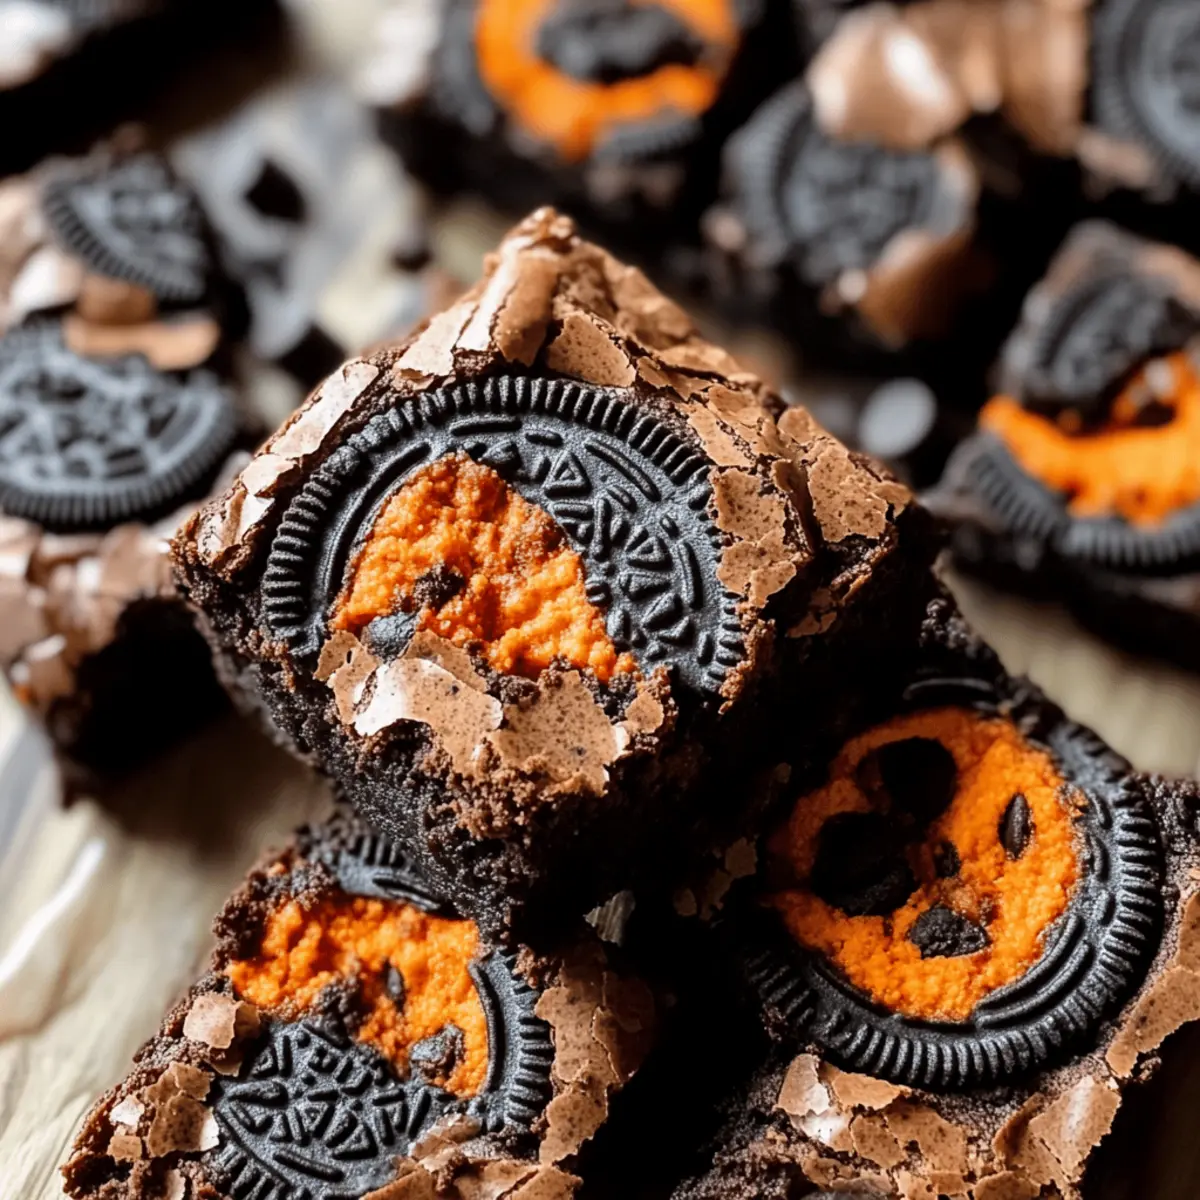
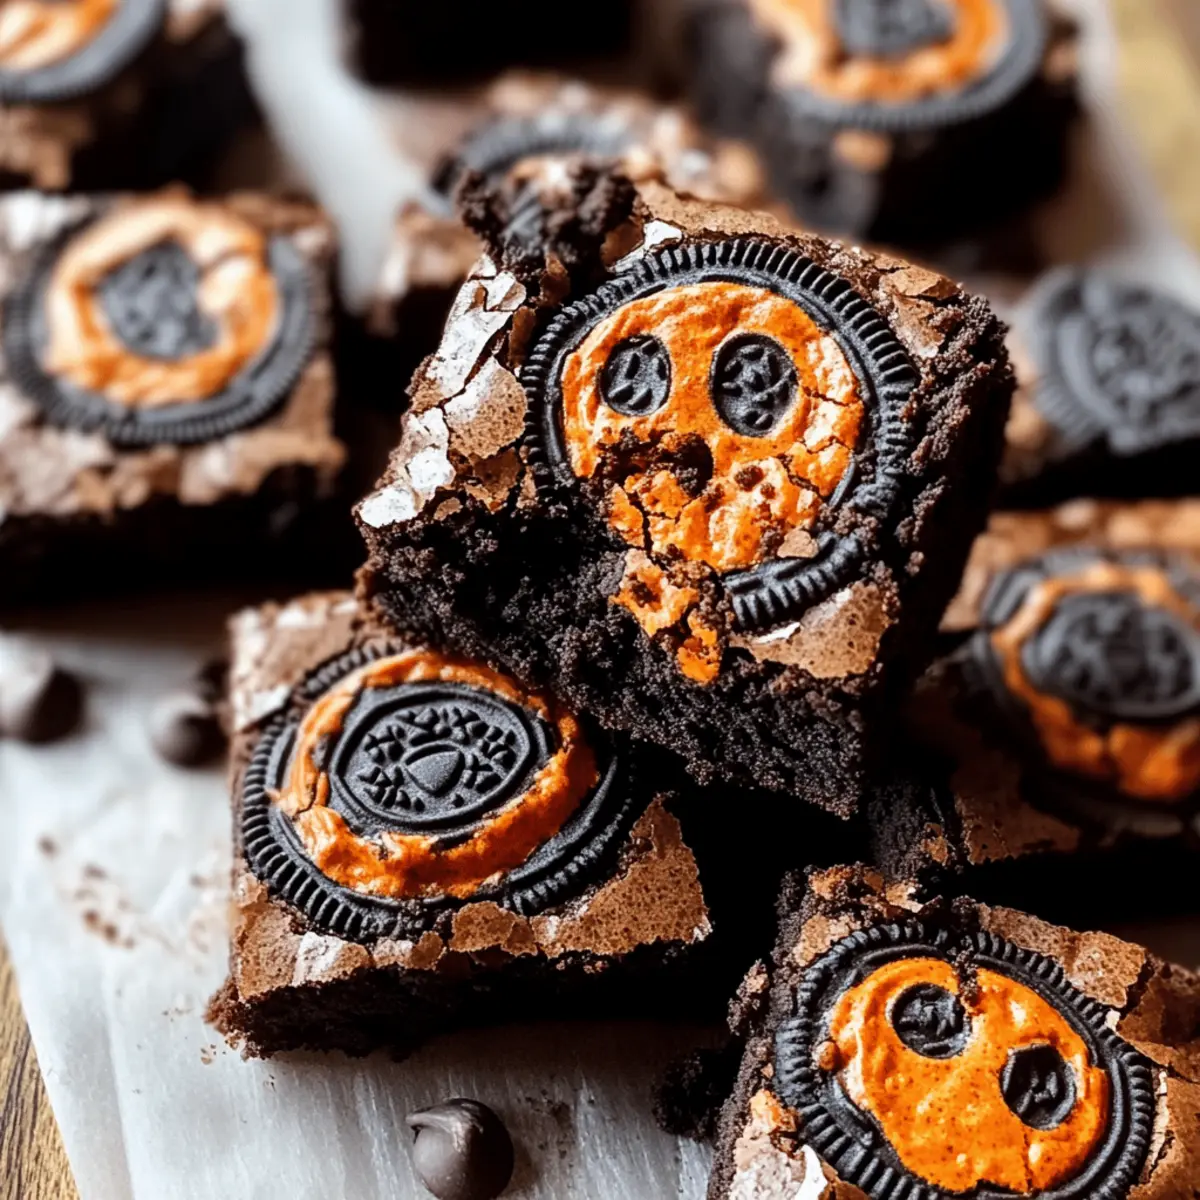
As I sat sipping pumpkin spice tea, I began to crave something heartwarming and fun for the upcoming Halloween festivities. That’s when I decided to whip up a batch of Halloween Oreo Cookie Boo Brownies, the perfect blend of chewy chocolate goodness and an Oreo crunch that will enchant your taste buds. This recipe not only simplifies the baking process but also ensures that you can create eye-catching treats without any elaborate decorating fuss. It’s a great way to treat your friends and family to a festive delight, making these brownies an irresistible addition to your dessert table. How do you plan to impress your guests this spooky season?

Why Will You Love These Brownies?

Irresistible chocolatey goodness: These Halloween Oreo Cookie Boo Brownies offer a delightful blend of chewy texture and crunchy Oreos, making every bite a festive treat!
Easy to make: With straightforward steps, you’ll find that even novice bakers can create these impressive brownies in no time.
Perfect for sharing: Whether it’s a Halloween party or an afternoon treat, these brownies are sure to gather rave reviews from friends and family!
Customizable flavors: Feel free to swap ingredients like using dark chocolate chips or different Oreo flavors to make your own spin on this classic.
Make ahead: Bake a batch ahead of time and freeze them for later—a perfect way to ensure you have something sweet for surprise guests!
These brownies are simple enough to whip up quickly, yet decadent enough to shine on any dessert table, much like my Baked Salmon with Honey Mustard Sauce brings a festive flair to dinner!

Halloween Oreo Cookie Boo Brownies Ingredients

• The key ingredients for an irresistible Halloween treat!

For the Brownies

  • Oreo Cookies – Adds flavor and texture; use Halloween-themed Oreos for an extra festive touch.
  • Chocolate Chips – Provides additional chocolatey richness; substitute with dark or semi-sweet chips for varying flavors.
  • Butter – Adds moisture and richness; can substitute for coconut oil for a dairy-free version.
  • Sugar – Sweetens the brownies; consider using brown sugar for a deeper flavor.
  • Eggs – Binds ingredients and adds moisture; can substitute with flax eggs for a vegan option.
  • Flour – Provides structure; use all-purpose flour, or opt for a gluten-free flour blend if necessary.

Optional Topping

  • Whole Oreo Pieces – Adds visual flair and an extra crunch; carefully place them on top before baking for a fun design.

These Halloween Oreo Cookie Boo Brownies are the perfect blend of sweet, chewy, and chocolatey, making them an essential addition for your Halloween celebrations!

Step‑by‑Step Instructions for Halloween Oreo Cookie Boo Brownies

Step 1: Preheat the Oven
Begin by preheating your oven to 350°F (175°C). While the oven heats up, grab a 9×9 inch baking pan and line it with parchment paper. This will ensure your Halloween Oreo Cookie Boo Brownies come out easily. Get your mixing bowls and spatula ready to whip up the batter!

Step 2: Mix Butter and Sugars
In a large mixing bowl, combine the melted butter with granulated and brown sugars. Using a whisk or a spatula, mix until the sugars are thoroughly integrated and the mixture feels smooth and glossy, typically about 2-3 minutes. This step will add rich sweetness to your brownies, which is essential for that delightful chewy texture.

Step 3: Beat in the Eggs and Vanilla
Now, crack in the eggs and pour the vanilla extract into the sugar mixture. Beat the ingredients together until the batter is fluffy and light, which should take about 2-3 minutes. You want to achieve a nice creamy consistency that will give your Halloween Oreo Cookie Boo Brownies a lovely rise and moisture.

Step 4: Combine Flour
Gradually sift the all-purpose flour into the batter. Use a spatula to gently fold in the flour until just combined—be careful not to overmix, as this can lead to dense brownies. You are looking for a thick, fudge-like batter that cohesively holds all the components together.

Step 5: Fold in Oreos and Chocolate Chips
Once the flour is just incorporated, it’s time to add a delightful crunch. Fold in the crushed Halloween Oreo cookies and chocolate chips using a gentle hand, ensuring an even distribution throughout the batter. The iconic flavors of these ingredients will make your Halloween Oreo Cookie Boo Brownies extra special!

Step 6: Prepare the Baking Pan
Pour the brownie batter into your prepared pan, spreading it evenly for uniform baking. To add an extra festive touch, place whole Oreo cookies on top of the batter, creating fun designs that will make your brownies visually appealing. This finishing touch will ensure they stand out during your Halloween celebrations.

Step 7: Bake the Brownies
Slide the pan into your preheated oven and bake for 28-32 minutes. Keep an eye out for the edges solidifying while the center remains slightly soft—use a toothpick to check that it comes out with a few moist crumbs for that perfect fudgy texture. Remember, overbaking can lead to dry brownies!

Step 8: Cool and Cut
Once baked, remove the pan from the oven and let the brownies cool completely in the pan for at least 30 minutes. This cooling period allows the brownies to set and makes cutting easier. Once cooled, lift using the parchment and cut into squares for serving. Your Halloween Oreo Cookie Boo Brownies are now ready to be enjoyed!

How to Store and Freeze Halloween Oreo Cookie Boo Brownies

Airtight Container: Store your Halloween Oreo Cookie Boo Brownies in an airtight container at room temperature for up to 3 days to keep them fresh and chewy.

Refrigeration: For longer storage, place the brownies in the fridge, where they can last up to a week, though they may become firmer and lose some chewiness.

Freezer: Freeze the brownies individually wrapped in plastic wrap and then in a freezer bag for up to 3 months, ensuring they retain their lovely flavor.

Reheating: To enjoy frozen brownies, simply thaw them at room temperature or microwave for about 10-15 seconds until warmed through—perfect for a sweet treat anytime!

Halloween Oreo Cookie Boo Brownies Variations

Feel free to unleash your creativity as you make these scrumptious brownies; every tweak can elevate the spooky fun!

  • Vegan Option: Replace eggs with flax eggs and butter with coconut oil for a delightful vegan version.

  • Nutty Addition: Incorporate chopped walnuts or pecans for an extra crunchy texture that pairs deliciously with chocolate.

  • Flavor Twists: Experiment with flavored Oreo cookies, like mint or peanut butter, to personalize the taste of your brownies.

  • Gluten-Free: Substitute all-purpose flour with a gluten-free flour blend so everyone can enjoy them guilt-free.

  • Frosted Finish: Top your brownies with a simple frosting or a drizzle of melted chocolate for an indulgent treat that’s bound to impress.

  • Spicy Warmth: Add a pinch of cinnamon or a dash of chili powder for a warm twist that complements the chocolate beautifully.

  • Choco-Lover’s Extras: Mix in chunks of white chocolate or caramel for delightful surprises within each brownie bite.

  • Serve with Style: Present your brownies on a festive platter alongside some of my Blueberry Breakfast Cookies to create a delectable dessert spread!

Get creative, and enjoy the journey of discovering new flavors and textures with these Halloween Oreo Cookie Boo Brownies!

Expert Tips for Halloween Oreo Cookie Boo Brownies

Parchment Paper Essential: Line your baking pan with parchment paper to ensure easy removal of brownies, preventing any accidental breakage.

Avoid Overbaking: Check for doneness with a toothpick in several places. The center should be slightly fudgy for the ideal chewy texture of your Halloween Oreo Cookie Boo Brownies.

Add Extra Oreos: Reserve whole Oreo pieces to place on top before baking, ensuring your brownies look festive and enticing for all your guests.

Mix Gently: When folding in baking ingredients like flour, crushed Oreos, and chocolate chips, mix gently to avoid dense brownies—this helps maintain that delightful chewy texture.

Cool Completely: Allow your brownies to cool in the pan for at least 30 minutes before cutting them; this will help achieve clean squares for serving!

What to Serve with Halloween Oreo Cookie Boo Brownies

Elevate your Halloween gathering with delightful pairings that complement the rich, chocolatey goodness of these festive treats.

  • Vanilla Ice Cream: The creamy coldness of vanilla ice cream contrasts beautifully with the chewy brownies, creating a delicious balance of textures. Drizzle some chocolate or caramel sauce on top for an extra indulgence.

  • Pumpkin Spice Latte: This warm, spiced beverage adds a cozy touch to your dessert experience, embracing the flavors of the season and enhancing the sweetness of the brownies.

  • Whipped Cream: A dollop of fresh whipped cream brings a lightness that beautifully offsets the dense, fudgy brownies, making each bite even more enjoyable.

  • Sliced Strawberries: Fresh strawberries add a vibrant color and juicy freshness that cut through the richness, providing a delightful contrast that brightens up the dessert table.

  • Spooky Punch: A fizzy Halloween-themed punch can create a fun atmosphere at your gathering. Whether it’s a fruity blend or a sparkling soda, it pairs wonderfully with the sweet brownies.

  • Chocolate Drizzle: Enhance the brownies by topping them with a warm melted chocolate drizzle. The added richness intensifies the chocolate flavor, making them a true chocolate lover’s dream.

  • Bourbon Caramel Sauce: For an adult twist, drizzle some bourbon caramel sauce over the brownies. The rich, buttery flavor of the sauce adds a luxurious touch that will impress your guests.

  • Milk: A classic pairing! The creaminess of a chilled glass of milk perfectly complements the sweetness of the Halloween Oreo Cookie Boo Brownies, making them a nostalgic delight.

  • Coffee: A strong cup of coffee balances the sweetness of the brownies, making it an ideal pairing for those who love a little kick with their dessert. The flavors of chocolate and coffee harmonize beautifully together.

Make Ahead Options

These Halloween Oreo Cookie Boo Brownies are a fantastic choice for meal prep, allowing you to enjoy various spooky-themed gatherings without spending all your time in the kitchen! You can prepare the batter up to 24 hours in advance by mixing the wet ingredients and folding in the dry ingredients but hold off on adding the crushed Oreos and chocolate chips until just before baking, ensuring their texture remains delightful. Keep the mixed batter in an airtight container in the refrigerator to maintain its freshness. Additionally, you can bake a batch and store the cooled brownies in an airtight container for up to 3 days at room temperature, or freeze them for up to 3 months. When ready to serve, simply thaw if frozen, cut into squares, and enjoy the same chewy, chocolatey goodness without the hassle!

Halloween Oreo Cookie Boo Brownies Recipe FAQs

How ripe should the Oreos be for the best flavor?
Absolutely! For the best flavor, it’s ideal to use fresh Oreo cookies, ideally within a few months of their expiration date. Look for cookies that are firm and not stale or crumbled. Using Halloween-themed Oreos will add a delightful festive twist without compromising taste!

How should I store leftover brownies?
To keep your Halloween Oreo Cookie Boo Brownies fresh and chewy, store them in an airtight container at room temperature for up to 3 days. If you want to preserve them longer, you can refrigerate them for up to a week, but note that they may become firmer in texture.

Can I freeze Halloween Oreo Cookie Boo Brownies?
Absolutely! To freeze your brownies, wrap them individually in plastic wrap and place them in a freezer bag. They will stay fresh for up to 3 months. When you’re ready to enjoy them, simply thaw them at room temperature or pop them in the microwave for about 10-15 seconds to warm them up!

What should I do if my brownies are too fudgy?
If your brownies end up too fudgy, it’s likely they were underbaked. To remedy this, check the baking time closely next time, as oven temperatures can vary. If you like them a little more cake-like, you can add an extra 2-3 minutes of baking time but be careful not to overbake. A toothpick test will help you find the perfect balance!

Are these brownies suitable for all diets?
While Halloween Oreo Cookie Boo Brownies are delicious, they do contain eggs and dairy. For a vegan alternative, you can substitute the eggs with flax eggs (1 tablespoon of flaxseed meal mixed with 2.5 tablespoons of water = 1 egg) and use coconut oil instead of butter. Make sure to choose vegan Oreos, which are widely available.

Halloween Oreo Cookie Boo Brownies

Halloween Oreo Cookie Boo Brownies: Chewy Delight for Spooky Fun

Halloween Oreo Cookie Boo Brownies are a delightful blend of chewy chocolate goodness and Oreo crunch, perfect for your spooky festivities.
Prep Time 15 minutes
Cook Time 30 minutes
Cooling Time 30 minutes
Total Time 1 hour 15 minutes
Servings: 16 squares
Course: Dessert
Cuisine: American
Calories: 250

Ingredients
  

For the Brownies
  • 1 package Oreo Cookies Use Halloween-themed Oreos for extra festive touch.
  • 1 cup Chocolate Chips Substitute with dark or semi-sweet chips for varying flavors.
  • 1/2 cup Butter Can substitute for coconut oil for a dairy-free version.
  • 1 cup Sugar Consider using brown sugar for a deeper flavor.
  • 2 large Eggs Can substitute with flax eggs for a vegan option.
  • 1 cup Flour Use all-purpose flour, or opt for a gluten-free flour blend if necessary.
Optional Topping
  • 1 package Whole Oreo Pieces Carefully place on top before baking.

Equipment

  • Oven
  • 9x9-inch baking pan
  • Mixing Bowl
  • spatula

Method
 

Step-by-Step Instructions
  1. Preheat your oven to 350°F (175°C) and line a 9x9 inch baking pan with parchment paper.
  2. In a large mixing bowl, combine melted butter with granulated and brown sugars. Mix until smooth and glossy, about 2-3 minutes.
  3. Beat in eggs and vanilla extract until fluffy and light, about 2-3 minutes.
  4. Gradually sift the flour into the batter and fold gently until just combined.
  5. Fold in crushed Halloween Oreo cookies and chocolate chips for even distribution.
  6. Pour batter into the prepared pan, spreading evenly, and place whole Oreo cookies on top for decoration.
  7. Bake for 28-32 minutes, checking for a toothpick to come out with a few moist crumbs.
  8. Allow brownies to cool completely in the pan for at least 30 minutes before cutting into squares.

Nutrition

Serving: 1squareCalories: 250kcalCarbohydrates: 35gProtein: 3gFat: 12gSaturated Fat: 7gPolyunsaturated Fat: 1gMonounsaturated Fat: 4gCholesterol: 40mgSodium: 150mgPotassium: 150mgFiber: 1gSugar: 18gVitamin A: 400IUCalcium: 30mgIron: 1mg

Notes

Store brownies in an airtight container at room temperature for up to 3 days. For longer storage, refrigerate for up to a week or freeze for up to 3 months.

Tried this recipe?

Let us know how it was!

Creamy Pasta Bake with Pumpkin Tomato Sauce for Cozy Nights

Autumn’s arrival always stirs a longing for heartwarming flavors, and nothing embraces the season quite like this Creamy Cheesy Pumpkin Pasta Bake with Walnut-Sage Topping. With layers of earthy mushrooms, vibrant spinach, and a luscious pumpkin tomato sauce, this dish transforms simple ingredients into a cozy, crowd-pleasing meal. Not only is it easy to prepare, but it also cleverly incorporates nutritious veggies for a wholesome twist on comfort food. Your family will sigh with satisfaction as they savor each gooey, cheesy bite. So, are you ready to discover a new fall favorite that will warm both your kitchen and your heart?

Why is this Pasta Bake a must-try?

Comforting, Cozy Dish: Perfectly embodying the essence of fall, this creamy pasta bake is a warm hug in a bowl, ideal for chilly nights.
Flavorful Layers: Rich pumpkin and zesty tomato sauce, combined with savory mushrooms and spinach, deliver nourishing taste and great texture.
Quick Prep Time: Ready in under an hour, you can whip up this delightful bake after a long day for a comforting meal that doesn’t compromise on flavor.
Crowd-Pleasing Delight: Perfect for family gatherings or casual dinner parties, everyone will rave about the creamy goodness, making it a hit at any table.
Nutritious Twist: Sneak in those vitamins with wholesome veggies, ensuring your comforting meal is also good for you! For another veggie-packed dish, check out my Cheesy Spinach Bake for more inspiration.

Pasta Bake with Pumpkin Tomato Sauce Ingredients

• Create a velvety, flavorful experience with these essential ingredients.

For the Pasta

  • Dry Pasta – 1 lb. of tubular pasta like mezzi rigatoni or ziti for the best texture. Substitutions: Use gluten-free pasta if desired.

For the Sauce

  • Butter – 2 Tbsp for sautéing and a rich flavor base. Use olive oil for a dairy-free option.
  • Olive Oil – 2 Tbsp for sautéing vegetables, enhancing the sauce.
  • Yellow Onion – 1, finely chopped, for a sweet base flavor.
  • Garlic – 4 cloves, minced, to bring aromatic depth.
  • Cremini Mushrooms – 8 oz., sliced, offering umami flavor and texture. Button mushrooms or any favorite variety work too.
  • Fresh Baby Spinach – 3 to 4 handfuls for nutrition and vibrant color.
  • Pumpkin Puree – 1 (15-oz) can, providing creaminess and seasonal flavor.
  • Tomato Paste – 1/4 cup to enhance richness and deepen the flavor profile.
  • Vegetable Broth – 3 cups to ensure moisture and balance the sauce.
  • Dried Oregano – 1 tsp for a touch of earthy notes.
  • Crushed Red Pepper Flakes – 1/2 tsp, for a hint of warmth. Adjust to taste for heat level.
  • Ground Nutmeg – 1/4 tsp, adding warm spice notes that complement the pumpkin.
  • Kosher Salt – 1 tsp for seasoning throughout the dish.
  • Black Pepper – 1/2 tsp to enhance overall flavor.

For the Cheese Topping

  • Grated Parmesan Cheese – 1/2 cup for salty, cheesy goodness.
  • Grated Fontina Cheese – 1 1/2 cups, divided, the key melting cheese for creaminess and flavor, adding an extra touch of indulgence.
  • Walnuts – 1/2 cup, finely chopped, for a crunchy texture and nutty flavor. Substitution: Pecans can be used instead.
  • Fresh Sage – 1 Tbsp + 2 tsp, finely chopped, brings aromatic elements. Replace with thyme if fresh sage is unavailable.

This Pasta Bake with Pumpkin Tomato Sauce is not just a recipe; it’s a loving addition to your fall meals that cherishes the season’s bounty. Get ready to cozy up and enjoy every delicious bite!

Step‑by‑Step Instructions for Creamy Pasta Bake with Pumpkin Tomato Sauce

Step 1: Preheat the Oven
Begin by preheating your oven to 375°F (190°C). This essential first step ensures that when your Pasta Bake with Pumpkin Tomato Sauce is ready to go in, it bakes evenly and achieves a beautifully melted top. Make sure your oven is properly heated before you proceed to the next steps.

Step 2: Cook the Pasta
In a large pot, bring salted water to a rolling boil. Add 1 lb. of your choice of tubular pasta, cooking until it’s 2 minutes shy of al dente, about 8-10 minutes. Once done, drain the pasta and set it aside, keeping it slightly undercooked, as it will finish cooking in the oven in the creamy bake.

Step 3: Toast the Walnuts and Sage
In a large skillet, melt 2 tablespoons of butter over medium heat. Add 1/2 cup of finely chopped walnuts and 1 tablespoon of fresh sage, allowing them to toast for about 5 minutes. You’ll know they’re ready when they’re golden and fragrant, then transfer this mixture to a bowl and set aside for later.

Step 4: Sauté the Vegetables
In the same skillet, add 2 tablespoons of olive oil and heat it over medium until shimmering. Toss in the finely chopped onion and sliced cremini mushrooms. Sauté this blend for about 8 minutes until the vegetables are soft and golden, stirring occasionally to avoid sticking.

Step 5: Add Flavor with Tomato Paste and Garlic
Once your mushrooms and onion are tender, stir in 1/4 cup of tomato paste, minced garlic, and 1/2 teaspoon of crushed red pepper flakes. Cook for an additional 3-4 minutes until the tomato paste deepens to a rich brick red color, allowing the flavors to meld beautifully.

Step 6: Incorporate Spinach and Seasonings
Next, gently fold in 3 to 4 handfuls of fresh baby spinach, stirring until it wilts. Once wilted, add 1 teaspoon of dried oregano, 1 teaspoon of kosher salt, 1/2 teaspoon of black pepper, and 1/4 teaspoon of ground nutmeg to the skillet, mixing until thoroughly combined and fragrant.

Step 7: Create the Creamy Pumpkin Sauce
Deglaze the skillet with 3 cups of vegetable broth, scraping up any flavorful bits from the bottom. Stir in 1 (15-oz) can of pumpkin puree, 1/2 cup of grated Parmesan cheese, and 1/2 cup of grated Fontina cheese. Cook this sauce over low heat, stirring until smooth and creamy, about 5 minutes.

Step 8: Combine Pasta and Sauce
Add the cooked pasta into the pumpkin sauce, mixing thoroughly until every piece is well coated and enveloped in that luscious creamy goodness. This ensures that every bite of your Pasta Bake with Pumpkin Tomato Sauce will be wonderfully flavorful.

Step 9: Transfer to Baking Dish
Lightly grease a 13×9-inch baking dish and pour the pasta mixture into it, spreading it evenly. Top with the remaining 1 cup of grated Fontina cheese and the toasted walnut-sage mixture that you saved earlier for added crunch and flavor.

Step 10: Bake Until Golden
Cover your baking dish with aluminum foil and place it in the preheated oven. Bake for 15 minutes, then remove the foil and continue to bake for an additional 10 minutes. Watch for the cheese to become beautifully melted and golden, signaling it’s time to bring your comforting dish to the table.

Expert Tips for Pasta Bake with Pumpkin Tomato Sauce

  • Pasta Perfection: Don’t overcook your pasta while boiling; keep it slightly firm since it will cook more while baking.
  • Freshness Matters: Using fresh herbs and vegetables will elevate the flavor of your Pasta Bake with Pumpkin Tomato Sauce significantly.
  • Moisture Maintenance: When reheating leftovers, add a splash of broth to keep the pasta bake creamy and delicious instead of dry.
  • Nut Sensitivity: If anyone has nut allergies, you can easily omit the walnuts or replace them with pumpkin seeds for a similar crunch.
  • Cheese Variations: Feel free to mix different cheeses to create your signature topping—mozzarella or gouda can make excellent substitutes for Fontina.

Make Ahead Options

These Creamy Cheesy Pumpkin Pasta Bakes are perfect for meal prep enthusiasts looking to save time on busy weeknights! You can prepare the entire dish (up to 24 hours ahead) by assembling everything in the baking dish, then cover and refrigerate it until you’re ready to bake. Alternatively, you can cook the pasta and make the creamy pumpkin sauce a day in advance, storing both components separately in the fridge. To maintain quality, allow the pasta and sauce to cool completely before refrigerating, and bring them to room temperature before baking. Simply preheat your oven and bake as directed, for warm, comforting results that are just as delicious as when freshly made!

What to Serve with Creamy Cheesy Pumpkin Pasta Bake?

Indulging in a hot, cheesy pasta bake evokes cozy family dinners and warm autumn nights, making it essential to complement this dish with delicious sides.

  • Simple Green Salad: A fresh salad with crisp greens and a light vinaigrette balances the richness of the pasta bake, adding brightness to your meal. Toss in seasonal ingredients like pears or walnuts for added texture.
  • Garlic Bread: Warm, buttery garlic bread is perfect for savoring every bit of that creamy sauce. The crunchiness complements your pasta while enhancing the cozy vibe of your dining experience.
  • Roasted Brussels Sprouts: The slight bitterness of roasted Brussels sprouts contrasts beautifully with the sweet pumpkin sauce, creating a delightful flavor pairing that everyone will love.
  • Creamy Polenta: For a twist, serve alongside creamy polenta. Its smooth texture echoes the pasta bake’s richness while adding a comforting taste that feels like a warm hug.
  • Sautéed Kale: This nutrient-rich side is a wonderful way to add color and earthiness to your meal, making your comforting dining experience a bit more wholesome.
  • Cranberry Sauce: A hint of sweetness and tartness from cranberry sauce can brighten your meal and offer a lovely contrast to the creamy, savory pasta flavors. Perfect for an extra autumn vibe!
  • Chardonnay: A glass of chilled Chardonnay complements the dish brilliantly, its crispness cutting through the creaminess while enhancing the warm spice notes of the pumpkin.
  • Apple Crisp: End the meal on a sweet note with a warm apple crisp. The comforting flavors of cinnamon and baked apples tie in perfectly with the autumn theme, making it a perfect dessert companion.

How to Store and Freeze Pasta Bake with Pumpkin Tomato Sauce

  • Fridge: Keep leftovers in an airtight container in the refrigerator for up to 5 days, ensuring they remain fresh and ready to enjoy.
  • Freezer: For longer storage, portion the cooled pasta bake in freezer-safe containers or bags, where it can last for up to 3 months.
  • Reheating: When you’re ready to enjoy your pasta bake again, thaw overnight in the fridge. Reheat in the oven at 350°F (175°C) until heated through, adding a splash of broth to maintain that creamy texture.
  • Room Temperature: It’s best to avoid keeping the pasta bake at room temperature for more than 2 hours, as it can spoil quickly.

Variations & Substitutions for Pasta Bake with Pumpkin Tomato Sauce

Feel free to customize this delightful dish to suit your taste preferences and dietary needs!

  • Dairy-Free: Substitute all cheese with a plant-based alternative and use olive oil instead of butter for a creamy texture.
  • Gluten-Free: Swap the dry pasta with gluten-free pasta varieties, allowing everyone to enjoy this comforting dish.
  • Protein Boost: Incorporate cooked lentils or chickpeas into the sauce for an easy protein upgrade; they blend beautifully into the flavors.
  • Veggie Power: Replace the spinach with kale, Swiss chard, or even shredded zucchini for a new twist each time—plenty of nutrient diversity!
  • Cheese Lovers: Experiment with a blend of cheeses like mozzarella, gouda, or cheddar for a unique, melty topping that’s extra indulgent.
  • Extra Crunch: Add crispy breadcrumbs or panko on top before baking for an additional layer of crunchy texture. It’s a delightful surprise!
  • Spicy Kick: For those who enjoy heat, toss in a diced jalapeño with the vegetables, or use a spicier version of crushed red pepper flakes to amp up the flavor.
  • Herbal Infusion: Feel free to replace the sage with fresh thyme or rosemary for a fragrant lift that beautifully complements pumpkin.

The versatility of this Pasta Bake with Pumpkin Tomato Sauce means there’s room for creativity! For additional veggie-packed inspiration, don’t forget to check out my Cheesy Spinach Bake.

Creamy Pasta Bake with Pumpkin Tomato Sauce Recipe FAQs

How do I select the best pumpkins for my dish?
Absolutely! When choosing pumpkins for a recipe like this, look for ones that feel heavy for their size with a smooth, firm skin. Ideally, you want to select pumpkins that are free from dark spots or blemishes, as these can indicate overripeness. Smaller sugar or pie pumpkins are preferred for cooking, as they have a sweeter and denser flesh compared to larger carving pumpkins.

How should I store leftover pasta bake?
Very! To keep your Pasta Bake with Pumpkin Tomato Sauce fresh, store leftovers in an airtight container in the refrigerator for up to 5 days. This will help maintain its creamy texture and delicious flavor. When reheating, I recommend adding a splash of broth to keep it moist and creamy during the reheating process.

Can I freeze my pasta bake for later enjoyment?
Absolutely! To freeze the Pasta Bake with Pumpkin Tomato Sauce, allow it to cool completely after baking. Then, portion it into freezer-safe containers or bags. Make sure to squeeze out as much air as possible to avoid freezer burn. It can be safely stored for up to 3 months. When you’re ready to eat, simply defrost overnight in the fridge and reheat in the oven for the best results.

What if my pasta bake turns out too dry?
Don’t worry! If it turns out a bit dry, there are a few troubleshooting steps you can take. First, add a splash of vegetable broth or water before reheating to reintroduce moisture. Alternatively, when preparing the dish, make sure to keep an eye on baking time; overbaking can dry it out. It’s also essential to use enough creamy sauce to coat the pasta evenly prior to baking, ensuring every noodle is covered.

Are there any dietary considerations I should be aware of?
Very! This recipe is vegetarian, making it suitable for those following a meat-free diet. If you have nut allergies, you can easily omit the walnuts or replace them with pumpkin seeds for a similar crunch. Always be cautious of cross-contamination if you’re cooking for individuals with severe allergies. If you’re looking for a dairy-free option, consider swapping the cheeses for vegan alternatives or nutritional yeast for a cheesy flavor.

Pasta Bake with Pumpkin Tomato Sauce

Creamy Pasta Bake with Pumpkin Tomato Sauce for Cozy Nights

Enjoy a heartwarming Creamy Pasta Bake with Pumpkin Tomato Sauce, filled with earthy flavors and creamy goodness, perfect for chilly nights.
Prep Time 30 minutes
Cook Time 30 minutes
Total Time 1 hour
Servings: 6 servings
Course: Casserole
Cuisine: American
Calories: 450

Ingredients
  

For the Pasta
  • 1 lb Dry Pasta (tubular like mezzi rigatoni or ziti) Use gluten-free pasta if desired.
For the Sauce
  • 2 Tbsp Butter Use olive oil for a dairy-free option.
  • 2 Tbsp Olive Oil
  • 1 Yellow Onion, finely chopped
  • 4 Garlic, minced
  • 8 oz Cremini Mushrooms, sliced Button mushrooms or any favorite variety work too.
  • 3-4 handfuls Fresh Baby Spinach
  • 1 15-oz can Pumpkin Puree
  • 1/4 cup Tomato Paste
  • 3 cups Vegetable Broth
  • 1 tsp Dried Oregano
  • 1/2 tsp Crushed Red Pepper Flakes Adjust to taste for heat level.
  • 1/4 tsp Ground Nutmeg
  • 1 tsp Kosher Salt
  • 1/2 tsp Black Pepper
For the Cheese Topping
  • 1/2 cup Grated Parmesan Cheese
  • 1 1/2 cups Grated Fontina Cheese, divided
  • 1/2 cup Walnuts, finely chopped Substitution: Pecans can be used instead.
  • 1 Tbsp + 2 tsp Fresh Sage, finely chopped Replace with thyme if fresh sage is unavailable.

Equipment

  • Large pot
  • Large skillet
  • baking dish

Method
 

Instructions
  1. Preheat your oven to 375°F (190°C).
  2. In a large pot, bring salted water to a rolling boil. Add the dry pasta, cooking until 2 minutes shy of al dente, about 8-10 minutes. Drain and set aside.
  3. Melt the butter in a large skillet over medium heat. Add the walnuts and sage, toasting them for about 5 minutes until golden and fragrant. Set aside.
  4. In the same skillet, add olive oil and heat until shimmering. Sauté the onion and mushrooms for about 8 minutes until soft and golden.
  5. Stir in the tomato paste, garlic, and crushed red pepper flakes. Cook for 3-4 minutes until the mixture deepens in color.
  6. Fold in the spinach until wilted. Add oregano, salt, black pepper, and nutmeg, mixing until combined.
  7. Deglaze with vegetable broth, scraping up bits from the bottom. Stir in pumpkin puree, Parmesan, and Fontina. Cook for 5 minutes until smooth.
  8. Add the cooked pasta to the sauce, mixing until coated.
  9. Lightly grease a 13x9-inch baking dish. Pour in the pasta mixture, top with remaining Fontina and the walnut-sage mixture.
  10. Cover with foil and bake for 15 minutes. Remove the foil and bake for an additional 10 minutes until cheese is melted and golden.

Nutrition

Serving: 1servingCalories: 450kcalCarbohydrates: 50gProtein: 15gFat: 22gSaturated Fat: 10gPolyunsaturated Fat: 5gMonounsaturated Fat: 8gCholesterol: 30mgSodium: 700mgPotassium: 700mgFiber: 5gSugar: 6gVitamin A: 1500IUVitamin C: 8mgCalcium: 250mgIron: 3mg

Notes

For best results, use fresh herbs and vegetables. Store in the fridge for up to 5 days. Freezes well for up to 3 months.

Tried this recipe?

Let us know how it was!

Irresistible Caramel Apple Spice Cake to Warm Your Heart

As the leaves transform into brilliant shades of red and gold, I can’t help but crave the comforting aromas of autumn wafting through my kitchen. Enter my Best Caramel Apple Spice Cake—a warm, inviting dessert that captures that essence perfectly. This is no ordinary cake; it’s a luscious blend of spiced apple goodness layered and topped with a dreamy caramel buttercream that satisfies both sweet and savory cravings. Whether you’re hosting a cozy gathering or simply looking to indulge on a chilly evening, this cake is not just easy to whip up, but it’s also sure to impress your guests. Are you ready to bring a taste of fall into your home? Let’s dive into this delicious recipe together!

Why is this cake a must-try?

Warmth of Autumn: Every bite of this Caramel Apple Spice Cake radiates autumn vibes, with the perfect blend of fragrant spices and fresh apples.

Quick to Prepare: Thanks to straightforward steps, you’ll have this delectable cake ready in no time—ideal for busy chefs and home cooks alike.

Rich, Creamy Frosting: The luscious caramel buttercream elevates the cake, creating a balance that tantalizes the taste buds and leaves everyone wanting more.

An Elevated Classic: This recipe transforms a simple apple cake into a showstopper, making it perfect for gatherings, family celebrations, or just cozy evenings with loved ones.

Versatile Pleasure: Feel free to tweak the ingredients, whether you’re going for gluten-free options or experimenting with different fruits, you can make it your own!

Serve it alongside a scoop of vanilla ice cream, and watch the smiles light up around your table.

Caramel Apple Spice Cake Ingredients

For the Cake
All-Purpose Flour – Provides structure and texture to the cake.
Baking Powder – Acts as a leavening agent for rising.
Salt – Enhances flavor and balances sweetness.
Ground Spices (Cinnamon, Nutmeg, Cloves, Ginger) – Infuses warmth and aromatics for a signature autumn flavor.
Unsalted Butter – Adds richness and moisture; can substitute with vegan margarine for a dairy-free alternative.
Vegetable Oil – Contributes to the cake’s moist texture; can be replaced with apple sauce for reduced fat.
Granulated Sugar – Sweetens the cake and helps keep it tender.
Applesauce – Introduces natural apple flavor and moisture, enhancing the Caramel Apple Spice Cake experience.
Large Eggs – Binds ingredients together and provides structure; use one aquafaba per egg for a vegan substitute.
Vanilla Extract – Enhances flavor; pure vanilla is recommended for depth.
Milk – Adds moisture; any non-dairy milk can replace it.
Chopped Apples – Fresh apple pieces throughout the cake provide a fruity burst of flavor.

For the Caramel Buttercream
Unsalted Butter – Serves as the base for creamy richness.
Vanilla Extract – Complements the caramel flavor beautifully.
Caramel Sauce – Infuses the frosting with sweetness; homemade or store-bought works.
Cinnamon – Adds warmth to the frosting, enhancing the overall flavor.
Powdered Sugar – Sweetens and thickens for a perfect spreading consistency.

Step‑by‑Step Instructions for Caramel Apple Spice Cake

Step 1: Preheat and Prepare Pans
Begin by preheating your oven to 350°F (175°C). While it warms up, grease four 8-inch round cake pans with butter or cooking spray to prevent sticking. This preparation ensures a smooth release of your delightful Caramel Apple Spice Cake once baked, leading to a beautiful presentation.

Step 2: Mix Dry Ingredients
In a medium-sized bowl, combine all-purpose flour, baking powder, salt, and your chosen ground spices—cinnamon, nutmeg, cloves, and ginger. Whisk them together until evenly mixed, creating a flavorful base for your cake. Setting this mixture aside allows the flavors to meld while you work on the wet ingredients.

Step 3: Cream Butter and Sugar
In a large mixing bowl, beat the softened unsalted butter, vegetable oil, applesauce, and granulated sugar until smooth and creamy. This process usually takes about 3-5 minutes with an electric mixer. The mixture should be pale and fluffy, indicating that it’s ready for the next ingredients to be added.

Step 4: Incorporate Eggs and Vanilla
Add the large eggs one at a time, mixing thoroughly after each addition to ensure they become fully incorporated. Pour in the vanilla extract and continue mixing until well combined. This enriches the batter for your Caramel Apple Spice Cake, providing a delicious flavor foundation.

Step 5: Combine Dry and Wet Mixtures
Gradually add the dry flour mixture to the wet ingredients, alternating with the milk. Start and end with the flour mixture to prevent overmixing. Mix until just combined; the batter will be thick but smooth. This careful incorporation helps maintain a light texture in your cake.

Step 6: Fold in Chopped Apples
Gently fold in the chopped apples using a spatula, being careful not to overmix. This step introduces delicious fruity bits into your Caramel Apple Spice Cake, ensuring every bite bursts with flavor. The gentle folding technique helps keep the batter airy and light.

Step 7: Distribute Batter into Pans
Evenly divide the batter among the prepared cake pans, smoothing the tops with a spatula for uniformity. Be sure to fill each pan to the same level to ensure even baking. This attention to detail will yield perfectly layered cakes that stack beautifully.

Step 8: Bake to Perfection
Place the filled pans in the preheated oven and bake for 20-25 minutes. Keep an eye on them; they are done when a toothpick inserted into the center comes out clean. This step is crucial for achieving soft, moist layers for your Caramel Apple Spice Cake.

Step 9: Cool the Cakes
Once baked, remove the pans from the oven and let them cool for about 10 minutes. After that, carefully turn the cakes out of the pans onto wire racks to cool completely. Cooling is essential to avoid melting the frosting during assembly, ensuring the layers stay intact.

Step 10: Prepare the Caramel Buttercream
For the frosting, in a clean bowl, beat the unsalted butter until creamy. Add in vanilla extract, caramel sauce, and cinnamon, mixing until smooth. Gradually incorporate the powdered sugar, adjusting as necessary to achieve your desired frosting consistency. This luxurious caramel buttercream will crown your cake perfectly.

Step 11: Assemble the Cake
Level the cooled cakes using a serrated knife if necessary, then stack them with a layer of caramel buttercream in between each layer. Apply a crumb coat of frosting over the entire cake to seal in crumbs. This technique ensures a clean and smooth final layer for your Caramel Apple Spice Cake.

Step 12: Final Frosting and Decoration
Chill the cake in the freezer for about 15 minutes, then use the remaining buttercream to frost the top and sides completely. For an extra touch, drizzle additional caramel and arrange apple slices on top before serving, making your Caramel Apple Spice Cake an irresistible centerpiece.

How to Store and Freeze Caramel Apple Spice Cake

Fridge: Store any leftover Caramel Apple Spice Cake in an airtight container in the fridge for up to 4 days to maintain its moisture and flavor.

Freezer: Wrap the cooled cake layers tightly in plastic wrap and place them in a freezer-safe container or bag. It can be frozen for up to 2 months, preserving its delicious taste.

Reheating: When ready to enjoy, thaw the cake overnight in the fridge or at room temperature for a couple of hours. If desired, warm individual slices gently in the microwave for a cozy treat.

Frosting Storage: If you have extra caramel buttercream, store it in an airtight container in the fridge for up to 5 days. Rewhip before using to restore its creamy texture.

What to Serve with Best Caramel Apple Spice Cake

As the aroma of autumn fills your kitchen, pairing this delightful cake with some complementary sides will create a heartwarming feast.

  • Vanilla Ice Cream: A scoop of creamy vanilla ice cream adds a rich, cold contrast, melting into the warm cake and enhancing its sweetness.

  • Whipped Cream: Light and airy, a dollop of whipped cream brings a fluffy texture that beautifully balances the cake’s dense layers, perfect for those chilly evenings.

  • Spiced Apple Cider: Serve warm spiced apple cider for a harmonious drink pairing, echoing the cake’s apple flavor while adding a comforting warmth.

  • Candied Pecans: Crunchy, sweet, and slightly salty pecans create a delightful contrast in texture, offering a splendid nutty flavor that elevates each bite of cake.

  • Pumpkin Pie: For a festive touch, serve slices of classic pumpkin pie alongside your cake; the spices will remind guests of the cherished flavors of fall.

  • Caramel Drizzle: A drizzle of extra caramel sauce on both the cake and your plates introduces an additional decadent layer of flavor, making each slice even more irresistible.

  • Chai Tea: Steaming cups of chai tea infused with warm spices like cardamom and ginger can perfectly complement the cake’s spices, creating a cozy, immersive experience.

  • Cheese Platter: Create a cheese platter with sharp cheddars or creamy bries. The savory elements contrast beautifully with the sweetness of the cake, adding a gourmet touch.

Expert Tips for Caramel Apple Spice Cake

  • Room Temperature Ingredients: Use ingredients at room temperature for better mixing, which results in a lighter, fluffier cake.

  • Precise Measurements: Level off your dry ingredients carefully to ensure accuracy; this prevents a dense texture in your Caramel Apple Spice Cake.

  • Gentle Folding: When incorporating chopped apples, fold gently to maintain the cake’s airy texture—overmixing can lead to a tough cake.

  • Cooling Time: Allow your cakes to cool completely before frosting to prevent the buttercream from melting—this keeps your layers intact and beautiful.

  • Crumb Coat Secret: Apply a thin crumb coat to seal in loose crumbs before the final frosting; it ensures a polished, professional look.

  • Chill for Flavor: Chilling the decorated cake in the fridge for about 30 minutes enhances flavors and gives a firm texture, making it easier to slice.

Make Ahead Options

These Caramel Apple Spice Cake layers are perfect for meal prep enthusiasts! You can bake the cake layers up to 3 days in advance and refrigerate them wrapped tightly in plastic wrap to maintain their moisture. If you’re looking to prep even further ahead, you can freeze the layers for up to 2 months—just ensure they’re well-wrapped to prevent freezer burn. When you’re ready to assemble, simply thaw the layers in the refrigerator overnight before frosting. This way, your assembled cake will be just as delicious and fresh when served at your next gathering, saving you precious time on busy days!

Caramel Apple Spice Cake Variations

Embrace your creativity with these delightful twists to make this Caramel Apple Spice Cake uniquely yours!

  • Gluten-Free: Substitute all-purpose flour with a gluten-free flour blend to ensure everyone can enjoy this treat without worry.

  • Vegan Delight: Swap eggs for aquafaba and use dairy-free butter and milk, making this cake suitable for your vegan friends. It’s amazing how easily you can cater to different diets!

  • Decadent Chocolate: Add ½ cup of cocoa powder to the dry ingredients for a rich chocolatey touch that pairs beautifully with caramel and apple flavors. Who can resist chocolate, right?

  • Fruity Variations: Use pears or mashed pumpkin in place of apples for a fresh take on fruity goodness. Each option provides a unique flavor twist, keeping your guests eagerly guessing!

  • Salted Caramel: Drizzle in some salted caramel sauce for a delightful contrast of sweet and salty, amplifying the flavors wonderfully. This addition will make your cake even more irresistible!

  • Spice it Up: Incorporate a dash of cayenne or chipotle powder to add a gentle heat that pairs surprisingly well with the sweetness of the caramel and apples.

  • Layered Surprise: Halve the ingredients for a two-layer cake, perfect for an intimate celebration or smaller gatherings. It’s cute and just as delicious!

  • Bake in a Bundt Pan: Pour the batter into a greased bundt pan for a beautiful sculpted cake, adding a fun twist to your presentation. You can still drizzle caramel on top for that indulgent touch!

For extra inspiration, don’t forget to check out my delightful recipes like the Vietnamese Caramel Ginger and the yummy Apple Crisp Cinnamon!

Caramel Apple Spice Cake Recipe FAQs

How do I select the best apples for this cake?
Absolutely! For the best results, choose firm apples with a balance of sweetness and tartness, such as Granny Smith or Honeycrisp. Look for apples without bruises or dark spots; they should feel crisp and firm to the touch. Freshly picked apples will impart a more vibrant flavor to your Caramel Apple Spice Cake.

How should I store leftover cake?
Very! Store any leftover Caramel Apple Spice Cake in an airtight container in the refrigerator for up to 4 days. If you want to keep it even longer, consider wrapping it tightly in plastic wrap and then placing it inside a container to maintain its moisture and flavor.

Can I freeze this cake?
Absolutely! To freeze your Caramel Apple Spice Cake, wrap each cooled layer separately in plastic wrap, ensuring it’s airtight to prevent freezer burn. Place the wrapped layers in a freezer-safe container or bag. It can be frozen for up to 2 months! When you’re ready to enjoy, simply thaw overnight in the fridge and, if desired, warm individual slices in the microwave.

What should I do if my cake is too dense?
If your Caramel Apple Spice Cake turns out too dense, it may be due to overmixing or using too much flour. Make sure to gently fold in the dry ingredients and avoid compacting them in the measuring cup. For a lighter texture, I recommend leveling off your dry ingredients while measuring and alternating the addition of wet and dry ingredients carefully.

Is this recipe suitable for people with allergies?
I often make variations to accommodate dietary needs! This recipe contains eggs and dairy. For a vegan option, replace eggs with aquafaba (1 tablespoon per egg) and use vegan butter and non-dairy milk. Always check labels for allergen-free products, especially in baking, as ingredients can vary. If you are serving this cake to guests, it’s a wonderful idea to ask about any food allergies beforehand.

How do I know when the cake is fully baked?
To check if your Caramel Apple Spice Cake is done, insert a toothpick into the center of the cake. It should come out clean or with a few moist crumbs (not wet batter). Typically, baking time is around 20-25 minutes but can vary slightly depending on your oven. Keeping an eye on the cake in the last few minutes of baking will help ensure its perfect texture!

Caramel Apple Spice Cake

Irresistible Caramel Apple Spice Cake to Warm Your Heart

This Caramel Apple Spice Cake features warm autumn flavors, rich caramel buttercream, and is perfect for gatherings.
Prep Time 30 minutes
Cook Time 25 minutes
Cooling Time 10 minutes
Total Time 1 hour 5 minutes
Servings: 12 slices
Course: Dessert
Cuisine: American
Calories: 350

Ingredients
  

For the Cake
  • 2 cups All-Purpose Flour
  • 1 tbsp Baking Powder
  • 1 tsp Salt
  • 1 tbsp Ground Spices (Cinnamon, Nutmeg, Cloves, Ginger) Mix of spices for flavor
  • 1 cup Unsalted Butter Can substitute with vegan margarine
  • 1/2 cup Vegetable Oil Or replace with apple sauce
  • 1 1/2 cups Granulated Sugar
  • 1 cup Applesauce For moisture and flavor
  • 3 large Large Eggs Or use aquafaba for vegan option
  • 1 tbsp Vanilla Extract Use pure for better flavor
  • 1/2 cup Milk Any non-dairy milk can be used
  • 2 cups Chopped Apples Fresh apple pieces
For the Caramel Buttercream
  • 1 cup Unsalted Butter
  • 1 tbsp Vanilla Extract
  • 1/2 cup Caramel Sauce Homemade or store-bought
  • 1 tsp Cinnamon
  • 4 cups Powdered Sugar

Equipment

  • Oven
  • Mixing bowls
  • Electric mixer
  • spatula
  • 8-inch Round Cake Pans

Method
 

Step-by-Step Instructions for Caramel Apple Spice Cake
  1. Preheat your oven to 350°F (175°C) and grease four 8-inch round cake pans.
  2. In a bowl, mix all-purpose flour, baking powder, salt, and ground spices.
  3. Cream softened butter, vegetable oil, applesauce, and granulated sugar until smooth and fluffy.
  4. Incorporate eggs one at a time and mix in vanilla extract.
  5. Gradually add dry mixture into wet, alternating with milk.
  6. Fold in chopped apples with a spatula carefully.
  7. Divide batter among the prepared pans and smooth the tops.
  8. Bake for 20-25 minutes until a toothpick comes out clean.
  9. Cool cakes in pans for 10 minutes, then transfer to wire racks.
  10. Beat unsalted butter until creamy for the frosting, then mix in vanilla, caramel, and cinnamon.
  11. Gradually add powdered sugar until the desired consistency is reached.
  12. Assemble the cake layers with caramel buttercream in between.
  13. Chill and then frost the top and sides, drizzling caramel and adding apple slices for decoration.

Nutrition

Serving: 1sliceCalories: 350kcalCarbohydrates: 50gProtein: 3gFat: 16gSaturated Fat: 8gPolyunsaturated Fat: 0.5gMonounsaturated Fat: 0.5gCholesterol: 50mgSodium: 250mgPotassium: 100mgFiber: 1gSugar: 30gVitamin A: 500IUVitamin C: 2mgCalcium: 10mgIron: 1mg

Notes

For best results, use room temperature ingredients and allow cakes to cool completely before frosting.

Tried this recipe?

Let us know how it was!

Indulge in a Thick Black Milkshake: Vegan & Paleo Delight

As I rummaged through my pantry, a mischievous thought crossed my mind: what if Halloween wasn’t just about candy, but also about creamy, decadent treats? That’s when I discovered the magic of the Black Milkshake! This recipe brings together the velvety smoothness of vanilla ice cream and the rich allure of black cocoa powder, creating an indulgence reminiscent of an Oreo milkshake, yet without any artificial food coloring. What’s more, it’s incredibly easy to whip up and perfect for all dietary needs, whether you’re vegan or paleo. This spooky drink not only serves as a fun treat but also stands out at Halloween gatherings, making it an instant crowd-pleaser. Curious how to blend this deliciousness together? Let’s dive in!

Why is the Black Milkshake a Must-Try?

Unforgettable Taste: This Black Milkshake captures the nostalgic flavors of an Oreo, delivering a unique treat that everyone will love.

Diet-Friendly Options: Whether you’re vegan or paleo, adapting this recipe is a breeze, allowing you to indulge without any guilt.

Spooky & Fun: Perfect for Halloween celebrations, its dark hue sparks curiosity and excitement, attracting kids and adults alike.

Quick and Simple: With just a few ingredients and easy blending, you’ll have this delightful shake ready in no time—ideal for busy days!

Crowd-Pleaser: Serve it at parties, and watch as guests rave about this delightful concoction! For more fun alternatives, check out our vegan dessert ideas.

Black Milkshake Ingredients

For the Milkshake

  • Vanilla Ice Cream – Offers creaminess and sweetness; use vegan ice cream for a dairy-free alternative.
  • Milk – Adjusts the thickness of the milkshake; any kind except canned coconut milk works, with unsweetened cashew milk being a great vegan option.
  • Black Cocoa Powder – Creates the dark color and Oreo-like flavor; avoid regular cocoa for the same taste and visual appeal.
  • Maple Syrup – Provides natural sweetness; honey can substitute for a non-vegan version.
  • Vanilla Extract – Enhances the overall flavor; omit for a more chocolate-forward taste if desired.

For Toppings (Optional)

  • Whipped Cream – Adds a creamy finish; can be left out for vegan and paleo variations.
  • Black Sanding Sugar – Perfect for garnishing; regular sugar can be used if you don’t have this on hand.

Experience the magic of this Black Milkshake, perfect for Halloween treat gatherings!

Step‑by‑Step Instructions for Black Milkshake

Step 1: Prep Whipped Cream
Start by pouring heavy cream into a mixing bowl. Whip the cream using a hand mixer on medium speed for about 3-5 minutes until stiff peaks form. Once done, transfer the whipped cream to the refrigerator to chill while you prepare the Black Milkshake, ensuring it stays fluffy and fresh for topping.

Step 2: Prepare Glasses
Take your serving glasses and brush the rims with maple syrup to help the sugar stick. Next, dip the wet rims into a plate of black sanding sugar to create a festive look. Place the glasses in the refrigerator to chill for about 10 minutes, enhancing the visual appeal of your milkshake.

Step 3: Blend Milkshake
In a blender, combine the vanilla ice cream, your choice of milk, black cocoa powder, maple syrup, and vanilla extract. Blend on high speed for about 30-45 seconds or until the mixture is completely smooth and creamy. The Black Milkshake should achieve a rich, dark color that’s visually striking and delightful.

Step 4: Adjust Thickness
After blending, check the consistency of your Black Milkshake. If it appears too thick for your liking, add a splash of milk (about a tablespoon at a time), blending again until you reach your desired thickness. Don’t hesitate to taste as you go; feel free to add more cocoa if you’d like it even richer.

Step 5: Serve
Carefully pour the creamy Black Milkshake into your prepared glasses, ensuring an even distribution. Top each shake with a generous dollop of the chilled whipped cream. For a final touch, sprinkle with additional black sanding sugar or chocolate shavings, and enjoy your festive treat immediately!

Make Ahead Options

These Black Milkshakes are perfect for meal prep! You can prepare the whipped cream and chill it in the refrigerator for up to 24 hours in advance, ensuring it’s ready to top off your milkshake without any extra hassle when serving. Additionally, you can also mix the milkshake base (vanilla ice cream, milk, black cocoa powder, maple syrup, and vanilla extract) and store it in an airtight container in the freezer for up to 3 days. Just give it a quick blend before serving to regain its creamy texture. This way, you’ll save time and still enjoy all the rich, chocolatey goodness just as delicious as when freshly made!

What to Serve with Oreo-Style Black Milkshake

Imagine a delightful feast that dances between fun and flavor, elevating your experience with every sip of this creamy concoction.

  • Spooky Sugar Cookies: These festive treats offer a sweet crunch that balances the milkshake’s richness and adds to the Halloween theme.

  • Chilled Fruit Salad: A bright medley of juicy fruits not only refreshes the palate but also adds a pop of color to your celebration.

  • Pumpkin Spice Muffins: Moist and fragrant, they echo the seasonal flavors and turn the black milkshake into a cozy fall experience.

  • Chocolate-Dipped Pretzels: The salty-sweet combination of these snacks enhances the milkshake’s chocolate notes, making for a delicious contrast.

  • Candy Corn Parfaits: Layered with whipped cream, these festive treats can be served on the side for a playful touch, capturing the Halloween spirit.

  • Cold Brew Coffee: For the adult crowd, the smoothness of cold brew offers a sophisticated pairing, enriching the milkshake’s chocolatey splendor.

  • Vegan Chocolate Cake: This indulgent treat complements the cocoa flavor beautifully, creating a harmonious dessert experience that everyone will crave.

  • Orange Sorbet: The tartness of this refreshing sorbet pairs well with the dark sweetness of the milkshake, providing a delightful contrast that invigorates the senses.

Expert Tips for the Best Black Milkshake

  • Ice Cream Quality: Use high-quality, dense ice cream for the best texture; airy ice cream can result in a watery shake.

  • Cocoa Caution: Black cocoa powder is essential for achieving that Oreo-like flavor; don’t substitute it with regular cocoa or you’ll lose the unique taste.

  • Milk Adjustment: The standard ratio is 1 part milk to 3 parts ice cream, but feel free to tweak it for your preferred thickness in the Black Milkshake.

  • Topping Options: Whipped cream adds richness, but if you’re going vegan or paleo, feel free to omit it and still enjoy the classic dark color!

  • Chill Your Glasses: Chilling the glasses before serving not only enhances presentation but also keeps your milkshake colder for longer—perfect for warm days!

Storage Tips for Black Milkshake

Fridge: Store any leftover Black Milkshake in a covered container in the fridge for up to 2 days. It’s best enjoyed fresh but can be slightly thickened before serving.

Freezer: If you want to keep it longer, transfer the Black Milkshake to a freezer-safe container. It can last for up to 1 month. Remember to leave some space for expansion.

Thawing: To enjoy frozen Black Milkshake, transfer it to the fridge for a few hours or let it sit at room temperature for about 15 minutes until it softens enough to blend again.

Reheating: While not typically necessary for milkshakes, if it separates after freezing, give it a quick blitz in the blender to restore its creamy texture.

Black Milkshake Variations & Substitutions

Feel free to unleash your creativity with this recipe and make it your own with these fun tweaks!

  • Vegan Ice Cream: Use your favorite dairy-free ice cream for a completely plant-based treat.

  • Paleo Alternative: Opt for frozen bananas blended with coconut milk instead of ice cream for a paleo-friendly shake. It adds natural sweetness while maintaining that creamy texture.

  • Sweetener Swap: Replace maple syrup with agave nectar or stevia for a different sweet flavor. Each option will bring its own character to the drink!

  • Chocolate Twist: Substitute vanilla ice cream with chocolate ice cream for a rich, double chocolate delight. This will make your milkshake even more indulgent!

  • Nutty Flavor: Add a tablespoon of almond or hazelnut butter to enrich the taste and texture with a nutty flavor. It enhances complexity and adds healthy fats!

  • Spicy Kick: Incorporate a pinch of chili powder or cayenne for those who fancy a bit of heat. The combination of sweet and spicy is utterly exciting!

  • Fun Toppings: Use crushed cookies or candy corn as toppings for an extra Halloween spirit. It adds a festive crunch that’s fun and engaging for everyone, especially kids!

  • Fat-Free Option: For a lighter version, use fat-free ice cream or yogurt for a guilt-free indulgence, making it a healthier treat without sacrificing flavor. For more enticing ways to enjoy ice cream, explore our delicious ice cream recipes.

Black Milkshake Recipe FAQs

What type of milk is best for the Black Milkshake?
I recommend using unsweetened cashew milk for a vegan and paleo option, but you can use any type of milk you prefer, except for canned coconut milk. Almond milk, oat milk, or even dairy milk will work beautifully, helping you achieve the perfect thickness that balances the creaminess of the ice cream.

How do I store leftovers of the Black Milkshake?
Any leftover Black Milkshake should be stored in a covered container in the fridge for up to 2 days. However, for the best flavor and texture, it’s best enjoyed fresh. If you want to store it longer, you can transfer it to a freezer-safe container, where it can last for up to 1 month. Just remember to leave some space in the container for expansion as it freezes.

Can I freeze the Black Milkshake?
Absolutely! To freeze your Black Milkshake, pour it into a freezer-safe container, ensuring you leave some space for it to expand. When you’re ready to enjoy it again, simply transfer the container to the fridge for a few hours or let it sit at room temperature for about 15 minutes. If it separates after thawing, give it a quick blitz in the blender to restore that wonderfully creamy texture.

What if my Black Milkshake is too thick or too thin?
If your milkshake ends up being thicker than you want, simply add a little more milk—about a tablespoon at a time—blending after each addition until you reach your desired consistency. On the other hand, if it turns out too thin, adding a touch more ice cream is an easy remedy! Don’t hesitate to taste and adjust the flavors as you go, especially with black cocoa, which gives that lovely Oreo-like sweetness.

Can pets have the Black Milkshake?
While you may be tempted to share this delightful treat with your furry friends, I would advise against it. Ingredients like vanilla ice cream and maple syrup aren’t ideal for pets, which can cause digestive issues. Stick to pet-safe treats for your beloved companions while you enjoy this indulgent milkshake!

Is there a non-vegan option for the Black Milkshake?
Yes! This recipe can easily be made with regular vanilla ice cream and dairy milk instead of vegan alternatives. If you’re not concerned about dietary restrictions, simply substitute the ingredients accordingly to enjoy the same deliciously thick and creamy Black Milkshake experience!

Black Milkshake

Indulge in a Thick Black Milkshake: Vegan & Paleo Delight

This Black Milkshake is a creamy, decadent treat perfect for Halloween, blending vanilla ice cream and black cocoa powder without artificial colors.
Prep Time 15 minutes
Chilling Time 10 minutes
Total Time 25 minutes
Servings: 2 glasses
Course: Drinks
Cuisine: American
Calories: 320

Ingredients
  

For the Milkshake
  • 2 scoops Vanilla Ice Cream Use vegan ice cream for a dairy-free alternative.
  • 1 cup Milk Any kind except canned coconut milk; unsweetened cashew milk is a great vegan option.
  • 2 tablespoons Black Cocoa Powder Avoid regular cocoa for the best taste and visual appeal.
  • 1 tablespoon Maple Syrup Honey can substitute for non-vegan version.
  • 1 teaspoon Vanilla Extract Omit for a more chocolate-forward taste if desired.
For Toppings (Optional)
  • 1 cup Whipped Cream Can be left out for vegan and paleo variations.
  • 2 tablespoons Black Sanding Sugar Regular sugar can be used if you don’t have this on hand.

Equipment

  • blender
  • Mixing Bowl
  • Hand mixer
  • Serving Glasses

Method
 

Step-by-Step Instructions
  1. Start by pouring heavy cream into a mixing bowl. Whip the cream using a hand mixer on medium speed for about 3-5 minutes until stiff peaks form. Transfer to the refrigerator to chill.
  2. Brush the rims of serving glasses with maple syrup, then dip the wet rims into black sanding sugar. Chill the glasses for about 10 minutes.
  3. In a blender, combine the vanilla ice cream, milk, black cocoa powder, maple syrup, and vanilla extract. Blend on high speed for about 30-45 seconds until smooth.
  4. Check the consistency; if too thick, add a splash of milk and blend again until desired thickness is achieved.
  5. Pour the creamy Black Milkshake into prepared glasses. Top with whipped cream and sprinkle with additional black sanding sugar or chocolate shavings.

Nutrition

Serving: 1glassCalories: 320kcalCarbohydrates: 45gProtein: 5gFat: 15gSaturated Fat: 10gCholesterol: 45mgSodium: 150mgPotassium: 300mgFiber: 1gSugar: 30gVitamin A: 500IUCalcium: 150mgIron: 1mg

Notes

Use high-quality, dense ice cream for the best texture. Chilling the glasses enhances presentation. Adjust milk for preferred thickness.

Tried this recipe?

Let us know how it was!

Scarecrow Crunch Snack Mix Recipe: Irresistible Halloween Treat

Colorful leaves rustle underfoot, and the air is filled with the sweet embrace of fall. As Halloween approaches, it’s the perfect time to bring festive spirit into our kitchens with treats that delight young and old alike. Enter my Scarecrow Crunch Snack Mix Recipe—a vibrant and fun way to celebrate the season! This easy snack mix combines decadent caramel corn with salty pretzels, creating a harmonious balance sure to excite taste buds at any gathering. Not only is it a quick whip-up that’ll leave you ample time for pumpkin carving or costume planning, but it also makes for adorable treat bags to surprise friends and family. So grab your mixing bowl, and let’s explore how to make this snack that captures the essence of Halloween. Are you ready to crunch into some seasonal fun?

Why is This Snack Mix a Must-Try?

Easy to Make: This Scarecrow Crunch Snack Mix comes together in minutes, meaning you can whip it up before your Halloween festivities without breaking a sweat.

Festive Appeal: Bursting with vibrant colors and seasonal candies, this treat is sure to be the highlight at your next party, resembling a delightful autumn landscape in a bowl.

Sweet and Salty Balance: The combination of caramel corn and pretzels creates a perfect mix of flavors, pleasing even the pickiest eaters—perfect for both kids and adults alike!

Customizable Fun: With options to substitute or add in your favorite ingredients, you can tailor this mix to suit your taste, just like our delicious Cheesy Hamburger Potato or a cozy Broccoli Cheddar Soup.

Crowd-Pleaser: Whether it’s a Halloween party, a school snack, or surprise treat bags for neighbors, this snack mix is sure to impress and spread smiles wherever it’s shared!

Scarecrow Crunch Snack Mix Ingredients

• Get ready for a colorful bite!

For the Base

  • Caramel Corn with Nuts – Provides a sweet, crunchy base; swap with nut-free caramel corn if needed.
  • Shreddies Cereal – Adds delightful texture and whole grain; substitute with Life cereal or Chex if unavailable.
  • Pretzel Twists – Contributes a salty crunch; mini pretzels can work if you want a change.

For the Treats

  • Candy Corn – A Halloween classic that adds sweetness and color; use other fall-themed candies as alternatives.
  • Candy Pumpkins – Bring festive flair and sweetness; can be replaced with seasonal candy or omitted if not on hand.
  • Reese’s Pieces – Imparts a delicious chocolatey peanut butter taste; M&M’s make a nut-free substitute.
  • Mini Rolos – Offer a mix of caramel and chocolate; swap with any chocolate-covered candy or leave out if desired.

This Scarecrow Crunch Snack Mix is not just tasty, but it’s also a fun way to celebrate the Halloween season!

Step‑by‑Step Instructions for Scarecrow Crunch Snack Mix Recipe

Step 1: Combine the Base Ingredients
In a large mixing bowl, combine 4 cups of caramel corn, 2 cups of Shreddies cereal, and 2 cups of pretzel twists. Use a spatula or large wooden spoon to gently toss the ingredients together until they’re evenly distributed, ensuring you don’t crush the pretzels or cereal as you mix. This creates a sweet, crunchy base for your Scarecrow Crunch Snack Mix.

Step 2: Add the Candies
Next, fold in 1 cup of candy corn, 1 cup of candy pumpkins, 1 cup of Reese’s Pieces, and 1 cup of mini Rolos to the bowl. Carefully mix everything by using a gentle motion to maintain the integrity of the bits. As the vibrant candies mix in, you’ll notice the colors brightening up your Scarecrow Crunch Snack Mix and adding that festive Halloween spirit!

Step 3: Portion for Gifting (Optional)
If you plan to give this delightful mix as gifts, prepare small plastic treat bags. Using a measuring cup, portion about 1 cup of the Scarecrow Crunch Snack Mix into each bag, ensuring they’re generously filled. Tie the bags with cheerful orange ribbon to make them visually appealing, perfect for sharing at Halloween parties or giving to friends and neighbors.

Step 4: Serve or Store
Once you’ve mixed and portioned your Scarecrow Crunch Snack Mix, you can serve it immediately for a festive snack! Alternatively, if you want to save some for later, transfer the remaining mix into an airtight container. Store it at room temperature for up to a week, keeping it fresh and crunchy for your autumn gatherings.

Scarecrow Crunch Snack Mix Variations

Feel free to get creative with your Scarecrow Crunch Snack Mix and make it uniquely yours!

  • Nut-Free: Use nut-free caramel corn and swap Reese’s Pieces for M&M’s to keep it safe for allergy concerns.
  • Gluten-Free: Opt for gluten-free pretzels and cereal to accommodate dietary restrictions without losing the fun flavors!
  • Choco-Lover: Drizzle melted chocolate over the mix or toss in chocolate chips for an extra sweet treat. The rich chocolatey goodness will take this nut-free delight to another level!
  • Spicy Twist: Add a sprinkle of chili powder or crushed red pepper flakes for an unexpected heat that contrasts beautifully with the sweetness. Just a little kick can make your snack feel exciting!
  • Dried Fruits: Swap some candies for dried fruits like cranberries or raisins for an earthy touch. It brings in chewy texture while still boosting the flavor profile!
  • Pumpkin Spice: Incorporate a teaspoon of pumpkin spice into your mix for a seasonal nod to fall flavors; perfect for celebrating autumn!
  • Savory Version: Try adding cheese-flavored crackers instead of pretzels to create a unique savory flavor profile that balances with the sweetness. It’ll surprise everyone in the best way!

For even more culinary inspiration, why not check out our hearty Mexican Taco Soup or enjoy the comforting warmth of Cabbage Fat Burning Soup? Happy snacking!

What to Serve With Scarecrow Crunch Snack Mix?

Indulging in a sweet-salty treat like this will surely elevate your festive gathering and delight everyone at the table.

  • Crispy Apple Slices: The crunch of fresh apples provides a refreshing contrast to the snack mix, making it a vibrant, seasonal addition.

  • Pumpkin Spice Cookies: These soft treats lend a warm, spicy flavor that enhances the autumn theme, bringing a cozy feel to your Halloween celebration.

  • Cheesy Nachos: The melty cheese and savory crunch create a fun balance to the sweetness of the Scarecrow Crunch, making for a tasty explosion of flavors.

  • Hot Apple Cider: A warm sip of spiced cider wraps you in the essence of fall, perfectly balancing the mix’s sweetness while keeping the cozy vibes going.

  • Mini Chocolate Cupcakes: These bite-sized delights add a rich, chocolatey bite that pairs beautifully with the crunchy mix; plus, they look great on any dessert table.

  • Savory Homemade Pretzels: Pairing salty pretzels with the sweet mix enhances the textures, creating a delightful snacking experience for both kids and adults alike.

  • Pumpkin Seeds: These crunchy, roasted seeds introduce a nutty flavor that complements the sweet notes of the mix, adding depth to your autumn spread.

With these ideas, your Scarecrow Crunch Snack Mix can take center stage among a delightful array of treats that will leave everyone raving!

How to Store and Freeze Scarecrow Crunch Snack Mix

Room Temperature: Store the Scarecrow Crunch Snack Mix in an airtight container at room temperature for up to a week to maintain freshness.

Fridge: If you prefer, you can refrigerate the mix, but be cautious—this may affect the crunchiness slightly due to moisture.

Freezer: While this snack is best enjoyed fresh, you can freeze it for up to 3 months. Make sure to use a freezer-safe container to prevent freezer burn.

Reheating: If you’re enjoying leftovers, simply let the mix come to room temperature before indulging; there’s no need to reheat!

Make Ahead Options

These Scarecrow Crunch Snack Mix preparations are perfect for busy home cooks who want to save time while still delivering festive treats! You can prepare and mix the base ingredients (caramel corn, Shreddies, and pretzels) up to 24 hours in advance. Simply store them in an airtight container at room temperature to maintain their crispiness. The candy elements (candy corn, candy pumpkins, Reese’s Pieces, and mini Rolos) can be added closer to serving time to prevent any melting or stickiness. When you’re ready to serve, just add the candies to your prepped mix, stir gently, and voila—an effortless, delicious Scarecrow Crunch Snack Mix that’s just as delightful as if you made it fresh!

Expert Tips for Scarecrow Crunch Snack Mix

  • Mixing Magic: Use a large bowl to avoid spills and ensure easier mixing of your Scarecrow Crunch Snack Mix without crushing ingredients.

  • Gentle Touch: Stir the mixture gently to keep the pretzels and cereal intact—nobody wants a soggy snack!

  • Nut-Free Option: When making this mix nut-free, double-check that the caramel corn is also nut-free, replacing Reese’s Pieces with M&M’s for safety.

  • Sweetness Control: Since candy varieties can differ in sweetness, feel free to adjust the amount of candy corn and candy pumpkins based on your family’s preferences.

  • Make It Festive: Add seasonal sprinkles or drizzle some melted chocolate on top for an extra festive touch and to make your mix even more appealing!

Scarecrow Crunch Snack Mix Recipe FAQs

What type of caramel corn should I use?
Absolutely! For the best results, I recommend using caramel corn with nuts for that sweet and crunchy base. However, if you’re preparing a nut-free version, simply opt for caramel corn without nuts, which is widely available. This ensures that everyone can enjoy the mix without any allergy concerns!

How should I store the Scarecrow Crunch Snack Mix?
You can store your Scarecrow Crunch Snack Mix in an airtight container at room temperature for up to a week. Keeping it sealed will help maintain its crunchiness and flavor. If you prefer, you can store it in the fridge, but be cautious, as the moisture might affect the texture.

Can I freeze the Scarecrow Crunch Snack Mix?
Yes, you can freeze this snack mix for up to 3 months! To do so, transfer the mix into a freezer-safe container or zip-top bag, removing as much air as possible to prevent freezer burn. When you’re ready to enjoy it, simply let it thaw at room temperature. It’s a wonderful way to make this treat last beyond the Halloween season!

What should I do if my mix looks soggy?
If you find your Scarecrow Crunch Snack Mix has turned out soggy, don’t worry! This usually happens from excess moisture. I recommend drying it out slightly by spreading the mix on a baking sheet in a preheated oven at 250°F (120°C) for about 15-20 minutes. Keep an eye on it to prevent burning. This should help revive the crunch!

Are there alternatives for the candy ingredients?
Very much so! Feel free to customize your Scarecrow Crunch Snack Mix to suit your taste or dietary needs. If you’re allergic to peanuts, swap out the Reese’s Pieces for M&M’s. Additionally, if candy corn isn’t your thing, you could use any festive fall-themed candy or simply omit it altogether for a simpler, yet still delightful, mix!

What if I want to make this healthier?
You can absolutely make this snack mix healthier! Consider using air-popped popcorn instead of caramel corn for a lighter base, and swap sugary candies for dried fruit or nuts. This way, you can still enjoy a festive treat while keeping it a bit healthier.

Scarecrow Crunch Snack Mix Recipe

Scarecrow Crunch Snack Mix Recipe: Irresistible Halloween Treat

Get ready for Halloween with this Scarecrow Crunch Snack Mix Recipe, a vibrant blend of sweet and salty flavors that everyone will love.
Prep Time 15 minutes
Total Time 15 minutes
Servings: 12 cups
Course: Appetizers
Cuisine: American
Calories: 150

Ingredients
  

Base Ingredients
  • 4 cups caramel corn swap with nut-free caramel corn if needed
  • 2 cups Shreddies cereal substitute with Life cereal or Chex if unavailable
  • 2 cups pretzel twists mini pretzels can work if you want a change
Treats
  • 1 cup candy corn use other fall-themed candies as alternatives
  • 1 cup candy pumpkins can be replaced with seasonal candy or omitted if not on hand
  • 1 cup Reese’s Pieces M&M’s make a nut-free substitute
  • 1 cup mini Rolos swap with any chocolate-covered candy or leave out if desired

Equipment

  • large mixing bowl
  • spatula
  • Measuring cups
  • plastic treat bags

Method
 

Step-by-Step Instructions
  1. Combine the base ingredients: In a large mixing bowl, combine the caramel corn, Shreddies cereal, and pretzel twists. Toss gently until evenly combined.
  2. Add the candies: Fold in the candy corn, candy pumpkins, Reese’s Pieces, and mini Rolos, mixing gently to maintain the candy bits.
  3. Portion for gifting (optional): Prepare small treat bags and portion about 1 cup of the mix into each bag.
  4. Serve or store: Serve immediately or transfer the mix to an airtight container for storage.

Nutrition

Serving: 1cupCalories: 150kcalCarbohydrates: 25gProtein: 3gFat: 6gSaturated Fat: 2gPolyunsaturated Fat: 1gMonounsaturated Fat: 2gSodium: 200mgPotassium: 50mgFiber: 1gSugar: 10gVitamin A: 200IUCalcium: 20mgIron: 1mg

Notes

This colorful snack mix is also customizable; feel free to add your favorite ingredients for a personal touch.

Tried this recipe?

Let us know how it was!

Pumpkin Cinnamon Rolls That Melt in Your Mouth

As I whisked together the ingredients, the air was soon filled with the cozy scent of warm spices—a delightful precursor to the magic of Pumpkin Cinnamon Rolls. These fluffy rolls, infused with pumpkin goodness and complemented by a rich coffee maple cream cheese icing, are a twist on the classic comfort food we crave, especially during chilly mornings. One of the best parts? They’re incredibly quick to whip up and can easily be customized with your favorite fillings. Whether you’re serving them at brunch or simply treating yourself, these rolls bring a touch of warmth and joy to any kitchen. Shall we dive into the recipe and create some sweet memories together?

Why are these rolls a must-try?

Irresistible Comfort: There’s something magical about warm, fluffy rolls that bring people together. These Pumpkin Cinnamon Rolls are perfect for cozy gatherings or quiet mornings.

Unique Twist: Infused with rich pumpkin flavor, they offer a delightful alternative to your average cinnamon roll, elevating your baking game effortlessly.

Customizable: Want to mix things up? Feel free to experiment! Try adding nuts or swapping pumpkin for apple sauce or butternut squash for a refreshing take.

Fast and Fun: With straightforward steps, even novice bakers can whip up this delicious treat in no time.

Perfect Pairing: Enjoy them warm with a cup of coffee or tea for an unbeatable combination; a match made in heaven! Want more delightful twists? Don’t miss out on Foster Cinnamon Rolls or our Apple Crisp Cinnamon Roll Casserole; both are sure to satisfy your sweet cravings!

Pumpkin Cinnamon Rolls Ingredients

For the Dough
All-Purpose Flour – Provides structure; you can substitute with bread flour for a different texture.
Active Dry Yeast – Leavens the dough for a light, airy texture; instant yeast can be used in equal amounts.
Milk – Adds moisture and richness; use lukewarm milk for best results.
Sugar – Sweetens the dough and filling; brown sugar can deepen flavor, or reduce for less sweetness.
Butter – Adds richness and flavor; unsalted butter is preferred.
Reduced Pumpkin Puree – Enhances flavor and moisture; it’s crucial to reduce it down for a thicker consistency.
Eggs – Enriches dough and contributes to structure; room temperature eggs are ideal for incorporation.
Salt – Enhances flavor and strengthens gluten structure; use Diamond Crystal kosher salt for best results.
Ground Cinnamon & Cardamom – Provide spice and warmth; feel free to adjust spice levels to your taste.

For the Icing
Cream Cheese – Used for icing, providing creaminess and tanginess; you may substitute with mascarpone for a different flavor profile.
Maple Syrup – Adds sweetness and a rich flavor to icing; honey can be used as an alternative.

This combination makes the Pumpkin Cinnamon Rolls not only fluffy and delicious but also an extraordinary treat that everyone will love.

Step‑by‑Step Instructions for Pumpkin Cinnamon Rolls

Step 1: Prepare Dough
In a large mixing bowl, combine 1 cup of lukewarm milk, 1/4 cup of sugar, and 2¼ teaspoons of active dry yeast. Let the mixture sit for about 5–10 minutes until it becomes frothy. Then, stir in 1/4 cup of melted unsalted butter, 1 large room temperature egg, and 1 cup of reduced pumpkin puree. Gradually fold in 3–4 cups of all-purpose flour, 1 teaspoon of ground cinnamon, and 1 teaspoon of salt. Knead the dough for about 8–10 minutes until smooth and elastic.

Step 2: First Rise
Place the kneaded dough in a greased bowl, covering it with a clean kitchen towel. Allow the dough to rise in a warm area until it doubles in size, which should take about 1 to 2 hours. Keep an eye on the dough—it’s ready when it feels airy and puffy, with a soft, slightly sticky texture.

Step 3: Prepare Filling
While the dough is rising, create your filling by mixing 1/2 cup of softened unsalted butter, 1 cup of brown sugar, 1 tablespoon of ground cinnamon, and a pinch of cardamom in a bowl. Use a hand mixer or a fork to blend until it’s smooth and spreadable. Set this mixture aside for later use in your Pumpkin Cinnamon Rolls.

Step 4: Shape Rolls
Once the dough has risen, punch it down to release any air bubbles. On a lightly floured surface, roll the dough into a rectangle approximately 16×12 inches. Spread the prepared filling evenly over the dough, leaving a small border around the edges. Starting from one long side, carefully roll the dough into a tight log and pinch the seam to seal. Cut the log into 12 equal pieces using a sharp knife or a bench scraper.

Step 5: Second Rise
Arrange the cut rolls in a greased 9×13 inch baking dish, spacing them evenly. Cover the dish with a towel and let the rolls rise for another 30–60 minutes until they are puffy and almost touching each other. You’ll know they are ready when they have nearly doubled in size, appearing soft and fluffy.

Step 6: Bake
Preheat your oven to 350°F (175°C). Once heated, bake the Pumpkin Cinnamon Rolls for 25–30 minutes. These rolls are done baking when they turn golden brown on top and your kitchen is filled with a warm, inviting aroma. Allow them to cool slightly in the pan after baking.

Step 7: Make Icing
While the rolls are cooling, prepare the coffee maple cream cheese icing. In a bowl, mix 4 ounces of softened cream cheese, 1/4 cup of maple syrup, and 1 tablespoon of brewed coffee until smooth and well combined. To achieve the best consistency, ensure that the cream cheese is at room temperature before mixing.

Step 8: Ice the Rolls
Once the Pumpkin Cinnamon Rolls have cooled for about 10 minutes, drizzle the creamy icing generously over the top. Allow the icing to soak slightly into the warm rolls, making each bite more delightful. Enjoy the soft, fluffy goodness of your homemade Pumpkin Cinnamon Rolls!

Expert Tips for Pumpkin Cinnamon Rolls

  • Perfect Pumpkin Purée: Make sure to reduce your pumpkin purée properly. This prevents the dough from becoming soggy, ensuring a delightful texture.

  • Temperature Matters: Use lukewarm milk, around 110°F, to activate the yeast nicely without killing it, leading to lighter rolls.

  • Knead with Care: Knead the dough until it’s smooth and elastic. This develops gluten, giving the Pumpkin Cinnamon Rolls that lovely fluffy texture.

  • Watch Your Timing: Keep an eye on the rising times—over-proofing can lead to rolls that collapse, while under-proofing can result in dense rolls.

  • Icing Consistency: Let your cream cheese come to room temperature before mixing. This ensures a silky-smooth coffee maple icing that drapes beautifully over each roll.

  • Storage Smart: If you have leftovers, store them in an airtight container at room temperature for up to two days to maintain their fluffiness.

Make Ahead Options

These delightful Pumpkin Cinnamon Rolls are perfect for meal prep enthusiasts! You can prepare the dough and filling up to 24 hours in advance. Simply follow the initial steps of making the dough and filling, then store them separately in airtight containers in the refrigerator to maintain their quality. When you’re ready to enjoy your rolls, let the dough sit at room temperature for about 30 minutes before shaping, and then continue with the second rise and baking steps. By prepping ahead, you’ll save valuable time for busy mornings while still delighting in warm, fluffy cinnamon rolls that are just as delicious as freshly made!

Storage Tips for Pumpkin Cinnamon Rolls

Room Temperature: Store leftover Pumpkin Cinnamon Rolls in an airtight container for up to 2 days to maintain their softness and flavor.

Fridge: If you wish to keep them longer, you can refrigerate them in a tightly sealed container for up to 5 days. Just make sure to warm them slightly before serving!

Freezer: For longer storage, wrap each roll individually in plastic wrap and then place them in a freezer-safe bag or container. They’ll stay fresh for up to 2 months.

Reheating: When you’re ready to enjoy, simply reheat the frozen rolls in the oven at 350°F (175°C) for about 10-15 minutes or until warmed through for that fresh-out-of-the-oven taste.

What to Serve with Pumpkin Cinnamon Rolls

Warm, cozy mornings are best spent indulging in fluffy delights that awaken your senses and create memories.

  • Coffee: The rich flavors of coffee perfectly balance the sweetness of the rolls, enhancing their flavors while providing a fulfilling morning boost.
  • Hot Tea: Enjoy a soothing cup of chai or Earl Grey alongside your rolls, as the spices in the tea complement the cinnamon beautifully.
  • Fruit Salad: A fresh, tangy fruit salad adds a refreshing contrast to the warm, spiced rolls, making for a delightful balance of flavors and textures.
  • Creamy Scrambled Eggs: The light, airy texture of scrambled eggs pairs wonderfully with the rolls for a heartier breakfast that feels indulgent yet comforting.
  • Maple Syrup Drizzle: For an extra touch of sweetness, drizzle some warm maple syrup over the rolls; the rich flavors intertwine beautifully with the coffee maple cream cheese icing.
  • Nutty Granola: A sprinkle of nutty granola on the side can introduce a crunchy texture, enhancing the overall experience and providing a satisfying bite.
  • Yogurt Parfait: Layered yogurt with honey and nuts offers a creamy tanginess and perfectly contrasts the sweetness of your Pumpkin Cinnamon Rolls.
  • Pumpkin Spice Latte: Celebrate the season by pairing your rolls with a pumpkin spice latte; the warm spices echo the flavors of the rolls, making them a match made in heaven.
  • Apple Cider: A complimentary drink option, warm spiced apple cider invites a cozy vibe and adds touch of sweetness to your breakfast.

Pumpkin Cinnamon Rolls Variations & Substitutions

Feel free to let your creativity shine and customize these delightful rolls to suit your preferences!

  • Apple Sauce: Replace pumpkin with apple sauce for a fruity twist that adds extra moisture. You’ll be amazed by the comforting flavors!
  • Nutty Filling: Add chopped pecans or walnuts to the filling for a delightful crunch. This simple tweak will elevate your rolls with texture and richness.
  • Spice It Up: Increase the amount of ground cinnamon or add nutmeg for a bolder flavor. The warm spices will create a fragrant experience that’s hard to resist.
  • Vanilla Icing: Swap coffee with vanilla extract in the icing for a sweeter option. This change will highlight the creaminess of the cheese, creating a heavenly drizzle over your rolls.
  • Dairy-Free: Use almond milk and coconut oil to make the recipe dairy-free without losing flavor. Just remember to adjust the amount of sugar, as some plant-based milks can differ in sweetness.
  • Gluten-Free: Substitute all-purpose flour with a gluten-free blend to accommodate dietary needs. Be sure to check for a blend suitable for yeast recipes, ensuring fluffy rolls!
  • Pumpkin Spice: Incorporate pumpkin spice seasoning into the dough for an aromatic twist that enhances the seasonal flavor. Just a teaspoon will do wonders!
  • Heat Wave: Add a pinch of cayenne pepper to the icing for a surprising kick. This unique combination will delight adventurous taste buds, making your rolls unforgettable!

Why not serve these delicious rolls next to a warm bowl of Joumou Haitian Pumpkin Soup? The cozy flavors are a match made in heaven! Enjoy your baking adventure!

Pumpkin Cinnamon Rolls Recipe FAQs

How do I choose the right pumpkin for this recipe?
When selecting pumpkin for your Pumpkin Cinnamon Rolls, look for canned pumpkin puree or fresh sugar pumpkins, which are sweeter and creamier. Avoid using pie filling, as it’s already sweetened and spiced. The puree should be thick without excess water—too much moisture can lead to soggy rolls.

How should I store my Pumpkin Cinnamon Rolls?
To keep your Pumpkin Cinnamon Rolls fresh, store them in an airtight container at room temperature for up to 2 days. If you’d like to keep them longer, refrigerate for up to 5 days, but be sure to warm them slightly before serving to restore their fluffy texture.

Can I freeze Pumpkin Cinnamon Rolls?
Absolutely! For the best freezing results, wrap each roll individually in plastic wrap and then place them in a freezer-safe bag or container. They can be stored in the freezer for up to 3 months. When you’re ready to enjoy them, reheat the rolls in the oven at 350°F (175°C) for about 10-15 minutes.

What can I do if my dough isn’t rising properly?
If your dough isn’t rising, it’s likely due to the yeast not activating. Make sure your milk is lukewarm (about 110°F) and check the expiration date on your yeast. If the dough hasn’t risen after the first hour, you can try moving it to a warmer spot, or gently kneading in a bit more flour if it’s too wet.

Are Pumpkin Cinnamon Rolls suitable for people with allergies?
These rolls contain common allergens like gluten, dairy, and eggs. If you have specific dietary restrictions, consider using gluten-free flour, dairy-free butter, and flax eggs as substitutes. Always double-check labels for allergens, especially with pre-packaged ingredients like cream cheese or maple syrup.

Pumpkin Cinnamon Rolls

Pumpkin Cinnamon Rolls That Melt in Your Mouth

Delight in these Pumpkin Cinnamon Rolls, infused with warm spices and topped with a rich coffee maple cream cheese icing.
Prep Time 1 hour
Cook Time 30 minutes
Rising Time 2 hours
Total Time 3 hours 30 minutes
Servings: 12 rolls
Course: Dessert
Cuisine: American
Calories: 250

Ingredients
  

For the Dough
  • 3-4 cups All-Purpose Flour Can substitute with bread flour for different texture
  • 2.25 teaspoons Active Dry Yeast Instant yeast can be used in equal amounts
  • 1 cup Milk Lukewarm for best results
  • 1/4 cup Sugar Brown sugar can deepen flavor
  • 1/4 cup Butter Unsalted preferred
  • 1 cup Reduced Pumpkin Puree Must be reduced for thicker consistency
  • 1 large Egg Room temperature is ideal
  • 1 teaspoon Salt Use Diamond Crystal kosher salt for best results
  • 1 teaspoon Ground Cinnamon Adjust spice levels to taste
  • 1 teaspoon Ground Cardamom Adjust spice levels to taste
For the Icing
  • 4 ounces Cream Cheese Can substitute with mascarpone
  • 1/4 cup Maple Syrup Honey can be used as an alternative
  • 1 tablespoon Brewed Coffee

Equipment

  • Mixing Bowl
  • baking dish
  • Rolling Pin
  • Oven
  • Hand mixer

Method
 

Step-by-Step Instructions for Pumpkin Cinnamon Rolls
  1. In a large mixing bowl, combine lukewarm milk, sugar, and active dry yeast. Let sit for 5-10 minutes until frothy.
  2. Stir in melted butter, egg, and pumpkin puree. Gradually fold in flour, cinnamon, and salt.
  3. Knead the dough for 8-10 minutes until smooth and elastic.
  4. Place the dough in a greased bowl and cover. Let it rise until doubled in size, about 1-2 hours.
  5. Mix softened butter, brown sugar, cinnamon, and cardamom for the filling.
  6. Roll the dough into a rectangle, spread filling, and roll into a log. Cut into 12 pieces.
  7. Arrange rolls in a greased baking dish and let rise again for 30-60 minutes.
  8. Preheat oven to 350°F (175°C) and bake for 25-30 minutes.
  9. Prepare icing by mixing cream cheese, maple syrup, and brewed coffee.
  10. Drizzle icing over warm rolls after cooling for 10 minutes.

Nutrition

Serving: 1rollCalories: 250kcalCarbohydrates: 35gProtein: 3gFat: 10gSaturated Fat: 5gCholesterol: 20mgSodium: 180mgPotassium: 150mgFiber: 1gSugar: 10gVitamin A: 200IUVitamin C: 1mgCalcium: 50mgIron: 1mg

Notes

Use lukewarm milk to activate yeast properly and reduce pumpkin puree to prevent sogginess.

Tried this recipe?

Let us know how it was!

Mini Pumpkin Pie Crescent Rolls for Cozy Fall Indulgence

The aroma of fall wafts through the air as I pull a golden tray of Mini Pumpkin Pie Crescent Rolls from the oven. Flaky and warm, these delightful bites offer a little twist on traditional pumpkin pie, making them a charming addition to any meal. The best part? They come together in just 20 minutes, making them perfect for a quick breakfast or an engaging snack to share with friends. The creamy, spiced filling can feature everything from pumpkin puree to sweet potato, allowing for creative fun with leftovers. Plus, they are the ultimate crowd-pleaser, satisfying cravings for comfort in a smokin’ hot package. Fancy treating yourself to a cozy kitchen moment today? Let’s dive into this easy fall dessert!

Why are these crescent rolls a must-try?

Simplicity at its Finest: These Mini Pumpkin Pie Crescent Rolls are a breeze to whip up, making them an easy fall dessert perfect for busy days.

Irresistible Flavor: The combination of spiced pumpkin filling and flaky pastry creates a mouthwatering bite that will have everyone coming back for seconds!

Versatile Treat: Feel free to substitute the pumpkin with sweet potato for a delicious twist or even add chocolate chips for extra indulgence!

Perfect for Leftovers: Have some leftover pumpkin from another recipe? These rolls are a delightful way to use it up. Consider pairing them with a warm cider or your favorite coffee for an autumn-inspired brunch that feels extra cozy.

Crowd-Pleaser: With their playful presentation and comforting flavors, these crescent rolls are sure to impress family and friends alike—perfect for gatherings or cozy nights in.

Mini Pumpkin Pie Crescent Rolls Ingredients

For the Filling

  • Pumpkin Puree – The main filling component that brings moisture and rich flavor; use canned or homemade.
  • Egg Yolk – Binds the filling ingredients together, enhancing the richness; no direct substitute is recommended.
  • Brown Sugar – Adds sweetness and depth while pairing beautifully with the pumpkin; can substitute with coconut sugar for a caramelized flavor.
  • Granulated Sugar – Balances the sweetness in the filling for a perfect bite.
  • Pumpkin Pie Spice – Delivers the traditional warm spice flavor; substitute with a mix of cinnamon, nutmeg, and ginger if necessary.

For the Pastry

  • Puff Pastry Sheets – Creates a flaky crust that encases the delightful filling; refrigerated crescent rolls are a quicker option.
  • Butter (for brushing) – Adds a touch of richness to the crust; optional for a dairy-free version.

These Mini Pumpkin Pie Crescent Rolls are sure to become a cherished family favorite, effortlessly prepared with leftover pumpkin and bursting with autumn comfort!

Step‑by‑Step Instructions for Mini Pumpkin Pie Crescent Rolls

Step 1: Prepare the Filling
In a mixing bowl, combine the pumpkin puree, egg yolk, brown sugar, granulated sugar, and pumpkin pie spice. Use a whisk or spatula to blend the ingredients until the mixture is smooth and well incorporated, creating a rich filling that embodies the flavors of fall. Set this aside while you prepare the pastry.

Step 2: Prepare the Pastry
Preheat your oven to 375°F (190°C) and line a baking sheet with parchment paper. If using puff pastry, roll it out on a floured surface until it’s about 1/8-inch thick. Alternatively, open your package of refrigerated crescent rolls. Cut the pastry into triangles or rectangles, ensuring they are large enough to hold the filling.

Step 3: Fill and Roll
Take a spoonful of your pumpkin filling and spread it evenly on the center of each pastry piece. Carefully roll each piece from the wide end toward the point, sealing the edges gently to create a tight cylinder. Place the rolled crescent rolls on the prepared baking sheet, ensuring they have space between them for even baking.

Step 4: Bake the Rolls
Melt some butter and brush a generous layer over the top of each rolled crescent. Carefully transfer the baking sheet to the preheated oven and bake for 15-20 minutes, or until the crescent rolls are golden brown and puffed up. Keep an eye on them to avoid overbaking, as you want a perfectly flaky exterior.

Step 5: Cool and Serve
Once baked, remove the mini pumpkin pie crescent rolls from the oven and allow them to cool on the baking sheet for about 5 minutes. This cooling time will help set the filling slightly. Serve them warm or at room temperature, and prepare for compliments on your delightful Mini Pumpkin Pie Crescent Rolls!

What to Serve with Mini Pumpkin Pie Crescent Rolls

Indulge in a cozy fall feast by pairing these delightful crescent rolls with complementary flavors and textures that will elevate your meal.

  • Warm Apple Cider: The sweetness and spice of apple cider perfectly enhance the autumn vibes of your rolls, creating a comforting experience.

  • Creamy Vanilla Ice Cream: A scoop of vanilla ice cream adds a cool creaminess, balancing the warmth of the spiced filling beautifully.

  • Maple Glazed Bacon: This savory addition offers a salty crunch that contrasts wonderfully with the sweet pumpkin filling, providing an exciting flavor combination.

  • Spiced Chai Latte: The aromatic spices in a chai latte will resonate with the flavors of your crescent rolls, making for a heartwarming sip alongside your treats.

  • Roasted Brussels Sprouts: The nuttiness of roasted Brussels sprouts complements the pumpkin filling, adding a lovely textural contrast to your meal’s lineup.

  • Chocolate Drizzle: A light drizzle of melted dark chocolate can elevate these crescent rolls from delicious to decadent, adding a sweet, luxurious touch.

  • Candied Pecans: These crunchy, sweet treats make for an elegant topping, bringing an added layer of flavor and texture that dances in harmony with the rolls.

  • Fresh Cranberry Sauce: The tartness of cranberry sauce cuts through the richness of the filling, adding brightness that balances your bites perfectly.

Let your taste buds explore these harmonious pairings while savoring each bite of your Mini Pumpkin Pie Crescent Rolls!

Expert Tips for Mini Pumpkin Pie Crescent Rolls

  • Chilling Dough: Keep the puff pastry cold for the flakiest texture; if it warms up, it won’t puff as beautifully while baking.

  • Avoid Overfilling: Don’t add too much filling; this can cause the rolls to burst during baking. A spoonful in the center is just right!

  • Watch for Color: Bake until golden brown but check towards the end. Overbaking can lead to a dry filling, defeating the point of these delightful mini treats.

  • Flaky Finish: Brush with melted butter before baking for a rich, golden crust, but skip it if you prefer a dairy-free version.

  • Serve Warm: These Mini Pumpkin Pie Crescent Rolls are best enjoyed fresh from the oven, but you can reheat in the oven for a few minutes if made ahead.

Make Ahead Options

These Mini Pumpkin Pie Crescent Rolls are a perfect option for meal prep and can save you time on hectic days! You can prepare the pumpkin filling up to 24 hours in advance—just store it in an airtight container in the refrigerator to keep it fresh. Additionally, you can also roll out the pastry and fill them, placing the unbaked rolls on a baking sheet; cover with plastic wrap and refrigerate for up to 3 days. When you’re ready to bake, simply preheat your oven, brush the rolls with melted butter, and bake for 15-20 minutes until they’re golden brown. This will ensure your crescent rolls come out just as delicious as when you made them fresh!

Mini Pumpkin Pie Crescent Rolls Variations

Feel free to get creative with your Mini Pumpkin Pie Crescent Rolls to suit your taste and dietary preferences!

  • Sweet Potato: Swap pumpkin for roasted sweet potato for a slightly sweeter and denser filling. It brings a cozy twist to the classic flavor.

  • Nutty Crunch: Incorporate a handful of chopped walnuts or pecans into the filling for delightful crunch and extra flavor. The nuts add a layer of texture that makes every bite even more satisfying.

  • Chocolate Delight: Add a sprinkle of mini chocolate chips to your filling for a rich, decadent touch. The combination of chocolate and pumpkin is a match made in heaven!

  • Spice it Up: For an extra kick, throw in a pinch of cayenne pepper alongside your pumpkin pie spice. This subtle heat can elevate the flavor profile and add a warmth that pairs beautifully with fall.

  • Almond Extract: Switch vanilla extract for almond extract in the filling for a lovely almond aroma. It adds a unique twist that complements the pumpkin wonderfully.

  • Gluten-Free: Use a gluten-free puff pastry or make your own with almond flour for a gluten-free treat. Just be sure to adjust baking time as needed to achieve that perfect golden crisp!

  • Pumpkin Cream Cheese: Mix some cream cheese into your pumpkin filling for a tangy and creamy addition. This creates an almost cheesecake-like surprise inside!

  • Savory Swaps: Don’t shy away from savory; consider adding sautéed spinach and feta cheese for a delightful spinach pie twist that blends superbly with the pumpkin!

With all these fun options, you can easily change the vibe of your Mini Pumpkin Pie Crescent Rolls. And when you’re ready for a cozy meal, consider pairing these rolls with a bowl of Joumou Haitian Pumpkin Soup for an extra comforting experience!

How to Store and Freeze Mini Pumpkin Pie Crescent Rolls

Room Temperature: Keep the rolls in a covered container at room temperature for up to 2 days. This keeps them fresh and ready to enjoy!

Fridge: Store any leftover Mini Pumpkin Pie Crescent Rolls in an airtight container in the fridge for up to 3 days. Reheat in the oven to restore their flaky texture.

Freezer: For longer storage, freeze the baked rolls in a single layer on a baking sheet before transferring them to an airtight container or freezer bag. They will keep for up to 3 months.

Reheating: When ready to enjoy frozen rolls, bake them directly from frozen at 375°F (190°C) for about 15-20 minutes until heated through and crisp.

Mini Pumpkin Pie Crescent Rolls Recipe FAQs

What type of pumpkin puree should I use?
Absolutely! You can use either canned pumpkin puree or homemade pumpkin puree for this recipe. If using fresh pumpkin, make sure it’s cooked and blended until smooth. Canned pumpkin offers convenience and consistent texture, making it a popular choice for busy cooks!

How should I store leftover Mini Pumpkin Pie Crescent Rolls?
Very! To keep your mini crescent rolls fresh, store them in an airtight container at room temperature for up to 2 days. If you’d like them to last longer, you can refrigerate them for up to 3 days. Just reheat in the oven briefly to restore their delightful flaky texture!

Can I freeze Mini Pumpkin Pie Crescent Rolls?
Of course! To freeze these delightful little treats, first, place the baked rolls on a baking sheet in a single layer and freeze until solid. Once frozen, transfer them to an airtight freezer bag or container. They can be kept for up to 3 months! When you’re ready to enjoy, bake them directly from frozen at 375°F (190°C) for about 15-20 minutes until heated through.

What should I do if my pastry doesn’t puff up?
Don’t worry; it happens! If your pastry doesn’t puff up nicely, ensure it was cold before baking and not overfilled with the pumpkin mixture. Additionally, check your oven temperature with an oven thermometer; baking at the correct temperature is crucial for achieving that desired puff!

Are these rolls suitable for people with dairy allergies?
Definitely! To make the Mini Pumpkin Pie Crescent Rolls dairy-free, simply skip the melted butter for brushing the tops. You can also use a dairy-free puff pastry or refrigerated crescent rolls. Always double-check labels on premade ingredients to ensure they meet your dietary needs.

Can I use something other than pumpkin for the filling?
The more the merrier! While pumpkin is the star of this recipe, feel free to get creative! Sweet potato works wonderfully as a substitute, providing a similar texture and taste. You can also add chocolate chips or nuts for a little extra indulgence in the filling!

Mini Pumpkin Pie Crescent Rolls

Mini Pumpkin Pie Crescent Rolls for Cozy Fall Indulgence

These Mini Pumpkin Pie Crescent Rolls are a delightful twist on traditional pumpkin pie, perfect for a quick and cozy fall treat.
Prep Time 10 minutes
Cook Time 15 minutes
Cooling Time 5 minutes
Total Time 30 minutes
Servings: 12 rolls
Course: Dessert
Cuisine: American
Calories: 150

Ingredients
  

For the Filling
  • 1 cup Pumpkin Puree canned or homemade
  • 1 large Egg Yolk no direct substitute
  • 1/2 cup Brown Sugar can substitute with coconut sugar
  • 1/4 cup Granulated Sugar
  • 1 tbsp Pumpkin Pie Spice or mix of cinnamon, nutmeg, and ginger
For the Pastry
  • 1 package Puff Pastry Sheets or refrigerated crescent rolls
  • 2 tbsp Butter for brushing, optional for dairy-free

Equipment

  • Mixing Bowl
  • whisk
  • Baking Sheet
  • Parchment Paper
  • Oven

Method
 

Step-by-Step Instructions
  1. In a mixing bowl, combine the pumpkin puree, egg yolk, brown sugar, granulated sugar, and pumpkin pie spice. Blend until smooth.
  2. Preheat your oven to 375°F (190°C) and line a baking sheet with parchment paper. Roll out puff pastry or open crescent rolls and cut into triangles.
  3. Spread pumpkin filling on each pastry piece and roll from the wide end to the point, sealing edges.
  4. Brush melted butter on top of each roll. Bake for 15-20 minutes until golden brown.
  5. Allow to cool for 5 minutes before serving warm or at room temperature.

Nutrition

Serving: 1rollCalories: 150kcalCarbohydrates: 20gProtein: 2gFat: 7gSaturated Fat: 4gPolyunsaturated Fat: 1gMonounsaturated Fat: 2gCholesterol: 50mgSodium: 150mgPotassium: 100mgFiber: 1gSugar: 8gVitamin A: 2000IUVitamin C: 2mgCalcium: 20mgIron: 1mg

Notes

These rolls are best enjoyed fresh from the oven but can be reheated for a few minutes if made ahead.

Tried this recipe?

Let us know how it was!

Irresistibly Moist Cinnamon Crumb Pumpkin Bread Recipe

As the crisp autumn air settles in, I find myself reaching for my favorite ingredients that embody the essence of the season: warm spices, comforting pumpkin, and a touch of sweetness. Enter the ultimate Cinnamon Crumb Pumpkin Bread Recipe, a delightful baking adventure that combines the rich, moist goodness of pumpkin with a heavenly crumb topping. Not only is this bread quick to prepare, making it perfect for a cozy evening snack or brunch gathering, but its adaptable nature means you can easily lighten it up by omitting the streusel. Imagine a slice of this flavorsome bread paired with your morning coffee or as a charming dessert to impress friends. Curious about how to make this seasonal delight? Let’s dive in!

Why is this pumpkin bread irresistible?

Moist, Flavorful Delight: The combination of pumpkin puree and warm spices ensures each bite is packed with flavor and moisture.
Quick and Simple: With minimal prep time, you’ll have a delicious treat ready in no time—perfect for brunch or an afternoon snack!
Versatile Enjoyment: Whether enjoyed warm with a pat of butter or cold with cream cheese, this bread adapts to any occasion.
Customizable Options: Want to lighten the recipe? Omit the streusel or swap in gluten-free flour for a healthier twist.
To explore even more delicious recipes, check out my Bananas Foster Cinnamon or for a cozy dish, try the Mexican Taco Soup!

Cinnamon Crumb Pumpkin Bread Ingredients

For the Batter

  • All-Purpose Flour – Essential for the structure; opt for high-quality flour for the best results.
  • Baking Soda – This leavening agent helps the bread rise; make sure it’s fresh for optimal effectiveness.
  • Baking Powder – Works alongside baking soda to ensure a fluffy texture in your bread.
  • Cinnamon – Adds that warm, cozy flavor; using freshly ground cinnamon enhances the taste.
  • Pumpkin Pie Spice – A delightful blend of spices that elevates the autumn flavor profile of your bread.
  • Salt – Balances the sweetness perfectly; it’s a key component that enhances all flavors.
  • Canola Oil – Provides moisture and richness; can be swapped with melted coconut oil or unsweetened applesauce for a healthier option.
  • Eggs – Act as a binder and contribute to the moistness of the bread; no substitutions recommended.
  • Pumpkin Puree – The star of the show, ensuring moisture; be sure to use pure pumpkin, not pie filling.
  • Vanilla Extract – Adds depth and a comforting flavor that complements the other ingredients.
  • Dark Brown Sugar – Provides sweetness and moisture; light brown sugar can be a great substitute.
  • Sugar – Adjust the quantity to your sweetness preference, enhancing the overall flavor of the bread.

For the Streusel Topping

  • Unsalted Butter – Adds richness to the streusel; can be replaced with vegan butter or margarine for a healthier alternative.
  • Sugar – Sweetens the topping; consider adjusting the amount to your taste.
  • Cinnamon – Enhances the flavor of the topping, creating a wonderful aroma while baking.
  • All-Purpose Flour – Helps to bind the streusel together, providing that delightful crumble.

Indulge in this Cinnamon Crumb Pumpkin Bread recipe, and let every bite whisk you away to fall bliss!

Step‑by‑Step Instructions for Cinnamon Crumb Pumpkin Bread Recipe

Step 1: Preheat and Prepare
Begin by preheating your oven to 350°F (175°C). While it’s heating, take a 9×5-inch bread pan and generously spray it with nonstick cooking spray. This ensures that your delightful Cinnamon Crumb Pumpkin Bread releases easily after baking. Set the pan aside while you prepare the batter.

Step 2: Mix the Dry Ingredients
In a medium mixing bowl, whisk together 2 cups of all-purpose flour, 1 teaspoon of baking soda, 1 teaspoon of baking powder, 1 tablespoon of cinnamon, 1 teaspoon of pumpkin pie spice, and ½ teaspoon of salt. This combination of dry ingredients creates a flavorful foundation for your bread, so ensure they’re well blended. Once mixed, set the bowl aside to focus on the wet ingredients.

Step 3: Combine the Wet Ingredients
In another large bowl, mix together ½ cup of canola oil, 2 large eggs, 1 cup of pumpkin puree, and 1 teaspoon of vanilla extract. Once well combined, gradually add ¾ cup of dark brown sugar and ½ cup of granulated sugar, stirring until the mixture is smooth and creamy. The sugars add sweetness and moisture to your Cinnamon Crumb Pumpkin Bread.

Step 4: Merge Wet and Dry Ingredients
Carefully pour the dry ingredient mixture into the wet ingredients. Gently fold them together using a spatula until just combined, being cautious not to overmix. It’s okay to leave a few streaks of flour visible in the batter. This will keep your bread light and fluffy when baked to perfection.

Step 5: Pour and Prepare for Baking
Transfer the batter into your prepared 9×5-inch bread pan, smoothing the top with a spatula. If you opted for the delicious streusel topping, now is the time to sprinkle it generously over the batter, creating an irresistible crunch. Your oven should be ready, so slide the pan in and set a timer for 50-60 minutes.

Step 6: Check for Doneness
As your Cinnamon Crumb Pumpkin Bread bakes, keep an eye on it. After about 50 minutes, do the toothpick test: insert a toothpick into the center of the bread; it should come out clean or with a few moist crumbs attached. If it needs more time, continue baking, checking every 5 minutes until fully baked.

Step 7: Cool and Serve
Once your bread is perfectly baked, remove it from the oven and let it cool in the pan for about 5 minutes. Carefully run a knife along the edges to loosen it, then invert the pan to release the bread onto a wire rack. Allow it to cool completely before slicing; this will enhance the flavors and ensure a delightful texture in each piece.

Expert Tips for Cinnamon Crumb Pumpkin Bread

Perfect Flour Choice: Use high-quality all-purpose flour for structure; lower-quality alternatives can result in a dense loaf.

Fresh Leavening: Ensure your baking soda and baking powder are fresh; stale leaveners won’t give your bread the right rise.

Avoid Overmixing: Gently fold the dry ingredients into the wet mixture until just combined; overmixing can yield a tough bread.

Check Doneness Wisely: Use a toothpick to check for doneness; it should come out clean to avoid a gummy texture in your Cinnamon Crumb Pumpkin Bread.

Customize Wisely: Consider adding nuts to the streusel for added texture; just make sure to adjust baking times if using a smaller pan.

Storage Know-How: Store your bread in an airtight container at room temperature for up to 5 days to maintain moisture and flavor.

Cinnamon Crumb Pumpkin Bread Recipe Variations

Feel free to sprinkle your own flair onto this delightful recipe, transforming every bite into a new experience!

  • Gluten-Free: Substitute all-purpose flour with gluten-free flour for a version suitable for those with gluten sensitivities.
  • Nutty Addition: Stir in chopped walnuts or pecans for an added crunch and enhanced flavor; they complement the pumpkin beautifully.
  • Chocolate Lovers: Toss in some mini chocolate chips into the batter for a sweet twist; the rich chocolate pairs perfectly with the spices.
  • Spice it Up: Boost the aroma by doubling the cinnamon or adding a pinch of nutmeg; each variation brings a new depth of flavor.
  • Healthier Option: Omit the streusel topping or replace it with a sprinkle of oats for a wholesome crunch without the extra sugar.
  • Creamy Delight: Spread with cream cheese or whipped butter right before serving for an indulgent touch; it makes each slice even more decadent.
  • Seasonal Twist: Add dried cranberries or raisins for a festive twist that adds bursts of sweetness; it’s a delightful surprise in every bite.

To further explore delightful recipes, don’t miss my spin on the Apple Crisp Cinnamon for a cozy dessert or light, comforting Cheesy Hamburger Food to warm up your mealtime!

What to Serve with Cinnamon Crumb Pumpkin Bread

When the scent of cinnamon and pumpkin fills your home, it’s the perfect time to think about delightful pairings to create a satisfying meal.

  • Creamy Cream Cheese Spread: A rich layer of cream cheese adds tanginess and creaminess that beautifully balances the warm spices.
  • Maple Syrup Drizzle: A touch of maple syrup enhances the sweetness, offering a delightful contrast to the spiced pumpkin flavors.
  • Fresh Fruit Salad: Bright, juicy fruits provide a refreshing contrast to the rich bread, adding a touch of brightness to your plate.
  • Savory Breakfast Sausages: Hearty, savory sausages pair nicely, offering a satisfying saltiness that complements the sweetness.
  • Pumpkin Spice Latte: This cozy beverage echoes the flavors in your pumpkin bread, creating a perfect seasonal experience.
  • Chai Tea: With its warm spices, chai tea creates an inviting atmosphere, perfectly complementing the flavors of the bread.
  • Vanilla Ice Cream: Serve warm slices of bread with a scoop of vanilla ice cream—a comforting dessert that melts beautifully over the bread.
  • Nuts and Dried Fruits: A crunchy side of nuts or sweet dried fruits brings texture and flavor diversity, elevating your breakfast or snack.
  • Whipped Cream: A dollop of lightly sweetened whipped cream provides a delightful finish, making it a cozy indulgence to savor.
  • Autumn Salad: A vibrant salad with roasted squash, nuts, and cranberries balances richness with freshness, rounding out your meal beautifully.

Make Ahead Options

These Cinnamon Crumb Pumpkin Bread Recipe preparations are perfect for busy home cooks seeking to save time without sacrificing flavor! You can prepare the batter and refrigerate it up to 24 hours in advance; this keeps the flavors melded while ensuring freshness. Alternatively, mix and store the dry ingredients in an airtight container for up to 3 days. For the streusel topping, assemble it ahead and keep it in the fridge, preventing sogginess. When ready to bake, simply combine the wet and dry ingredients, pour into your prepared pan, and bake as directed. You’ll have delicious, homemade pumpkin bread ready with minimal effort, making your meal planning a breeze!

How to Store and Freeze Cinnamon Crumb Pumpkin Bread

Room Temperature: Store in an airtight container at room temperature for up to 5 days. This keeps your bread moist and flavorful, ready for a snack whenever you crave it.

Fridge: If you want to prolong its freshness, refrigerate your Cinnamon Crumb Pumpkin Bread for up to 7 days. Be sure to wrap it tightly to prevent it from drying out.

Freezer: For longer storage, wrap the bread well in plastic wrap and aluminum foil, then freeze it for up to 3 months. This preserves the delicious flavor and texture for when you want a cozy treat.

Reheating: To enjoy frozen bread, thaw it overnight in the fridge, then warm slices in a toaster or oven at 350°F (175°C) for about 10 minutes until heated through.

Cinnamon Crumb Pumpkin Bread Recipe FAQs

How do I choose the best pumpkin puree?
It’s important to select pure pumpkin puree rather than pumpkin pie filling for your Cinnamon Crumb Pumpkin Bread. Look for cans labeled “100% pumpkin” in the ingredient list and ensure there are no added sugars or spices, as you’ll be adding your own. If you have fresh pumpkin, you can roast it, scoop out the flesh, and puree it for an even fresher taste.

What is the best way to store leftover pumpkin bread?
To keep your Cinnamon Crumb Pumpkin Bread moist and flavorful, store it in an airtight container at room temperature for up to 5 days. If you expect it to last longer, refrigerate it in the same container for up to 7 days. Just make sure it’s wrapped well to prevent it from drying out, as bread can become stale quickly when exposed to air.

Can I freeze Cinnamon Crumb Pumpkin Bread?
Absolutely! To freeze your bread, wrap it tightly in plastic wrap and then in aluminum foil to prevent freezer burn. You can store it in the freezer for up to 3 months. When you’re ready to enjoy it again, simply thaw it in the fridge overnight and warm up slices in the toaster or oven for about 10 minutes at 350°F (175°C) to refresh its delightful flavors.

What should I do if my pumpkin bread is too dry or too dense?
If your Cinnamon Crumb Pumpkin Bread turns out dry, there could be a couple of reasons. Make sure you measure your ingredients accurately, especially the flour—too much flour can make the bread dense. Always spoon flour into your measuring cup and level it off with a knife. If your bread is too dry, the next time, you might want to include an extra tablespoon of oil or check that your baking powder and soda are fresh. If it’s too dense, try not to overmix the batter, as this can lead to tougher bread.

Is there a gluten-free option for this recipe?
Very! You can easily substitute the all-purpose flour with a good quality gluten-free flour blend designed for baking. Just make sure it contains xanthan gum to help with binding and rise. The flavor and texture should still be delicious, letting everyone enjoy this seasonal treat!

Can my pets eat pumpkin bread?
While pure pumpkin is safe for dogs in moderation, the other ingredients in this Cinnamon Crumb Pumpkin Bread, like sugars and spices, can be harmful to pets. It’s best to avoid giving them any bread made for humans and stick to plain, cooked pumpkin as a treat in small portions.

Cinnamon Crumb Pumpkin Bread Recipe

Irresistibly Moist Cinnamon Crumb Pumpkin Bread Recipe

Enjoy the cozy flavors of autumn with this delightful Cinnamon Crumb Pumpkin Bread Recipe, perfect for breakfast or a sweet snack.
Prep Time 15 minutes
Cook Time 1 hour
Cooling Time 5 minutes
Total Time 1 hour 20 minutes
Servings: 10 slices
Course: Breakfast
Cuisine: American
Calories: 220

Ingredients
  

For the Batter
  • 2 cups all-purpose flour high-quality flour recommended
  • 1 teaspoon baking soda fresh
  • 1 teaspoon baking powder fresh
  • 1 tablespoon cinnamon freshly ground preferred
  • 1 teaspoon pumpkin pie spice
  • 0.5 teaspoon salt
  • 0.5 cups canola oil or melted coconut oil
  • 2 large eggs no substitutions
  • 1 cup pumpkin puree use pure pumpkin
  • 1 teaspoon vanilla extract
  • 0.75 cups dark brown sugar light brown sugar can be used
  • 0.5 cups sugar to taste
For the Streusel Topping
  • 0.5 cups unsalted butter or vegan butter
  • 0.5 cups sugar
  • 1 tablespoon cinnamon
  • 0.5 cups all-purpose flour

Equipment

  • 9x5-inch bread pan
  • Mixing bowls
  • whisk
  • spatula

Method
 

Baking Instructions
  1. Preheat your oven to 350°F (175°C) and prepare a 9x5-inch bread pan with nonstick cooking spray.
  2. In a medium bowl, mix together the dry ingredients: flour, baking soda, baking powder, cinnamon, pumpkin pie spice, and salt.
  3. In a large bowl, combine the wet ingredients: canola oil, eggs, pumpkin puree, and vanilla extract.
  4. Gradually add the sugars to the wet mixture, stirring until smooth and creamy.
  5. Fold the dry ingredients into the wet ingredients until just combined.
  6. Pour the batter into the prepared pan and add streusel topping if desired.
  7. Bake for 50-60 minutes, checking for doneness with a toothpick.
  8. Allow to cool for 5 minutes in the pan before transferring to a wire rack to cool completely.

Nutrition

Serving: 1sliceCalories: 220kcalCarbohydrates: 34gProtein: 3gFat: 10gSaturated Fat: 1.5gPolyunsaturated Fat: 0.5gMonounsaturated Fat: 4gCholesterol: 30mgSodium: 200mgPotassium: 150mgFiber: 1gSugar: 12gVitamin A: 1000IUVitamin C: 1mgCalcium: 30mgIron: 1mg

Notes

Store in an airtight container at room temperature for up to 5 days or refrigerate for up to 7 days.

Tried this recipe?

Let us know how it was!

Hearty Mexican Ground Beef Skillet in Just 40 Minutes

As the sizzle of ground beef fills the air, I can feel the excitement of a delicious dinner nearing completion. This One-Pan Mexican Ground Beef Skillet has become my go-to recipe when I want to whip up something quick and satisfyingly hearty. In just 40 minutes, you’ll have a colorful, gluten-free meal that’s bursting with protein and packed with vibrant veggies. It’s the perfect antidote to fast food fatigue, easily bringing a taste of Mexico right to your dinner table. Plus, the ease of a one-pan meal means less cleanup, allowing you to savor every bite without the fuss. Are you ready to dive into this culinary delight?

Why is this Mexican Skillet a must-try?

Vibrant Flavors: The blend of spices and fresh ingredients creates a delightful medley that transports you straight to Mexico with every bite.

Quick Dinner Solution: In just 40 minutes, this dish is perfect for busy weeknights or any occasion where you need a meal in a hurry.

One-Pan Wonder: Enjoy the beauty of minimal cleanup; everything cooks in one pan, so you can enjoy your meal without a pile of dishes waiting for you.

Protein-Packed: With ground beef and black beans, this meal is satisfying and hearty, making it perfect for families and dinner guests alike.

Versatile Choices: Feel free to switch it up by using ground turkey or chicken, or adapt it to your taste with additional ingredients like corn or diced tomatoes. For more delicious ground beef options, check out Korean Ground Beef or Mongolian Ground Beef.

Mexican Ground Beef Skillet Ingredients

For the Skillet
Olive Oil – Adds fat for cooking and flavor. Can be substituted with avocado oil for a lighter touch.
Minced Garlic (1 tablespoon) – Provides aromatic flavor; fresh garlic enhances the overall taste.
Yellow Onion (1/2 medium, minced) – Adds sweetness and depth; substitute with shallots for a unique twist.
Bell Peppers (2 large, diced) – Offers sweetness and texture; any color can be used for variety.
Ground Beef (1 lb, 85% lean) – Main protein source providing richness; use ground turkey for a healthier option.
Homemade Taco Seasoning (3 tablespoons) – Adds flavor complexity; pre-made seasoning can also be used in place.
Tomato Sauce (1/2 cup) – Provides moisture and a tangy flavor base; substitute with crushed tomatoes for a chunkier consistency.
Green Chiles (2 tablespoons) – Adds subtle heat and flavor; use canned jalapeños for an extra kick.
Canned Black Beans (15 oz, drained and rinsed) – Adds fiber and texture; pinto beans can work well too.
Quick-Cooking Rice (1 cup) – Acts as a filler and thickener; substitute with quinoa for a completely gluten-free option.
Beef Broth (1.5 cups) – Provides moisture and flavor; vegetable broth can be used in vegetarian versions.
Mexican Shredded Cheddar Cheese (1/2 cup) – Adds creaminess and richness; for a vegan option, use dairy-free cheese alternatives.

Now that you have all the ingredients ready, you’re just moments away from creating a mouthwatering Mexican Ground Beef Skillet that’s sure to become a family favorite!

Step‑by‑Step Instructions for Mexican Ground Beef Skillet

Step 1: Heat the Oil
Begin by heating 2 tablespoons of olive oil in a large nonstick skillet over medium-high heat. Once the oil shimmers, add 1 tablespoon of minced garlic and ½ medium minced yellow onion. Sauté for about 2-3 minutes until they become fragrant and the onion is translucent, creating a wonderful aromatic base for your Mexican Ground Beef Skillet.

Step 2: Sauté the Peppers
Next, add 2 large diced bell peppers to the skillet with the garlic and onion. Stir the mixture well and continue to sauté for an additional 3-5 minutes until the peppers are tender yet still vibrant. This step enhances the flavors and adds a lovely colorful touch to your dish.

Step 3: Cook the Ground Beef
Push the sautéed vegetables to the side of the skillet and add 1 pound of ground beef to the center. Using a spatula, break up the meat as it cooks, allowing it to brown evenly for about 7-9 minutes. Look for the beef to be fully browned with no pink remaining, ensuring it’s delicious and safe to eat.

Step 4: Combine Ingredients
Once the ground beef is browned, mix it thoroughly with the sautéed veggies. Then, stir in 3 tablespoons of homemade taco seasoning, ½ cup of tomato sauce, 2 tablespoons of green chiles, and 15 oz of drained and rinsed canned black beans. Cook everything together for a few minutes until heated through and fragrant.

Step 5: Add Rice and Broth
Now, pour in 1 cup of quick-cooking rice and 1.5 cups of beef broth. Gently stir the mixture to combine, bringing it to a boil. You’ll want to ensure everything is well incorporated—this is key for the flavors to meld in your Mexican Ground Beef Skillet.

Step 6: Simmer the Skillet
Reduce the heat to low and cover the skillet with a lid. Allow it to simmer for about 20 minutes, stirring occasionally. Keep an eye on it—a perfect simmer will mean the rice is absorbing the broth and flavors while becoming tender.

Step 7: Add the Cheese
Once the rice is cooked and the liquid is mostly absorbed, remove the lid and sprinkle ½ cup of Mexican shredded cheddar cheese over the top. Allow the cheese to melt into the skillet for a few minutes, creating a creamy finish. If desired, you can place the skillet in a preheated oven at 400°F for a few minutes for optimal melt.

Mexican Ground Beef Skillet Variations

Feel free to explore these exciting twists on your Mexican Ground Beef Skillet to create a dish that’s perfect for your taste bud adventures!

  • Turkey Swap: Use ground turkey instead of beef for a lighter option that doesn’t skimp on flavor.
  • Veggie Power: Add corn or diced tomatoes for extra color and sweetness; they enhance both the flavor and visual appeal.
  • Nacho Style: Serve the mixture in crispy tortilla chips for a fun nacho twist that’s great for sharing or snacking.
  • Quinoa Boost: Substitute quick-cooking rice with quinoa for an even healthier, gluten-free meal that’s packed with protein.
  • Spice It Up: Want more heat? Toss in jalapeños or some chili flakes to kick the spice level up a notch!
  • Cheesy Goodness: Experiment with different cheeses like pepper jack for a creamy, spicy finish that’s sure to delight.
  • Taco Twist: Instead of serving it as a skillet, spoon the mixture into tortillas for delicious, hand-held tacos that are perfect for gatherings.
  • Beans Galore: Mix and match your beans by trying pinto or kidney beans; each will add its own unique texture and flavor to the dish.

Whether you stick to the original or make it your own, this Mexican Ground Beef Skillet will surely be a hit at the dinner table! If you’re looking for more inspiration, you can check out my other ground beef creations like Sticky Beef Noodles or Mexican Taco Soup for more exciting flavors.

Make Ahead Options

These Mexican Ground Beef Skillet preparations are perfect for busy cooks looking to save time during the week! You can sauté the vegetables and brown the ground beef up to 24 hours in advance—just store them in an airtight container in the refrigerator to maintain freshness. Additionally, you can mix the taco seasoning into the beef for enhanced flavor. When it’s time to serve, simply reheat the beef and vegetable mixture in a skillet, add the rice and broth, and follow the final instructions to cook it all together. With these make-ahead steps, you’ll enjoy a delicious, stress-free meal that’s just as satisfying as if it were made from scratch the same day!

Expert Tips for Mexican Ground Beef Skillet

Choose the Right Pan: A large, deep skillet or Dutch oven is essential for cooking all the ingredients evenly without spilling.

Avoid Sticking: Stir occasionally while simmering to prevent the rice and beef from sticking to the pan, ensuring a perfect texture in your Mexican Ground Beef Skillet.

Cook Right: If using regular rice, pre-cook it separately to avoid a soupy dish, reducing broth by ½ cup at the end.

Adjust Spice Levels: Feel free to tweak the taco seasoning to enjoy a flavor profile that suits you and your family’s spice tolerance.

Make It Your Own: Don’t hesitate to add extra veggies, like corn or diced tomatoes, to customize your Mexican Ground Beef Skillet to your taste.

How to Store and Freeze Mexican Ground Beef Skillet

Fridge: Store leftover Mexican Ground Beef Skillet in an airtight container for up to 3-5 days, keeping the flavors fresh and ready for quick reheating.

Freezer: This hearty dish freezes beautifully for up to 3 months. For best results, allow it to cool completely before storing in a freezer-safe container or bag.

Reheating: When it’s time to enjoy your leftovers, simply microwave on high until heated through, about 2-3 minutes, or reheat in a skillet over medium heat, stirring occasionally.

Portion Tip: Consider dividing into single servings before freezing for easy, quick meals throughout the month.

What to Serve with One-Pan Mexican Ground Beef Skillet

Elevate your dining experience with delicious sides that perfectly complement the vibrant flavors of this one-pan wonder.

  • Creamy Guacamole: This rich dip brings a smooth, buttery texture and freshness that balances the dish’s spices beautifully. A scoop of guacamole is like a hug for your taste buds!

  • Crispy Tortilla Chips: Perfect for scooping or munching, these crunchy chips add an enjoyable texture contrast. They’re always a hit, turning your meal into a fun, interactive experience.

  • Zesty Lime Wedges: A squeeze of lime brightens every bite, enhancing the flavors of the beef and veggies. It’s that final touch that ties everything together, making each mouthful sing.

  • Fresh Cilantro Salad: A light salad with chopped cilantro, diced tomatoes, and onion adds a refreshing crunch. This helps cut through the richness while enhancing the dish’s Mexican flair.

  • Mexican Street Corn: Creamy, tangy, and a little spicy, this dish complements the warm spices in the skillet perfectly. Plus, the sweetness of corn brings a lovely balance to the meal.

  • Spicy Black Bean Soup: A spoonful of soup rounds out this hearty meal with lovely flavors and warmth. It adds another layer of comfort and is satisfying without feeling heavy.

  • Chilled Sangria: A refreshing glass of sangria will cool you down and enhance the flavors of your meal. Fruity and a touch sweet, it’s the perfect drink to sip while enjoying the vibrant dishes.

Mexican Ground Beef Skillet Recipe FAQs

How do I choose ripe ingredients for this dish?
Absolutely! For the best flavor and texture, choose bell peppers that are firm and shiny, without any dark spots or blemishes. When selecting onions, aim for those that feel heavy for their size and have dry, papery skins. For garlic, fresh cloves should be firm and plump, with no signs of sprouting.

What are the best storage methods for leftovers?
Very good question! Store your Mexican Ground Beef Skillet in an airtight container in the fridge for up to 3-5 days. Make sure it’s completely cooled before placing it in the container to avoid condensation, which can affect the texture. If you feel you won’t finish it in that timeframe, freezing is a great option!

Can I freeze this Mexican Ground Beef Skillet?
Definitely! This dish freezes beautifully for up to 3 months, which is fabulous for meal prepping. To freeze, ensure it has cooled completely, then transfer it to a freezer-safe container or bag. Make sure to squeeze out as much air as possible to prevent freezer burn. When you’re ready to enjoy, thaw it overnight in the fridge before reheating.

What should I do if my beef is not browning properly?
No worries! If your ground beef isn’t browning as it should, it might be getting steamed instead of fried. This could happen if there’s too much moisture in the pan. Make sure not to overcrowd the skillet and use a bit more heat. Push the cooked veggies to the side to allow the beef more direct contact with the bottom of the pan.

Are there any dietary considerations I should keep in mind?
Great question! This Mexican Ground Beef Skillet is gluten-free when using certified gluten-free taco seasoning and broth, making it perfect for those with gluten sensitivities. For dairy-free needs, substitute the Mexican cheese with a dairy-free alternative. Also, if you have pets, be mindful not to feed them any leftovers containing onions or garlic, as these can be harmful to them.

How do I adjust the spice levels in this recipe?
The more the merrier! If you prefer a milder dish, start with a smaller amount of taco seasoning and increase it gradually to taste. If you’re up for some heat, consider adding jalapeños or swapping out the green chiles for spicier varieties. Tasting as you go is key to finding the perfect balance for your palate!

Mexican Ground Beef Skillet

Hearty Mexican Ground Beef Skillet in Just 40 Minutes

This One-Pan Mexican Ground Beef Skillet is a quick, hearty meal filled with vibrant veggies and bursting with flavor, perfect for busy weeknights.
Prep Time 10 minutes
Cook Time 30 minutes
Total Time 40 minutes
Servings: 4 servings
Course: Dinner
Cuisine: Mexican
Calories: 450

Ingredients
  

For the Skillet
  • 2 tablespoons Olive Oil Can be substituted with avocado oil.
  • 1 tablespoon Minced Garlic Fresh enhances overall taste.
  • 1/2 medium Yellow Onion Minced; substitute with shallots for a twist.
  • 2 large Bell Peppers Diced; any color can be used for variety.
  • 1 lb Ground Beef 85% lean; ground turkey can be used.
  • 3 tablespoons Homemade Taco Seasoning Pre-made can also be used.
  • 1/2 cup Tomato Sauce Substitute with crushed tomatoes for a chunkier consistency.
  • 2 tablespoons Green Chiles Use canned jalapeños for extra heat.
  • 15 oz Canned Black Beans Drained and rinsed; pinto beans can work too.
  • 1 cup Quick-Cooking Rice Substitute with quinoa for a gluten-free option.
  • 1.5 cups Beef Broth Vegetable broth can be used for vegetarian versions.
  • 1/2 cup Mexican Shredded Cheddar Cheese For a vegan option, use dairy-free cheese alternatives.

Equipment

  • Large nonstick skillet

Method
 

Step-by-Step Instructions for Mexican Ground Beef Skillet
  1. Heat the olive oil in a large nonstick skillet over medium-high heat. Add the minced garlic and onion, sauté for 2-3 minutes until fragrant.
  2. Add the diced bell peppers to the skillet. Stir and sauté for an additional 3-5 minutes until tender.
  3. Push vegetables to the side and add the ground beef. Break it up as it cooks for 7-9 minutes until fully browned.
  4. Mix the ground beef with the veggies and stir in taco seasoning, tomato sauce, green chiles, and black beans. Cook until heated through.
  5. Pour in the rice and broth. Stir gently to combine, bringing it to a boil.
  6. Reduce heat to low, cover, and simmer for about 20 minutes, stirring occasionally.
  7. Remove lid, sprinkle with cheese, let it melt for a few minutes, and serve.

Nutrition

Serving: 1bowlCalories: 450kcalCarbohydrates: 40gProtein: 30gFat: 20gSaturated Fat: 8gPolyunsaturated Fat: 2gMonounsaturated Fat: 10gCholesterol: 80mgSodium: 800mgPotassium: 900mgFiber: 10gSugar: 4gVitamin A: 1000IUVitamin C: 90mgCalcium: 200mgIron: 4mg

Notes

This dish is perfect for busy weeknights and can be customized with extra veggies or different meats.

Tried this recipe?

Let us know how it was!

Sheet Pan Sausage and Sweet Potatoes for Quick Cozy Dinners

As I stood in my kitchen, cradling a hefty bag of sweet potatoes, I marveled at how something so simple could transform into a comforting meal in no time. This Sheet Pan Sausage and Sweet Potatoes recipe is my go-to solution for busy weeknights when I crave something hearty without the fuss. With just five ingredients, it delivers all the cozy goodness you’d expect from your favorite comfort food, while being healthy and budget-friendly. The beauty of this one-pot meal lies not just in the effortless preparation, but also in the delightful caramelization of sweet potatoes and smoky sausage that makes every bite feel like a warm hug. Ready to whip up a dish that’s as nourishing as it is satisfying? Let’s dive into this easy dinner that your family will love!

What makes this dish a weeknight favorite?

Simplicity is key: With just five ingredients, this Sheet Pan Sausage and Sweet Potatoes recipe is perfect for busy evenings when time is limited. Wholesome flavors come together beautifully as sweet potatoes caramelize alongside savory sausage, creating a mouthwatering aroma in your kitchen. Versatility matters: Customize by adding your favorite vegetables or seasonings, like in my Heartwarming Comfort Sausage dish for a delightful twist! Effortless cleanup is a dream—everything cooks in one pan, allowing more time to unwind. Budget-friendly and healthy, this dish is sure to satisfy everyone at the table, making it the ultimate cozy dinner!

Sheet Pan Sausage and Sweet Potatoes Ingredients

For the Base

  • Sweet Potatoes – Provides natural sweetness and a satisfying texture; can substitute with russet potatoes if needed.
  • Yellow Onion – Adds flavor and aromatic depth; for a milder taste, consider using red onion.
  • Garlic – Introduces savory notes; use chopped garlic for better flavor release.

For Roasting

  • Extra-Virgin Olive Oil – Essential for roasting; increases flavor and prevents sticking. Ensure to use at least 2 tablespoons to keep ingredients moist.
  • Smoked (or Pre-Cooked) Sausage – The main protein, offering hearty flavor; options like andouille or kielbasa work well; turkey or vegetarian sausages can be used for lighter variations.

For Seasoning

  • Seasoning of Choice – Enhances overall flavor; suggestions include Greek seasoning, taco spices, or simple salt and pepper to heighten the deliciousness of your Sheet Pan Sausage and Sweet Potatoes.

Step‑by‑Step Instructions for Sheet Pan Sausage and Sweet Potatoes

Step 1: Preheat the Oven
Begin by preheating your oven to 425°F (220°C). This high temperature is essential for achieving that perfect caramelization on the sweet potatoes and sausage. While the oven warms up, grab a large rimmed baking sheet, as this will hold all your delightful ingredients for the Sheet Pan Sausage and Sweet Potatoes.

Step 2: Prepare the Vegetables
Chop the sweet potatoes into bite-sized cubes and slice the yellow onion into thin wedges. Mince or chop the garlic to release its aromatic goodness. On the prepared baking sheet, combine the sweet potatoes, onion, and garlic, ensuring they are mixed well. Drizzle with at least 2 tablespoons of extra-virgin olive oil and sprinkle your choice of seasoning. Toss everything to coat evenly, making your ingredients glisten with oil.

Step 3: Roast the Base Ingredients
Place the baking sheet in the preheated oven and roast the mixture for 20 minutes. This initial roasting will allow the sweet potatoes to start becoming tender and developing that lovely browned exterior. Once the timer goes off, take a peek and stir the ingredients to ensure even cooking before returning the sheet to the oven for an additional 15 minutes.

Step 4: Add the Sausage
After the veggies have roasted for 35 minutes, it’s time to add the hero of the dish—sliced sausage! Lay the sausage pieces on top of the roasted vegetables, pressing them down so the cut sides meet the baking sheet. This will ensure the sausage gets a nice browning as it cooks. Return the pan to the oven for another 10 minutes, allowing the sausages to crisp up beautifully.

Step 5: Final Touch and Serve
Once the sausage is browned and the sweet potatoes are tender, remove the baking sheet from the oven. Let it cool slightly before serving. Scoop the delightful mixture onto plates, enjoying the harmony of flavors in your Sheet Pan Sausage and Sweet Potatoes. This dish is perfect served warm and goes wonderfully with a side salad or steamed greens.

Make Ahead Options

These Sheet Pan Sausage and Sweet Potatoes are perfect for meal prep enthusiasts looking to save time on busy weeknights! You can chop the sweet potatoes, slice the onion, and mince the garlic up to 24 hours in advance, storing them in an airtight container in the refrigerator to maintain their freshness. Additionally, if using pre-cooked sausage, feel free to slice it ahead of time as well. When you’re ready to cook, simply spread your prepped vegetables on a baking sheet, drizzle with olive oil and seasoning, then follow the roasting instructions as usual. This way, you’ll enjoy a delightful, wholesome meal with just a little bit of effort, and it will taste just as delicious!

How to Store and Freeze Sheet Pan Sausage and Sweet Potatoes

Fridge: Store leftovers in an airtight container for up to 3 days for a quick and healthy meal when you need it later.

Freezer: You can freeze the cooled dish in an airtight container for up to 3 months. Thaw in the fridge overnight before reheating.

Reheating: To reheat, simply place it in an oven at 350°F (175°C) for about 15-20 minutes, or until warmed through, ensuring that the flavors of your Sheet Pan Sausage and Sweet Potatoes shine again.

Expert Tips for Sheet Pan Sausage and Sweet Potatoes

  • Perfect Preheat: Ensure your oven is fully preheated to 425°F to achieve optimal caramelization of the sweet potatoes and sausage.

  • Uniform Cuts: Cut sweet potatoes and onions into similar-sized pieces for even cooking; uneven sizes can lead to an inconsistent texture in your Sheet Pan Sausage and Sweet Potatoes.

  • Oil Generously: Don’t skimp on the olive oil! It prevents sticking and dryness, ensuring that your veggies and sausage cook beautifully and maintain moisture.

  • Check for Doneness: Keep an eye on the baking time, especially if your oven runs hot. Adjust cooking times as needed to prevent overcooking or burning.

  • Creative Customization: Feel free to mix in additional vegetables or different seasonings to suit your family’s taste; this dish is versatile and can easily adapt to your preferences!

What to Serve with Sheet Pan Sausage and Sweet Potatoes

Looking to create a memorable meal to accompany your comforting and flavorful dish?

  • Crispy Green Salad: Fresh greens like arugula or spinach add a refreshing contrast, balancing the hearty elements of your main dish.

  • Steamed Broccoli: Tender broccoli florets bring bright color and a delightful crunch, enhancing the overall nutritional value of your meal.

  • Creamy Coleslaw: A tangy coleslaw adds a creamy, crunchy side that perfectly complements the rich flavors of the sausage and sweet potatoes.

  • Garlic Bread: Warm, buttery garlic bread provides a comforting texture, ideal for sopping up any delicious juices left on the plate.

  • Roasted Brussels Sprouts: These savory little bites caramelize beautifully and add depth to your dinner, providing a satisfying crunch beside the sweet and smoky flavors.

  • Chilled White Wine: A crisp Sauvignon Blanc or a lightly oaked Chardonnay enhances the meal, offering a refreshing sip that keeps the ambiance light and cheerful.

Enhance your dining experience with these delectable pairings, turning your Sheet Pan Sausage and Sweet Potatoes into a full, delightful feast.

Sheet Pan Sausage and Sweet Potatoes Variations

Feel free to explore these creative variations that will add your personal touch to this delicious dish!

  • Vegetable Boost: Add bell peppers or Brussels sprouts for extra color and nutrition. The added crunch makes each bite even more exciting!

  • Sweet Twist: Drizzle a hint of maple syrup over your veggies before roasting. This creates a delightful contrast between sweet and savory that’s sure to impress.

  • Spicy Kick: Sprinkle some cayenne pepper or red pepper flakes for a touch of heat. Spice enthusiasts will absolutely love the added zing!

  • Herb Infusion: Toss in fresh herbs like rosemary or thyme for aromatic flavor. The fragrance will fill your kitchen, making it hard to wait for dinner!

  • Breakfast Remix: Add eggs into the mix during the last roasting step. Imagine running a golden yolk over the tasty sweet potatoes and sausage for a satisfying brunch dish.

  • Protein Swap: Use turkey or vegetarian sausage for a lighter, healthier version. This way, everyone can indulge guilt-free without losing flavor!

  • Mediterranean Vibe: Swap out the seasoning for Italian herbs and throw in some olives or sun-dried tomatoes. This twist transports you to the sunny Mediterranean with every bite.

  • Comforting Pairings: Serve alongside a simple green salad or steamed greens for a complete, wholesome meal. Check out my Parmesan Chicken Potatoes for even more paired inspiration!

Sheet Pan Sausage and Sweet Potatoes Recipe FAQs

How do I choose ripe sweet potatoes?
Absolutely! When selecting sweet potatoes, look for ones that are firm and free from dark spots or blemishes. They should feel heavy for their size. Avoid sweet potatoes with soft patches or wrinkles, as these can indicate spoilage. The ideal sweet potato is a smooth, vibrant orange or yellow color, indicating freshness.

What is the best way to store leftovers?
Very! Once your Sheet Pan Sausage and Sweet Potatoes cool completely, transfer them to an airtight container. They can be stored in the fridge for up to 3 days. This makes for a quick reheatable meal option! Just reheat in the oven or microwave until warmed through, and you’ll have a delightful dish ready in no time.

Can I freeze this dish for later use?
Absolutely! To freeze your Sheet Pan Sausage and Sweet Potatoes, first, allow the dish to cool completely. Then, transfer it into an airtight freezer-safe container or a heavy-duty freezer bag, removing as much air as possible to prevent freezer burn. It can be frozen for up to 3 months. When you’re ready to enjoy, simply thaw it overnight in the fridge and reheat in the oven at 350°F (175°C) for about 15-20 minutes until heated through.

What should I do if the sweet potatoes are not cooking evenly?
So, if you find that your sweet potatoes are browning too fast or taking longer to cook, check the size of your cubes. Aim for uniform cubes around 1-inch for even cooking. If they’re too large, they may need more time, and if they’re too small, they may overcook. And remember to stir the ingredients halfway through roasting to promote even cooking throughout the dish!

Are there any dietary considerations for this meal?
Very! This Sheet Pan Sausage and Sweet Potatoes recipe is gluten-free and can be modified for various dietary preferences. For those with allergies, always check the sausage label to ensure it’s free from allergenic ingredients. If preparing for pets, avoid feeding them cooked sausage as it can contain seasonings and preservatives harmful to animals. You can also easily substitute turkey sausage or veggie sausage to cater to different diets.

Sheet Pan Sausage and Sweet Potatoes

Sheet Pan Sausage and Sweet Potatoes for Quick Cozy Dinners

This Sheet Pan Sausage and Sweet Potatoes is a quick, hearty dish perfect for busy weeknights, delivering comforting flavors in under an hour.
Prep Time 15 minutes
Cook Time 45 minutes
Total Time 1 hour
Servings: 4 servings
Course: Dinner
Cuisine: Comfort Food
Calories: 400

Ingredients
  

For the Base
  • 2 medium Sweet Potatoes Can substitute with russet potatoes if needed.
  • 1 medium Yellow Onion For milder taste, consider using red onion.
  • 3 cloves Garlic Use chopped garlic for better flavor release.
For Roasting
  • 2 tablespoons Extra-Virgin Olive Oil Essential for roasting; increases flavor and prevents sticking.
  • 1 pound Smoked (or Pre-Cooked) Sausage Options like andouille or kielbasa work well.
For Seasoning
  • to taste Seasoning of Choice Suggestions include Greek seasoning, taco spices, or simple salt and pepper.

Equipment

  • Oven
  • Large Rimmed Baking Sheet

Method
 

Step-by-Step Instructions
  1. Preheat your oven to 425°F (220°C), which is essential for perfect caramelization.
  2. Chop the sweet potatoes into bite-sized cubes, slice the onion, and mince the garlic. Combine these in a baking sheet with olive oil and seasoning.
  3. Roast the mixture in the oven for 20 minutes. Stir and then continue roasting for another 15 minutes.
  4. Add the sliced sausage on top of the roasted vegetables. Press down and return to the oven for another 10 minutes.
  5. Once the sausage is browned and the sweet potatoes are tender, remove from oven, let cool slightly, and serve.

Nutrition

Serving: 1plateCalories: 400kcalCarbohydrates: 40gProtein: 20gFat: 20gSaturated Fat: 5gPolyunsaturated Fat: 1gMonounsaturated Fat: 5gCholesterol: 50mgSodium: 800mgPotassium: 800mgFiber: 6gSugar: 8gVitamin A: 12000IUVitamin C: 30mgCalcium: 50mgIron: 2mg

Notes

Store leftovers in an airtight container for up to 3 days. You can freeze the cooled dish for up to 3 months.

Tried this recipe?

Let us know how it was!

Stay Connected

Get recipes via email: