Get my cookbooks

Coconut Crusted Fish with Mango Salsa for a Tropical Feast

You know that feeling when you take a bite of something that instantly transports you to a sun-soaked beach? That’s what you’ll experience with my Coconut Crusted Fish with Mango Salsa. This tropical dish combines a crunchy coconut crust with tender, flaky fish, and let me tell you—it’s not just a feast for the senses, but also a quick and healthy dinner option ready in just 30 minutes! Whether you’re whipping it up for a casual weeknight meal or hosting friends for a vibrant gathering, this recipe is a delightful way to add wholesome seafood to your table. Curious about how to elevate your weeknight meals with this island-inspired dish? Let’s dive in!

Why is this recipe a must-try?

Tropical Escape: With its crunchy coconut coating, this dish is your ticket to a sunny beach experience right at home.

Quick & Easy: Prep and cook in just 30 minutes—perfect for those busy weeknights when you crave something special!

Versatile Options: Feel free to swap in your favorite fish like salmon or halibut, or get creative with the mango salsa by adding pineapple for a fun twist.

Crowd-Pleaser: This dish is sure to impress family and friends, making it a go-to for gatherings and festive mealtimes.

Healthy Delight: Packed with protein and fresh ingredients, it’s a nutritious way to enjoy seafood. Pair it with some grilled vegetables or coconut rice for a complete meal!

Coconut Crusted Fish Ingredients

• Get ready for a tropical treat with these essential ingredients!

For the Fish

  • Fish fillets – Choose fresh tilapia or cod for a mild, flaky delight.
  • All-purpose flour – Helps the coating stick; you can also use coconut flour for a gluten-free option.
  • Eggs, beaten – Acts as a binder for that perfect coconut crust; a flaxseed meal mixture works for a vegan substitute.

For the Coconut Coating

  • Shredded coconut – Choose unsweetened for a balanced flavor and great crunch.
  • Breadcrumbs – Regular or gluten-free breadcrumbs elevate the texture of the coating.
  • Salt – Enhances the flavor; adjust to your preference.
  • Black pepper – Freshly ground adds a kick.
  • Garlic powder – Adds depth; feel free to substitute with fresh garlic, just adjust the amount.
  • Paprika – Introduces subtle smokiness and beautiful color.

For the Mango Salsa

  • Mango – Ripe, slightly soft mangoes add the sweetest touch; try different fruits for variety!
  • Red onion – Imparts crunch and sharpness, but green onions are a milder alternative.
  • Red bell pepper – Offers sweetness and vivid color; feel free to swap with yellow or orange bell peppers.
  • Jalapeño – Adds heat; adjust based on your spice preference or omit for a milder salsa.
  • Lime – Provides acidity and brightness to balance flavors; fresh lime juice is best.

So gather these ingredients, and get ready to elevate your culinary repertoire with this delightful Coconut Crusted Fish with Mango Salsa!

Step‑by‑Step Instructions for Coconut Crusted Fish with Mango Salsa

Step 1: Prepare the Coconut Coating
In a shallow dish, combine shredded coconut, breadcrumbs, salt, pepper, garlic powder, and paprika. Mix until evenly blended. This coconut coating is key to your Coconut Crusted Fish, providing that irresistible crunch. Set aside while you prepare the fish for dredging, ensuring all ingredients are at your fingertips for a smooth cooking experience.

Step 2: Set up Dredging Stations
On your countertop, arrange three shallow dishes: place all-purpose flour in one, beaten eggs in another, and your coconut mixture in the last. This dredging station will streamline the coating process for your fish. Make sure to have a large plate nearby to hold the coated fillets, which will help keep things tidy as you prep the delicious Coconut Crusted Fish.

Step 3: Coat the Fish Fillets
Take each fish fillet and gently dredge it in the flour, ensuring it’s fully coated. Next, dip the floured fillet into the beaten eggs, allowing any excess to drip off. Finally, press the fish into the coconut coating, making sure it’s well-covered. Place the coated fillets on the plate, ready for frying, and admire that beautiful tropical crust!

Step 4: Heat the Skillet
In a large skillet, pour enough oil to cover the bottom, heating it over medium heat for about 2-3 minutes. To test if the oil is ready for frying, drop in a small piece of fish; it should quickly sizzle. Achieving the right temperature is crucial for your Coconut Crusted Fish to turn golden brown without becoming greasy.

Step 5: Fry the Fish Fillets
Carefully add the coated fillets into the hot skillet, ensuring not to overcrowd the pan. Cook each fillet for about 4-5 minutes on one side, or until it’s golden brown and crispy. Flip the fillets with a spatula, cooking for another 4-5 minutes until both sides are perfectly cooked. Transfer the fritters to a paper towel-lined plate to drain excess oil.

Step 6: Make the Mango Salsa
In a mixing bowl, combine diced mango, red onion, red bell pepper, jalapeño, lime juice, and a pinch of salt. Stir gently to mix and allow those refreshing flavors to meld. This vibrant mango salsa will beautifully complement your Coconut Crusted Fish, adding a burst of sweetness that perfectly contrasts the dish’s rich coconut flavor.

Step 7: Serve and Enjoy
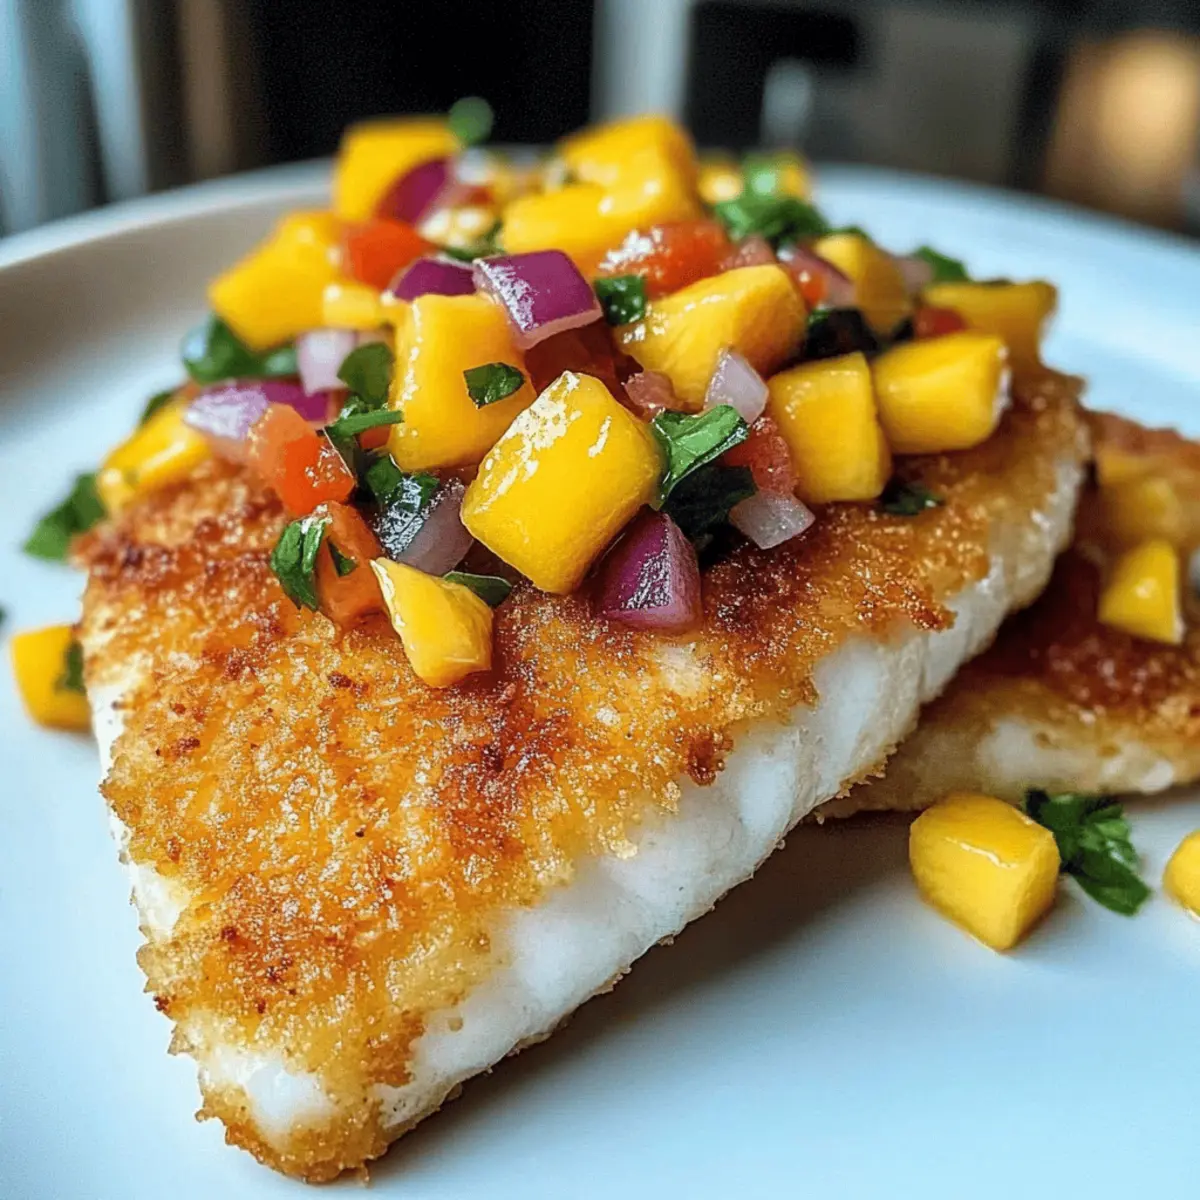
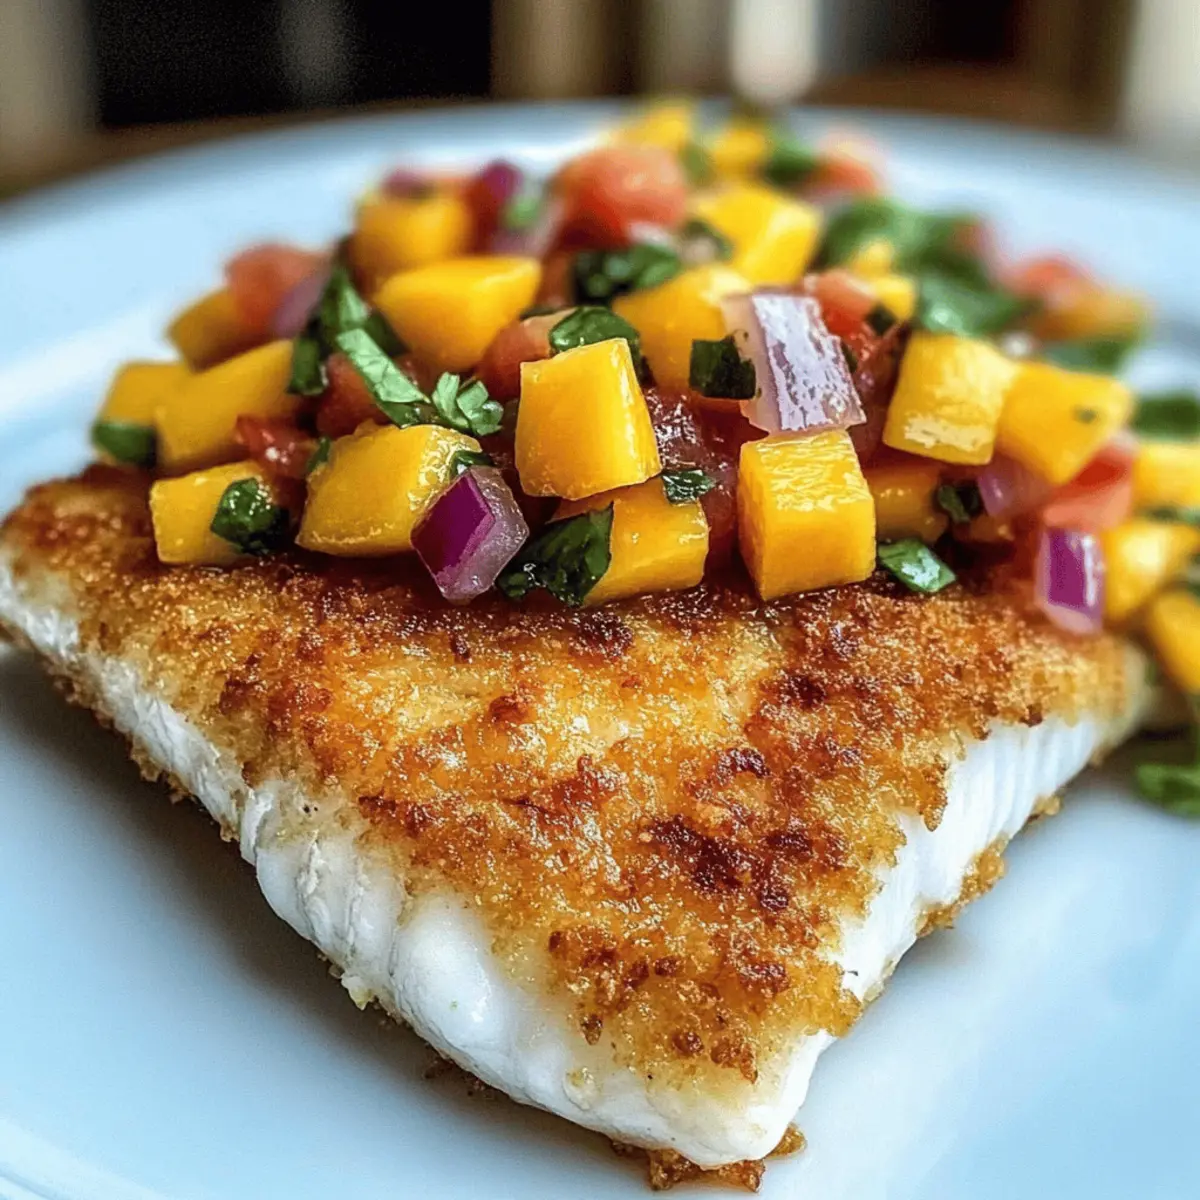
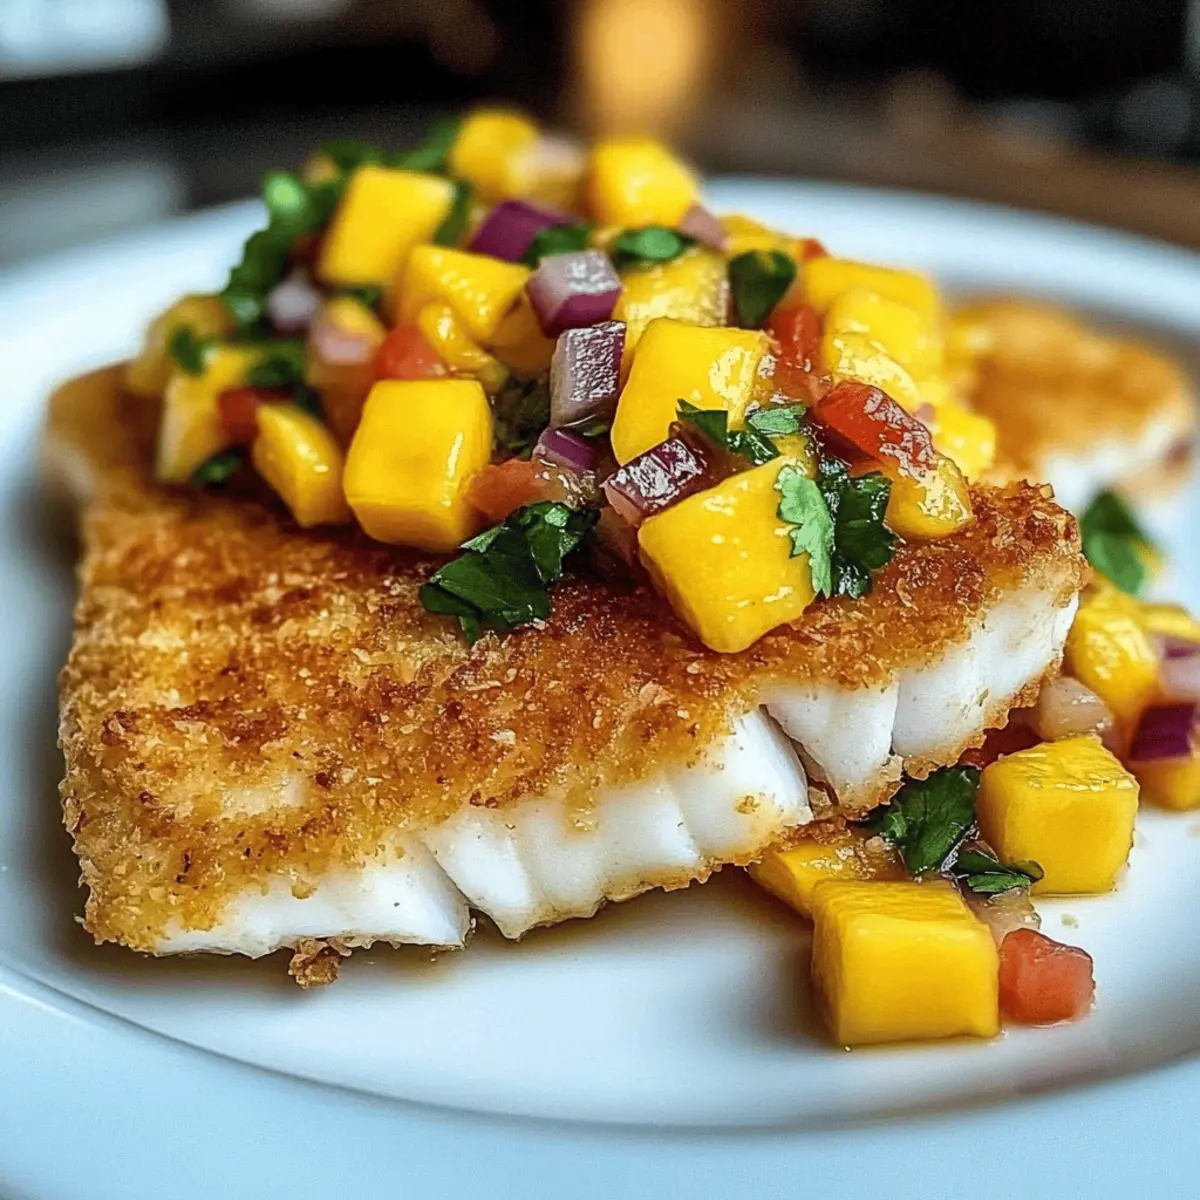
Arrange the freshly fried Coconut Crusted Fish on a serving platter and generously top each fillet with your mango salsa. Serve immediately for the best crunch and flavor, allowing everyone to enjoy this tropical feast right at home. The combination of the crispy fish and zesty salsa will rival any beachside dining experience!

What to Serve with Coconut Crusted Fish with Mango Salsa

Elevate your dining experience with complementary sides that enhance the tropical flavors of this vibrant dish.

  • Coconut Rice: This fluffy, subtly sweet side dish complements the coconut crust beautifully, adding a delightful relevance to the meal.
  • Grilled Asparagus: Lightly charred asparagus with lemon zest brings a fresh crunch, balancing the richness of the fish perfectly.
  • Tropical Fruit Salad: A mix of fresh fruits like pineapple, kiwi, and berries offers a refreshing contrast and a burst of color on the plate.
  • Simple Green Salad: Crisp greens tossed with a citrus vinaigrette provide a light, tangy touch to balance the satisfying fish and salsa.
  • Plantain Chips: These crunchy snacks add a delightful texture and flavor that enhance the tropical theme of your meal.
  • Iced Coconut Water: Served chilled, this hydrating drink echoes the bright flavors in your dish and adds a fun, festive vibe.

Imagine sitting back, savoring the harmony of textures and flavors, while enjoying a meal that instantly transports you to a sun-soaked beach.

Coconut Crusted Fish Variations

Feel free to let your creativity shine with these delightful twists that enhance the flavor and excitement of your dish!

  • Different Fish: Swap out tilapia or cod for salmon, snapper, catfish, or halibut for a unique taste experience. Each fish brings its own flavor profile that complements the tropical crust beautifully.

  • Fresh Fruit Salsa: Mix ripe mango with pineapple, kiwi, or even diced strawberries for a bright and fruity salsa. A melody of flavors will transport you straight to a tropical paradise!

  • Herb-Infused Salsa: Add fresh herbs like mint or cilantro to the mango salsa for a fresh burst of flavor. These herbs will elevate the dish, creating layers of taste.

  • Spice It Up: If you crave heat, include minced jalapeños or diced serrano peppers in the mango salsa. Feel free to adjust based on the spice level you enjoy—turn the heat up or down as you please!

  • Baked Version: Instead of frying, bake or air-fry the fish for a healthier twist. Coat the fillets as usual, then place them on a baking sheet and cook until golden brown.

  • Coconut Flour: Use coconut flour instead of all-purpose flour for the dredging step for a gluten-free twist. This change maintains that lovely coconut flavor while catering to dietary preferences.

  • Creamy Salsa: Add a spoonful of Greek yogurt or a splash of coconut cream to your mango salsa for a creamy texture. This option enhances the richness and adds a smooth balance to the dish.

  • Tropical Rice: Serve the fish over a bed of coconut rice, like in my Avocado Bowls Mango, for an extra touch of tropical flair. The creaminess pairs wonderfully with the fish and salsa!

Let your taste buds lead the way, making this Coconut Crusted Fish with Mango Salsa your very own culinary masterpiece!

Make Ahead Options

These Coconut Crusted Fish with Mango Salsa are perfect for meal prep enthusiasts! You can coat the fish fillets and refrigerate them for up to 24 hours before cooking, which allows the coating to adhere beautifully. Prepare the mango salsa a few hours ahead, letting it sit in the refrigerator to meld flavors, which enhances its freshness when served. When you’re ready to fry, simply heat the oil in your skillet and cook the fillets for about 4-5 minutes on each side until they’re golden brown. This approach saves time during busy weeknights while ensuring that your dish is just as delicious as if it were made fresh!

How to Store and Freeze Coconut Crusted Fish

Fridge: Store leftover Coconut Crusted Fish in an airtight container for up to 3 days; place parchment paper between layers to maintain crispiness.

Freezer: For longer storage, freeze cooked fillets in a single layer on a baking sheet, then transfer to a freezer-safe bag for up to 2 months.

Reheating: Reheat in an oven at 350°F (175°C) for 10-15 minutes to regain crispiness. Avoid microwave reheating, as it may make the fish soggy.

Salsa Storage: Keep mango salsa in the fridge for up to 2 days in a covered container; flavors meld beautifully, but add avocado just before serving to prevent browning.

Expert Tips for Coconut Crusted Fish

  • Choose Fresh Fish: Always opt for fresh fillets like tilapia or cod. Frozen fish can alter the dish’s texture and flavor, so fresh is best!

  • Proper Oil Temperature: Heat oil until a small piece of fish sizzles when added. If it’s too cold, the coating can become greasy; too hot, and it may burn.

  • Avoid Crowding: Cook fish in batches if necessary, as overcrowding the skillet can lead to uneven cooking and a less crispy crust on your Coconut Crusted Fish.

  • Rest for Crunch: Let the cooked fish rest on paper towels to absorb excess oil. This will keep your crust crispy longer!

  • Customize Your Salsa: Feel free to mix and match ingredients in your mango salsa—pineapple, avocado, or even mint can add exciting twists and enhance freshness.

Coconut Crusted Fish with Mango Salsa Recipe FAQs

What type of fish should I use for this recipe?
I recommend using fresh fillets of tilapia or cod for their mild flavor and flaky texture. However, you can also try salmon, snapper, catfish, or halibut for variation. Just remember, the fresher the fish, the better the dish!

How should I store leftover Coconut Crusted Fish?
Store any leftovers in an airtight container in the refrigerator for up to 3 days. For best results, place parchment paper between layers to help maintain that delightful crispiness from the coconut crust.

Can I freeze Coconut Crusted Fish?
Absolutely! To freeze, lay the cooked fillets in a single layer on a baking sheet and freeze until solid. Once frozen, transfer them to a freezer-safe bag, where they can be stored for up to 2 months. When you’re ready to enjoy them, simply reheat in the oven at 350°F (175°C) for about 10-15 minutes to recapture that crispy texture.

How can I prevent my Coconut Crusted Fish from getting soggy when reheating?
To avoid sogginess, it’s best to reheat the fish in the oven rather than the microwave. Preheat your oven to 350°F (175°C) and bake the fillets on a parchment-lined baking sheet for around 10-15 minutes, checking to ensure they are heated through and regain their lovely crunch.

Are there any dietary considerations for this recipe?
Yes, if you’re accommodating dietary restrictions, you can use gluten-free breadcrumbs for a gluten-free option, and for a vegan twist, substitute the eggs for a mixture of flaxseed meal and water. Always double-check ingredient labels for allergens and adjust according to your guests’ needs to ensure everyone can enjoy this Coconut Crusted Fish with Mango Salsa!

Coconut Crusted Fish with Mango Salsa

Coconut Crusted Fish with Mango Salsa for a Tropical Feast

Experience a tropical escape with this Coconut Crusted Fish with Mango Salsa, a quick and healthy dinner option ready in just 30 minutes!
Prep Time 15 minutes
Cook Time 15 minutes
Total Time 30 minutes
Servings: 4 servings
Course: Dinner
Cuisine: Seafood, Tropical
Calories: 350

Ingredients
  

For the Fish
  • 4 fillets Fish fillets Fresh tilapia or cod for mild flavor.
  • 1/2 cup All-purpose flour Coconut flour can be used for gluten-free.
  • 2 large Eggs, beaten Flaxseed meal mixture for vegan option.
For the Coconut Coating
  • 1 cup Shredded coconut Unsweetened preferred.
  • 1/2 cup Breadcrumbs Regular or gluten-free.
  • 1 teaspoon Salt Adjust to your preference.
  • 1/2 teaspoon Black pepper Freshly ground.
  • 1 teaspoon Garlic powder Can substitute with fresh garlic.
  • 1 teaspoon Paprika For smokiness and color.
For the Mango Salsa
  • 1 large Mango Ripe and slightly soft.
  • 1/4 cup Red onion Can use green onions for milder flavor.
  • 1 large Red bell pepper Swap with yellow or orange if desired.
  • 1 small Jalapeño Adjust for spice preference.
  • 1 lime Lime Fresh lime juice is best.

Equipment

  • Skillet
  • shallow dishes
  • Mixing Bowl
  • Plate

Method
 

Step-by-Step Instructions
  1. In a shallow dish, combine shredded coconut, breadcrumbs, salt, pepper, garlic powder, and paprika. Mix well and set aside.
  2. Set up three shallow dishes: one with flour, one with beaten eggs, and one with the coconut mixture.
  3. Dredge each fish fillet in flour, dip in eggs, and then press into the coconut coating. Set aside on a plate.
  4. Heat oil in a large skillet over medium heat for 2-3 minutes. Test if oil is ready by adding a small piece of fish.
  5. Fry the coated fillets for about 4-5 minutes on each side until golden brown and crispy. Drain on paper towels.
  6. In a mixing bowl, combine diced mango, red onion, red bell pepper, jalapeño, lime juice, and a pinch of salt. Mix gently.
  7. Serve the fried fish on a platter topped with mango salsa. Enjoy your tropical feast!

Nutrition

Serving: 1fillet with salsaCalories: 350kcalCarbohydrates: 30gProtein: 25gFat: 15gSaturated Fat: 6gPolyunsaturated Fat: 2gMonounsaturated Fat: 5gCholesterol: 70mgSodium: 500mgPotassium: 600mgFiber: 4gSugar: 5gVitamin A: 10IUVitamin C: 50mgCalcium: 5mgIron: 10mg

Notes

Best served immediately for optimal crunch and flavor. Customize the salsa with other fruits if desired.

Tried this recipe?

Let us know how it was!

Spooktacular Rotten Deviled Eggs for Halloween Fun

“Eww, what’s that?” I heard my niece gasp as she stared at the tray of zombies and ghouls decorating our Halloween gathering. I couldn’t help but chuckle; it was the perfect setup for introducing my Deliciously Rotten Halloween Deviled Eggs. This playful twist on a classic appetizer combines creamy, flavorful filling with an eye-catching, dinosaur egg appearance that’s sure to enchant both kids and adults alike. Best of all, these Rotten Deviled Eggs are incredibly easy to prepare—meaning less stress for the cook and more fun for everyone at the party. Whether you’re hosting a spooky soirée or looking for a fun snack for the little ones, these devilish delights will steal the show. Curious to see how you can whip up these frightfully delicious treats? Let’s dive into the recipe!

Why Will You Love These Rotten Deviled Eggs?

Easily prepared: These deviled eggs are a breeze to make, requiring little culinary skill and minimal time.

Eye-catching appearance: The vibrant green filling and creative dinosaur egg look will capture everyone’s attention, adding flair to any Halloween gathering.

Endless variations: Feel free to customize the flavors or colors according to your theme—try using Greek yogurt for a healthier twist or infused ingredients for an unexpected kick!

Crowd-pleaser: Both kids and adults will love these spooky snacks, making them a hit at parties or family events.

Make ahead: Prepare these fun bites the day before to save time and keep your party stress-free, just like my Feta Fried Eggs!

Get ready for a Halloween hit that’s sure to impress!

Rotten Deviled Eggs Ingredients

For the Filling

  • Eggs – Hard boiled & sliced in half; they provide the base and structure for the filling.
  • Mayonnaise – 2 tablespoons; adds creaminess and moisture for a smoother texture.
  • Mustard – 1 scant tablespoon; imparts a tangy flavor that balances the creaminess.
  • Worcestershire Sauce – 1 teaspoon; enhances flavor depth to make the filling more interesting.
  • Hot Sauce – A splash (Frank’s Red Hot preferred); adds a delightful kick, perfect for adventurous eaters.
  • Green Gel Food Dye – Adjust as needed to create a monster egg appearance; adds visual appeal essential for these Rotten Deviled Eggs.
  • Salt & Pepper – To taste; enhances the overall flavor profile of the filling.

For Garnish

  • Paprika – Sprinkle for a pop of color and a smoky touch that complements the filling.
  • Chia Seeds – For garnish; adds a bit of crunch, creating an interesting texture contrast.

Let’s gather these ingredients and prepare for a Halloween treat that’s both fun and delicious!

Step‑by‑Step Instructions for Deliciously Rotten Halloween Deviled Eggs

Step 1: Boil the Eggs
Begin by boiling your eggs to create the perfect base for your Rotten Deviled Eggs. Place the eggs in a saucepan and cover them with cold water, ensuring they’re submerged. Bring the water to a gentle boil over medium heat, then cover the pot, remove it from heat, and let the eggs sit for about 12 minutes. Once the time is up, transfer the eggs to an ice bath for 5–10 minutes to cool completely before peeling.

Step 2: Prepare the Filling
Once your hard-boiled eggs have cooled, carefully peel them and slice them in half lengthwise. Gently scoop the yolks into a mixing bowl and mash them with a fork until crumbly. Add the mayonnaise, mustard, Worcestershire sauce, a splash of hot sauce, and a few drops of green gel food dye. Season with salt and pepper, and mix well until smooth and creamy, creating a deliciously eerie filling for your Halloween Deviled Eggs.

Step 3: Assemble the Eggs
Now it’s time to assemble those spooky Rotten Deviled Eggs! Using a spoon or piping bag, fill each egg white half with the vibrant green yolk mixture, creating a generous mound. Make sure to fill them all to achieve that monster egg appearance. The key is to make them look both inviting and eerily delicious—aim for a playful presentation that will entice your guests.

Step 4: Garnish for Spookiness
To enhance the look and flavor of your Rotten Deviled Eggs, it’s time to add the finishing touches. Sprinkle a dash of paprika over the filled eggs for a pop of color and smoky flavor. For an added crunch, scatter chia seeds on top, evoking the texture of lizard scales. These garnishes will not only make your deviled eggs look fabulous but also add an extra layer of taste.

Step 5: Chill and Serve
Finally, place your completed Halloween Deviled Eggs on a serving platter and cover them with plastic wrap. For optimal taste, let them chill in the refrigerator for at least 30 minutes before serving. This allows the flavors to meld beautifully. When you’re ready to impress your guests, unveil these fun and frightful snacks at your Halloween gathering for a deliciously spooky treat!

What to Serve with Deliciously Rotten Halloween Deviled Eggs

These vibrant, spooky bites make a perfect centerpiece for your Halloween spread, but they deserve some delicious companions!

  • Crispy Veggie Platter: A colorful array of fresh vegetables adds a crunchy contrast, balancing the rich filling and making it fun to dip.
  • Cheesy Garlic Breadsticks: Soft and warm breadsticks bring a comforting touch to the table, offering a flavorful pairing against the eggs’ tangy taste.
  • Creepy Pasta Salad: Tossed with colorful veggies and a spooky dressing, it complements the aesthetic of your deviled eggs while bringing freshness to each bite.
  • Mini Pumpkin Pies: For a sweet treat, these mini desserts echo the Halloween theme and provide a delightful contrast to your savory deviled eggs.
  • Witch’s Brew Punch: Quench your thirst with a fun, bubbly beverage flavored with fruity juices that harmonizes perfectly with the egg’s bold flavors.
  • Spooktacular Fruit Skewers: Combine seasonal fruits on sticks for a lively, refreshing side that adds a burst of color and sweetness alongside the deviled eggs.
  • Chocolate Mousse Cups: These rich, creamy desserts bring a touch of decadence that everyone will love, making them a fitting end to your haunted feast.
  • Ghoulish Cheese Platter: Select a variety of cheeses and charcuterie, enhancing your table’s elegance and satisfying any crunchy or creamy cravings from guests.
  • Jack-o’-Lantern Stuffed Peppers: Adding color and fun, these roasted peppers filled with flavorful rice or meat blend seamlessly with the Halloween theme.
  • Black Cat Cookies: These adorable cookies will charm kids and add whimsy to your Halloween gathering, ensuring smiles all around.

Make Ahead Options

These Deliciously Rotten Halloween Deviled Eggs are perfect for meal prep! You can boil and peel the eggs up to 3 days in advance—simply refrigerate them in a covered container to keep them fresh and prevent that unsightly greening along the edges. Additionally, you can prepare the creamy filling and store it in an airtight container for up to 24 hours in the fridge. When you’re ready to serve, just fill the egg whites with the prepared mixture and garnish them; a quick chill in the refrigerator for 30 minutes will enhance the flavors without compromising quality. By prepping ahead, you’ll save valuable time on party day, ensuring your Halloween gathering is both fun and stress-free!

Expert Tips for Rotten Deviled Eggs

Cool Eggs Properly: Ensure eggs are completely cooled after boiling to make peeling easier without damaging the whites.

Customize Spice Levels: Adjust the hot sauce and Worcestershire sauce to suit your family’s palate for the perfect kick in these Rotten Deviled Eggs.

Choose the Right Dye: For a vibrant color, use high-quality green gel food dye. If preferred, explore natural food coloring options for a healthier twist.

Piping for Precision: If you want a clean and neat filling, consider using a piping bag to fill the egg whites, creating a sophisticated look.

Garnish Creatively: Experiment with different garnishes like chopped olives or spicy sprinkle blends for added flavor and visual appeal.

Embrace these tips to take your Halloween Deviled Eggs to spooktacular new heights!

Variations & Substitutions for Rotten Deviled Eggs

Feel free to customize these treats with fun twists and substitutions that will delight every palate!

  • Greek Yogurt: Swap mayonnaise for Greek yogurt for a creamy and tangy twist that adds protein to these devilish snacks.
    This option keeps the filling smooth but light, perfect for a healthier choice!

  • Natural Food Coloring: Use beet juice or turmeric for a natural alternative to food dye, creating a fun spin on the visuals.
    Kids love the idea of using “real” colors, making them feel like little chefs in the kitchen!

  • Diced Ingredients: Add diced pickles or crispy bacon bits for a crunch that elevates the flavor.
    These unexpected additions can make your deviled eggs even more irresistible—perfect for those craving a twist!

  • Spicy Variants: Incorporate diced jalapeños or sriracha in the filling for extra heat.
    For those who enjoy a kick, this variation adds an exciting twist to the traditional recipe!

  • Alternative Garnishes: Swap paprika for smoked paprika or chili powder to add new flavor dimensions to your eggs.
    A slight change in garnish can create a whole new tasting experience—a fun experiment!

  • Avocado Filling: Replace yolks with mashed avocado for a creamy, nutrient-packed filling that’s vegan-friendly.
    The resulting mixture will maintain that smooth texture while providing a different taste sensation!

  • Creative Shapes: Use cookie cutters to create fun shapes from the egg white halves for themed occasions.
    Not only do they look adorable, but they also encourage kids to interact and enjoy their food!

  • Add Herb Flavor: Mix in fresh herbs like chives or dill for an aromatic twist to the filling.
    Fresh herbs can brighten the flavor profile beautifully, offering a garden-fresh taste each bite!

Want more ideas? Customize them while keeping in mind some delightful recipes like my Feta Fried Eggs that can inspire exciting alternatives for your gatherings!

How to Store and Freeze Rotten Deviled Eggs

Fridge: Store your Rotten Deviled Eggs in an airtight container for up to 3 days. This keeps them fresh and ready to serve whenever a craving strikes!

Make-Ahead: These spooky snacks can be prepared the day before your Halloween party, making them a convenient choice for entertaining. Just cover and refrigerate until serving.

Freezer: While not recommended for freezing due to the texture of the filling, if necessary, you can freeze unfilled egg whites for up to 2 months. Thaw and fill them fresh before serving!

Reheating: These treats are best enjoyed cold, so skip the reheating and serve them directly from the fridge for that perfect creamy texture.

Rotten Deviled Eggs Recipe FAQs

How do I choose the best eggs for boiling?
Absolutely! Look for eggs that are at least a week old, as they peel more easily once boiled. Check for freshness by placing the eggs in water; if they sink and lay flat, they’re fresh. If they stand upright or float, it’s best to discard them.

How should I store leftover Rotten Deviled Eggs?
These tasty deviled eggs can be kept in an airtight container in the refrigerator for up to 3 days. Make sure to cover them to prevent any odors from other foods affecting their flavor. This way, you can enjoy this spooky treat anytime!

Can I freeze Rotten Deviled Eggs?
It’s not recommended to freeze the complete deviled eggs since the filling texture changes after thawing. However, you can freeze the egg whites for up to 2 months. To do this, allow them to cool after boiling, then place them in a single layer on a baking sheet in the freezer until firm. Transfer them to an airtight container or freezer bag. When ready to serve, thaw the egg whites and then fill them with your creamy filling fresh!

What if my egg yolks are crumbly after mashing?
Very! If your egg yolks are crumbly, it may mean they weren’t mashed thoroughly. Just whisk them a bit longer—if they’re still not coming together, try adding a little more mayonnaise to achieve that creamy consistency. Don’t be afraid to get in there with a fork or even a food processor for a smooth blend!

Are there any dietary considerations for these deviled eggs?
Yes! If you’re concerned about allergens, always check the labels on your mayonnaise and hot sauce. For gluten-free diets, this recipe is safe as long as you choose gluten-free brands. Additionally, if you want to make them a bit lighter, consider substituting the mayonnaise with Greek yogurt, which offers a tangy touch while keeping it creamy.

How far in advance can I prepare these deviled eggs?
I often make these the day before a party! They can be prepared up to 24 hours in advance. Just assemble them and store them covered in the fridge. This allows the flavors to meld beautifully and means one less thing to worry about on the big day.

Rotten Deviled Eggs

Spooktacular Rotten Deviled Eggs for Halloween Fun

These Rotten Deviled Eggs are a fun twist on a classic appetizer, perfect for Halloween parties and gatherings.
Prep Time 10 minutes
Cook Time 12 minutes
Cooling Time 10 minutes
Total Time 32 minutes
Servings: 12 eggs
Course: Appetizers
Cuisine: Halloween
Calories: 80

Ingredients
  

For the Filling
  • 6 pieces Eggs Hard boiled & sliced in half
  • 2 tablespoons Mayonnaise Adds creaminess
  • 1 tablespoon Mustard Imparts tangy flavor
  • 1 teaspoon Worcestershire Sauce Enhances flavor depth
  • 1 splash Hot Sauce Frank's Red Hot preferred
  • Green Gel Food Dye Adjust as needed for color
  • Salt & Pepper To taste
For Garnish
  • Paprika Sprinkle for color and flavor
  • Chia Seeds For garnish and texture

Equipment

  • Saucepan
  • Mixing Bowl
  • Spoon
  • Piping Bag
  • airtight container

Method
 

Step-by-Step Instructions
  1. Boil the Eggs: Place the eggs in a saucepan with cold water, bring to a boil, cover and remove from heat, let sit for 12 minutes, then cool in an ice bath.
  2. Prepare the Filling: Peel cooled eggs, scoop yolks into a bowl, mash with mayonnaise, mustard, Worcestershire sauce, hot sauce, dye, and seasonings until smooth.
  3. Assemble the Eggs: Fill egg white halves with the yolk mixture to create a generous mound for appearance.
  4. Garnish for Spookiness: Sprinkle paprika and chia seeds on top for added flavor and visual appeal.
  5. Chill and Serve: Place the eggs on a platter, cover, and chill in the fridge for 30 minutes before serving.

Nutrition

Serving: 1eggCalories: 80kcalCarbohydrates: 1gProtein: 5gFat: 7gSaturated Fat: 1gPolyunsaturated Fat: 0.5gMonounsaturated Fat: 2gCholesterol: 186mgSodium: 150mgPotassium: 60mgVitamin A: 270IUCalcium: 25mgIron: 0.8mg

Notes

These deviled eggs are best enjoyed cold and can be made a day ahead of your Halloween party for convenience.

Tried this recipe?

Let us know how it was!

Irresistible Pumpkin S’mores Cookies for Cozy Fall Days

As the leaves begin to swirl in a golden dance and the crisp autumn air beckons us outdoors, I find myself craving the warmth of cozy treats that celebrate the season. That’s where my Pumpkin S’mores Cookies come into play, a delightful fusion of soft, chewy textures and rich fall flavors. Each cookie is not just a sweet indulgence; it’s a mini celebration of those bonfire nights spent roasting marshmallows, all while infusing the beloved taste of pumpkin. Not only are these cookies incredibly easy to whip up—perfect for last-minute gatherings—but they also make for a lovely addition to any fall dessert table. Curious about how to capture the essence of autumn in cookie form? Let’s get baking!

Why are Pumpkin S’mores Cookies a must-try?

Irresistible flavors climb to new heights with the blend of pumpkin and s’mores that delights every palate. Soft and chewy in texture, they create a comforting bite that exemplifies the joys of fall baking. Effortless to make, these cookies require minimal time and yield maximum deliciousness, making them perfect for busy weekends. Versatile options allow you to experiment with different chocolate types or even try swapping in Biscoff cookies for a unique twist. Whether enjoyed warm or cooled, every cookie is sure to spark smiles among friends and family, elevating your gatherings. Don’t miss out on this scrumptious treat to celebrate the season!

Pumpkin S’mores Cookies Ingredients

For the Cookies

  • Unsalted Butter – Provides richness and moisture; make sure it’s at room temperature for easier mixing.
  • Brown Sugar – Adds depth of flavor and moisture; can substitute with granulated sugar for a lighter taste.
  • Granulated Sugar – Sweetens the cookies, enhancing their delightful flavors.
  • Pumpkin Puree – The star of these Pumpkin S’mores Cookies; ensure you use 100% pure pumpkin puree, not pie filling.
  • Egg – Binds the ingredients together and contributes to the cookie’s structure.
  • Vanilla Extract – A small touch that elevates the overall flavor profile.
  • All-Purpose Flour – Gives the cookies their structure; whole wheat flour can be a fun swap for a heartier taste.
  • Baking Soda – Ensures the cookies rise and stay fluffy.
  • Pumpkin Pie Spice – Infuses a warm, spicy flavor; feel free to replace with individual spices like cinnamon, nutmeg, or ginger.
  • Salt – Balances the sweetness for a perfect bite.

For the S’mores Filling

  • Chocolate Chips – Adds a sweet, rich layer to every bite; choose semi-sweet, white chocolate, or dark as per your craving.
  • Mini Marshmallows – Provides a chewy, sweet texture; optional for those who prefer a lighter marshmallow presence.
  • Graham Crackers – Brings a crunchy texture that recreates the classic s’mores experience; crush them for more integrated flavor.

Optional

  • Orange Food Coloring – Just a drop to enhance the cookie’s appearance, adding a festive fall touch.

Dive into these Pumpkin S’mores Cookies, and let the rich flavors and cozy warmth fill your kitchen with the spirit of autumn!

Step‑by‑Step Instructions for Pumpkin S’mores Cookies

Step 1: Preheat the Oven
Begin by preheating your oven to 350°F (175°C). While the oven heats, line two baking sheets with parchment paper to prevent sticking and ensure easy cleanup. This step sets the stage for baking the Pumpkin S’mores Cookies, allowing them to bake evenly.

Step 2: Cream Together Butter and Sugars
In a large mixing bowl, combine room-temperature unsalted butter with both brown and granulated sugars. Use an electric mixer to beat them together until the mixture is light and fluffy, which should take about 2-3 minutes. This step creates a rich base for your cookies, enhancing their texture and flavor.

Step 3: Incorporate Wet Ingredients
Next, add the pumpkin puree, egg, vanilla extract, and optional orange food coloring to your creamed mixture. Mix thoroughly until all the wet ingredients are well combined, creating a smooth, vibrant mix. The pumpkin puree will give your Pumpkin S’mores Cookies their distinct flavor and moistness.

Step 4: Combine the Dry Ingredients
In another bowl, whisk together the all-purpose flour, baking soda, pumpkin pie spice, and salt. Ensure there are no lumps in the dry ingredients for a uniform cookie texture. Gradually incorporating this mixture in the next step will help maintain the fluffiness of the dough as your cookies bake.

Step 5: Mix Wet and Dry Ingredients
Slowly add the dry ingredients to the wet mixture, gently stirring until just combined. Avoid over-mixing; you want the dough to remain soft and tender. This step is crucial to ensuring your Pumpkin S’mores Cookies turn out chewy and delicious.

Step 6: Fold in S’mores Elements
Add in the chocolate chips, mini marshmallows, and crushed graham crackers into the dough. Gently fold them in with a spatula until evenly distributed. This is where the magic happens, as the flavors of s’mores start to blend beautifully with the pumpkin cookie base.

Step 7: Scoop the Dough
Using a cookie scoop or tablespoon, drop rounded mounds of dough onto the prepared baking sheets, spacing them about 2 inches apart. Aim for uniform-looking dough balls for even baking. This step will make sure each Pumpkin S’mores Cookie has enough room to spread while baking.

Step 8: Add Extra Toppings
For a decorative and delicious touch, press additional chocolate chips, marshmallows, and graham cracker crumbs onto the top of each cookie dough ball. This will enhance the visual appeal of your cookies and ensure every bite is packed with s’mores goodness.

Step 9: Bake the Cookies
Place the baking sheets in your preheated oven and bake the cookies for 12-14 minutes. Keep an eye on them, and look for golden edges with soft centers. This visual cue means your Pumpkin S’mores Cookies are perfectly baked and ready to delight your senses.

Step 10: Cool and Enjoy
After baking, allow the cookies to cool on the baking sheet for about 5 minutes before transferring them to a wire rack. This step ensures they set properly while still warm and prevents them from breaking apart. Enjoy the deliciousness of your Pumpkin S’mores Cookies once they have cooled, or serve them warm for an irresistible treat.

What to Serve with Pumpkin S’mores Cookies?

As the aroma of freshly baked Pumpkin S’mores Cookies fills your kitchen, let’s elevate your dessert table with delightful pairings that enhance this cozy treat.

  • Vanilla Ice Cream: A scoop of creamy vanilla ice cream brings a cold contrast to the warm, chewy cookies, creating a delightful melting experience.
  • Apple Cider: Warm spiced apple cider offers a festive, seasonal drink that perfectly complements the flavors of pumpkin and spice in the cookies.
  • Chai Latte: The rich, spiced notes of a chai latte amplify the fall essence, bringing warmth and comfort to your afternoon snack or evening dessert.
  • Pumpkin Spice Hot Chocolate: This decadent drink channels all the cozy vibes of fall, matching the flavors of your cookies while providing an indulgent treat.
  • Toffee Pudding: A rich, buttery toffee pudding creates an inviting dessert duo, combining soft textures in the most delightful way.
  • Cinnamon Sugar Doughnuts: These sugary delights add a crispy texture, juxtaposing the chewy cookies while staying true to fall’s spice theme.
  • Chocolate Almond Milkshake: A velvety shake marries the flavors of chocolate and almond, beautifully aligning with the chocolate chips in your cookies.
  • Ginger Snap Cookies: The spiciness of ginger snaps will enhance the pumpkin notes, creating a delightful cookie platter that encourages sampling.
  • Coffee or Espresso: A hot cup of coffee or a shot of espresso balances the sweetness and enriches the experience with a warm embrace.

Make Ahead Options

These Pumpkin S’mores Cookies are perfect for meal prep enthusiasts looking to save time during busy weeks! You can prepare the cookie dough up to 24 hours ahead of time and refrigerate it in an airtight container. Just scoop the dough onto your baking sheets and cover them with plastic wrap to prevent drying out. Alternatively, you can freeze the unbaked cookie dough for up to 3 months. When you’re ready to bake, simply place them directly from the freezer into a preheated oven, adding an extra minute or two to the baking time. This way, you’ll have fresh, delicious Pumpkin S’mores Cookies with minimal effort on those cozy fall days!

How to Store and Freeze Pumpkin S’mores Cookies

Room Temperature: Store your Pumpkin S’mores Cookies in an airtight container for up to 2-3 days to maintain their soft and chewy texture.

Fridge: If you’d like to extend their freshness, refrigerate the cookies in an airtight container for up to a week while preserving their delightful flavors.

Freezer: For long-term storage, freeze unbaked cookie dough in a tightly sealed container or freezer bag for up to a year. When ready, simply bake straight from the freezer!

Reheating: To enjoy warm cookies later, microwave them for about 10-15 seconds, ensuring they stay deliciously gooey without overcooking.

Pumpkin S’mores Cookies Variations

Feel free to explore these delightful twists on your Pumpkin S’mores Cookies to spark creativity and cater to your taste buds!

  • Biscoff Swap: Replace graham crackers with crushed Biscoff cookies for a deliciously unique flavor twist. It adds a delightful caramel note that truly complements the pumpkin.

  • Nutty Addition: Incorporate toasted pecans or walnuts alongside chocolate chips. The added crunch and nutty flavor will elevate your cookies, adding both texture and warmth.

  • Vegan Delight: Use coconut oil instead of butter and replace the egg with a flax egg for a delightful vegan version. Your family won’t miss a beat with this substitute!

  • Chili Chocolates: Craving a little heat? Mix in some chili-flavored chocolate chips for a fiery surprise inside each cookie. It’s a fun contrast to the sweet pumpkin flavors.

  • Cinnamon Sugar Topping: Before baking, sprinkle the dough with a blend of cinnamon and sugar for a sweet, aromatic crust. It layers additional warmth and sweetness to each bite.

  • Gooey Chocolate Center: For a molten chocolate surprise, stuff each cookie with a piece of chocolate or a mini chocolate bar just before baking. When you bite in, the chocolate will ooze out, creating a decadent treat.

  • Pumpkin Spice Swirls: For added visual appeal, dollop small spoonfuls of pumpkin spice batter on the cookie dough and swirl with a toothpick before baking. It gives a marbled effect and extra pumpkin flavor.

  • Dipped in Chocolate: After baking and cooling, dip half of the cookie in melted chocolate and let it set. This adds an indulgent touch that pairs well with the pumpkin flavor.

And if you’re looking for more fall-inspired sweets, check out these scrumptious Blueberry Breakfast Cookies or warm up with a hearty bowl of Joumou Haitian Pumpkin Soup! Each addition brings its own charm, enhancing your culinary adventure with these cookies. Happy baking!

Expert Tips for Pumpkin S’mores Cookies

  • Don’t Over-Mix: Mix dry and wet ingredients just until combined. Over-mixing can lead to tough cookies instead of the soft and chewy texture you desire.

  • Use Room Temperature Ingredients: Ensuring your butter and eggs are at room temperature allows for better incorporation, resulting in a smoother cookie dough for your Pumpkin S’mores Cookies.

  • Cool Before Storing: Allow cookies to cool on a wire rack for the best texture. Storing them while still warm can lead to sogginess.

  • Elevate Flavor with Chilling: Consider chilling your cookie dough for 30 minutes before baking. This can enhance the flavors and improve the cookie’s final texture.

  • Less is More on Marshmallows: If you prefer a more subtle marshmallow flavor, reduce the number of mini marshmallows in your dough. It’s all about finding your perfect balance!

  • Experiment with Mix-ins: Don’t hesitate to try different chocolate chips or add nuts to your Pumpkin S’mores Cookies. They can add interesting flavors and textures to your delicious creation.

Pumpkin S’mores Cookies Recipe FAQs

How do I choose ripe pumpkin puree?
Absolutely! When selecting pumpkin puree, look for cans labeled “100% pure pumpkin.” Avoid any that mention “pumpkin pie filling,” as these contain added sugar and spices. If you’re using fresh pumpkins, choose one that feels heavy for its size with a firm skin and no dark spots.

What’s the best way to store leftover cookies?
For storing your delicious Pumpkin S’mores Cookies, keep them in an airtight container at room temperature for 2-3 days. If you’d like them to last longer, pop them in the refrigerator for up to one week. Just remember to give them a little time to come to room temperature before enjoying!

Can I freeze the unbaked cookie dough?
Yes! Freezing unbaked dough is an excellent way to enjoy fresh cookies later on. Simply scoop the cookie dough onto a baking sheet lined with parchment paper, freeze until solid, and then transfer the dough balls to a freezer-safe bag. They can last up to a year! When you’re ready to bake, there’s no need to thaw; just add a couple of extra minutes to the baking time.

What should I do if my cookies spread too much while baking?
If you find your Pumpkin S’mores Cookies are spreading too much, it’s likely due to insufficient chilling of the dough or over-mixing. I recommend chilling the cookie dough for at least 30 minutes before baking; this helps the cookies maintain their shape. Also, ensure you’re not over-mixing when incorporating the dry ingredients!

Are there any dietary considerations for this recipe?
Certainly! If you’re catering to specific dietary needs, it’s easy to make adjustments. Substitute regular butter with dairy-free or vegan butter for a dairy-free option, and use vegan marshmallows to keep them completely vegan. Always check for allergens in the ingredients you choose, particularly with chocolate chips and cookies used in fillings.

Pumpkin S’mores Cookies

Irresistible Pumpkin S'mores Cookies for Cozy Fall Days

Delight in these Pumpkin S’mores Cookies, a perfect blend of soft, chewy textures and rich fall flavors for a cozy treat.
Prep Time 15 minutes
Cook Time 14 minutes
Cooling Time 5 minutes
Total Time 34 minutes
Servings: 24 cookies
Course: Dessert
Cuisine: American
Calories: 180

Ingredients
  

For the Cookies
  • 1 cup Unsalted Butter Room temperature
  • 1 cup Brown Sugar Can substitute with granulated sugar
  • 1/2 cup Granulated Sugar
  • 1 cup Pumpkin Puree 100% pure, not pie filling
  • 1 large Egg
  • 1 teaspoon Vanilla Extract
  • 3 cups All-Purpose Flour Whole wheat flour can be a fun swap
  • 1 teaspoon Baking Soda
  • 2 teaspoons Pumpkin Pie Spice Can replace with individual spices
  • 1/2 teaspoon Salt
For the S'mores Filling
  • 2 cups Chocolate Chips Semi-sweet, white, or dark
  • 1 cup Mini Marshmallows Optional
  • 1 cup Graham Crackers Crushed
Optional
  • 1 drop Orange Food Coloring For enhanced appearance

Equipment

  • Electric mixer
  • Mixing bowls
  • Baking Sheets
  • Parchment Paper
  • Cookie Scoop

Method
 

Step-by-Step Instructions
  1. Preheat your oven to 350°F (175°C) and line two baking sheets with parchment paper.
  2. In a large mixing bowl, cream together room-temperature unsalted butter, brown sugar, and granulated sugar until light and fluffy.
  3. Add pumpkin puree, egg, vanilla extract, and optional orange food coloring; mix until smooth.
  4. In another bowl, whisk together flour, baking soda, pumpkin pie spice, and salt.
  5. Gradually add the dry mixture to the wet mixture, stirring until just combined.
  6. Fold in chocolate chips, mini marshmallows, and crushed graham crackers.
  7. Scoop rounded mounds of dough onto the baking sheets, spacing them about 2 inches apart.
  8. Press additional chocolate chips, marshmallows, and graham cracker crumbs on top of each dough ball.
  9. Bake for 12-14 minutes until golden around the edges and soft in the center.
  10. Let the cookies cool on the baking sheet for 5 minutes before transferring to a wire rack.

Nutrition

Serving: 1cookieCalories: 180kcalCarbohydrates: 25gProtein: 2gFat: 8gSaturated Fat: 5gPolyunsaturated Fat: 1gMonounsaturated Fat: 1gCholesterol: 30mgSodium: 100mgPotassium: 75mgFiber: 1gSugar: 12gVitamin A: 1500IUCalcium: 15mgIron: 0.5mg

Notes

For best texture, cool cookies completely before storing. Chilling dough for 30 minutes may enhance flavors and texture.

Tried this recipe?

Let us know how it was!

Creamy Philly Cheesesteak Soup for Cozy Nights In

As the first chill of autumn settles in, I find myself craving cozy, hearty meals that warm both the body and soul. That’s when my passion for cooking brings me back to a family favorite: Philly Cheesesteak Soup. This delightful recipe merges the comforting essence of America’s beloved cheesesteak sandwich into a creamy, savory broth that’s ready in no time. Not only is it easy to whip up on a busy weeknight, but it’s also a surefire crowd-pleaser that will have your loved ones asking for seconds. Trust me; this soup is a game-changer for chilly evenings or those days when you simply want to indulge in rich, hearty flavors. Can you already smell those savory aromas wafting through your kitchen? Let’s dive in!

Why is Philly Cheesesteak Soup a Must-Try?

Comforting warmth: This soup delivers the ultimate cozy sensation, perfect for chilly nights when you want something hearty and satisfying.

Rich, cheesy goodness: The creamy broth blended with provolone and cream cheese gives a truly luxurious texture that feels indulgent but is still easy to make.

Quick and simple: With a straightforward cooking process, you can prepare this dish even on the busiest weeknights, making it ideal for family dinners that everyone will love.

Crowd-pleaser: It’s a meal that appeals to all ages, much like the classic cheesesteak, ensuring everyone at the table is happy and coming back for more.

Flexible toppings: You can easily customize it with your favorite garnishes, such as sautéed mushrooms or a sprinkle of parsley, to elevate the dish.

Whether served on its own or with a side of crusty rolls, this recipe truly embodies home-cooked warmth and goodness!

Philly Cheesesteak Soup Ingredients

For the Soup
Olive Oil – Use this for sautéing vegetables; vegetable oil works too if you prefer.
Onion – Adds a sweet depth; yellow or white onion is milder and great for this dish.
Green Bell Pepper – Contributes freshness and a crunch; feel free to swap for any other bell pepper color.
Red Bell Pepper – Adds sweetness and vibrant color; yellow or orange bell peppers also do the trick.
Sirloin Steak – The heart of your soup, must be thinly sliced for tenderness; ribeye or flank steak can be substituted.
Beef Broth – The base that brings depth of flavor; low-sodium is best for controlling saltiness.
Diced Tomatoes – Provide acidity and texture; use fresh tomatoes when they’re in season for extra flavor.
Worcestershire Sauce – Enhances the umami flavor; soy sauce can be a gluten-free alternative.
Dried Thyme – Adds an aromatic note; Italian seasoning makes a fine substitute.
Red Pepper Flakes – A dash of heat if you like; feel free to omit if you prefer no spice.
Salt and Black Pepper – Essential for flavor; adjust to your taste preferences.

For the Cheese Sauce
Butter – Used in making the cheese sauce; margarine works for a dairy-free option.
All-Purpose Flour – Thickens the sauce; a gluten-free flour blend can be used instead.
Milk – Ensures a creamy base for the sauce; almond milk is a lighter alternative.
Cream Cheese – Adds a rich, creamy texture; mascarpone can substitute for a different flavor profile.
Provolone Cheese – Key for that authentic cheesesteak flavor; mozzarella offers a milder taste if desired.
Mozzarella Cheese – For that gooey stretch; you can use extra provolone to amp up the cheesiness.
Garlic Powder – Enhances the overall flavor; fresh minced garlic can work as a substitute.
Onion Powder – Adds subtle onion flavor; it’s optional based on preference.

For Serving
Crusty Rolls – Perfect for dipping; any type of crusty bread will complement this soup well.
Chopped Fresh Parsley – Adds a pop of color and freshness; optional but definitely enhances presentation.
Extra Shredded Cheese – For garnishing; more provolone or mozzarella will elevate the cheesiness even further.

Indulge in the enchanting tastes of Philly Cheesesteak Soup, and let your loved ones savor every comforting spoonful!

Step‑by‑Step Instructions for Philly Cheesesteak Soup

Step 1: Sauté Vegetables
In a large pot, heat 2 tablespoons of olive oil over medium heat. Once hot, add 1 chopped onion and 1 diced green bell pepper along with 1 diced red bell pepper to the pot. Sauté the vegetables for about 8–10 minutes, stirring occasionally, until they are softened and slightly caramelized, filling your kitchen with delightful aromas.

Step 2: Brown Steak
Add 1 pound of thinly sliced sirloin steak to the pot, spreading it out evenly to avoid overcrowding. Cook for about 5–7 minutes until the steak is browned and just cooked through. Stir occasionally to ensure even cooking and transform the flavors before moving on to the next steps in your Philly Cheesesteak Soup.

Step 3: Combine Base Ingredients
Pour in 4 cups of low-sodium beef broth, bringing depth to your soup’s flavorful base. Stir in 1 can of diced tomatoes, 2 tablespoons of Worcestershire sauce, 1 teaspoon of dried thyme, and a pinch of red pepper flakes. Season with salt and black pepper to taste, then let the mixture simmer for 30-60 minutes on low heat, allowing flavors to meld beautifully.

Step 4: Make Cheese Sauce
In a separate saucepan, melt 2 tablespoons of butter over medium heat. Whisk in 2 tablespoons of all-purpose flour and cook for about 2 minutes to form a roux. Gradually add 2 cups of milk while whisking constantly until the mixture is smooth and heated through, about 5 minutes. Stir in 4 ounces of cream cheese, followed by 1 cup of provolone cheese and 1 cup of mozzarella cheese until melted and creamy.

Step 5: Integrate Cheese Sauce
Reduce the heat to low beneath the soup and pour the creamy cheese sauce into the pot, stirring thoroughly to combine. Let the mixture heat gently, avoiding boiling, for about 5 minutes. If the soup is too thick for your liking, feel free to adjust its consistency by adding more beef broth gradually, ensuring a perfect creamy texture for your Philly Cheesesteak Soup.

Step 6: Serve
Ladle the hot soup into bowls, and garnish with additional shredded provolone or mozzarella cheese, and a sprinkle of chopped fresh parsley if desired. Serve immediately alongside crusty rolls for dipping, transforming your dinner table into a warm and inviting gathering spot. Enjoy every comforting bite of your flavorful Philly Cheesesteak Soup!

What to Serve with Philly Cheesesteak Soup

Create a comforting dining experience that captivates the senses and enriches your mealtime rituals.

  • Crusty Rolls: Perfect for dipping into the creamy soup, these rolls absorb the savory flavors beautifully. Choose a baguette or Italian loaf for added texture.

  • Garlic Bread: A warm, buttery garlic bread offers a rich flavor that complements the cheesy soup, adding a satisfying crunch with each bite.

  • Simple Salad: A light side salad with mixed greens, cherry tomatoes, and a tangy vinaigrette balances the richness of the soup, providing a refreshing contrast.

  • Roasted Vegetables: Vegetable medleys of zucchini, asparagus, and bell peppers add a vibrant, caramelized touch, enhancing the overall meal with their earthy sweetness.

Enjoy a cozy evening with a glass of red wine or light beer to pair perfectly, harmonizing with the comforting elements of your Philly Cheesesteak Soup.

  • Chocolate Chip Cookies: Finish off your meal on a sweet note! Warm cookies provide a delightful contrast and complete the cozy, comforting experience.

Philly Cheesesteak Soup Variations & Substitutions

Feel free to make this comforting soup uniquely yours with these delightful twists and swaps!

  • Dairy-Free: Use almond milk and dairy-free cream cheese for a lactose-free version that doesn’t skimp on flavor.

  • Spicy Kick: Add sliced jalapeños or a splash of hot sauce while simmering for a tasty heat boost that warms you from the inside out.

  • Mushroom Magic: Incorporate sautéed mushrooms alongside the bell peppers to add earthy depth and rich umami flavors.

  • Low-Carb Option: Swap out the crusty rolls for celery sticks or serve over a bed of sautéed spinach for a deliciously lighter dish.

  • Vegetarian Delight: Replace the steak with hearty plant-based protein like lentils or jackfruit, ensuring the broth is rich and full of flavor.

  • Extra Creamy: Boost the cream factor by adding an additional block of cream cheese; it’ll yield a luxurious texture that’s irresistibly smooth.

  • Fresh Herbs: Stir in fresh basil or cilantro right before serving for a burst of flavor & brightness that elevates the whole dish.

  • Flavorful Broth: For a richer taste, try swapping half the beef broth for chicken broth or bone broth to deepen the flavor profile.

With these variations, you can easily transform your Philly Cheesesteak Soup and share your loving creativity. Looking for similar comforting dishes? Check out my Potato and Bacon Soup or explore my Mexican Soup Flavorful that also bring family-favorite flavors to new heights!

Expert Tips for Philly Cheesesteak Soup

  • Quality Beef Matters: Use high-quality sirloin steak, slicing thinly against the grain for tenderness and optimal flavor in your Philly Cheesesteak Soup.

  • Don’t Rush the Sauté: Properly sauté the onions and bell peppers until caramelized to enhance the soup’s depths of flavor—this step is crucial!

  • Season Gradually: Start with low-sodium broth and adjust seasonings as needed. Balance is key to achieving harmony in your soup’s flavors.

  • Cheese Sauce Consistency: If the cheese sauce is too thick, gradually stir in more broth or milk to reach your preferred creamy consistency.

  • Make Ahead for Flavor: Letting your Philly Cheesesteak Soup rest overnight in the refrigerator significantly enhances the flavor as it melds together beautifully.

  • Garnish Wisely: Add your favorite toppings like sautéed mushrooms or a sprinkle of parsley not only enhances aesthetics but takes the flavors to new heights!

How to Store and Freeze Philly Cheesesteak Soup

Fridge: Store in an airtight container in the refrigerator for up to 3 days. Allow the soup to cool before refrigerating to maintain its creamy texture.

Freezer: You can freeze Philly Cheesesteak Soup for up to 3 months. Ensure it’s cooled completely, then transfer to freezer-safe containers or bags.

Reheating: Thaw in the refrigerator overnight before reheating. Gently warm on the stovetop over low heat, adding a splash of broth or milk to restore creaminess, if needed.

Portions: Divide the soup into individual portions before freezing for easy meal prep. This way, you can enjoy a cozy bowl anytime!

Make Ahead Options

Philly Cheesesteak Soup is perfect for busy cooks looking to save time during hectic weeknights! You can chop the vegetables and slice the sirloin steak up to 24 hours in advance, storing them separately in airtight containers in the refrigerator to maintain their freshness. If you prefer, you can also prepare the soup base (steps 1 through 3) and refrigerate it for 3 days before finishing. To keep the creamy cheese sauce smooth, prepare it the day you plan to serve, as reheating can alter the texture. When you’re ready to enjoy your delicious Philly Cheesesteak Soup, simply reheat the base gently, add the cheese sauce, and serve with crusty rolls for a comforting meal everyone will love!

Philly Cheesesteak Soup Recipe FAQs

What kind of steak should I use for Philly Cheesesteak Soup?
For the best flavor and tenderness, I recommend using high-quality sirloin steak, thinly sliced against the grain. If you prefer, ribeye or flank steak can also be fabulous alternatives, each adding its own unique flavor to the soup.

How should I store Philly Cheesesteak Soup?
Store your soup in an airtight container in the refrigerator for up to 3 days. It’s best to allow the soup to cool completely before refrigerating to help maintain its creamy texture.

Can I freeze Philly Cheesesteak Soup?
Absolutely! You can freeze the soup for up to 3 months. Just ensure it cools completely, then transfer it to freezer-safe containers or bags. Make sure to leave some headspace, as the soup will expand when frozen.

What should I do if my soup is too thick?
If you find the soup too thick after reheating, simply adjust its consistency by gradually stirring in additional beef broth or a splash of milk over low heat until it reaches your desired creaminess. Remember, a little at a time helps prevent it from becoming too thin!

Is Philly Cheesesteak Soup safe for those with dairy allergies?
This soup does contain dairy ingredients such as milk, butter, and cheese. However, you can easily modify the recipe to accommodate dairy allergies by substituting butter with margarine and using dairy-free cheese alternatives. Always check labels for hidden allergens.

What’s the best way to reheat leftover Philly Cheesesteak Soup?
To reheat, thaw the soup in the refrigerator overnight. Then gently warm it on the stovetop over low heat, stirring often. Adding a splash of broth or milk will help restore its creamy goodness if needed. Enjoy a comforting bowl anytime!

Philly Cheesesteak Soup

Creamy Philly Cheesesteak Soup for Cozy Nights In

This Creamy Philly Cheesesteak Soup combines the flavors of a classic cheesesteak in a hearty, comforting bowl, perfect for chilly evenings.
Prep Time 10 minutes
Cook Time 1 hour
Total Time 1 hour 10 minutes
Servings: 6 bowls
Course: Dinner
Cuisine: American
Calories: 450

Ingredients
  

For the Soup
  • 2 tablespoons olive oil can substitute vegetable oil
  • 1 onion chopped, yellow or white preferred
  • 1 green bell pepper diced
  • 1 red bell pepper diced
  • 1 pound sirloin steak thinly sliced, ribeye or flank steak can be substituted
  • 4 cups low-sodium beef broth
  • 1 can diced tomatoes
  • 2 tablespoons Worcestershire sauce soy sauce can be a gluten-free alternative
  • 1 teaspoon dried thyme Italian seasoning makes a fine substitute
  • 1 pinch red pepper flakes omit if preferred
  • to taste salt
  • to taste black pepper
For the Cheese Sauce
  • 2 tablespoons butter can substitute margarine
  • 2 tablespoons all-purpose flour gluten-free flour blend can be used
  • 2 cups milk almond milk is a lighter alternative
  • 4 ounces cream cheese mascarpone can substitute
  • 1 cup provolone cheese use mozzarella for a milder taste
  • 1 cup mozzarella cheese extra provolone may be used
  • 1 teaspoon garlic powder fresh minced garlic can be substituted
  • 1 teaspoon onion powder optional
For Serving
  • 6 crusty rolls any type works
  • 1/4 cup chopped fresh parsley optional, for garnish
  • to taste extra shredded cheese more provolone or mozzarella

Equipment

  • Large pot
  • separate saucepan
  • whisk

Method
 

Step-by-Step Instructions
  1. In a large pot, heat olive oil over medium heat. Add chopped onion, diced green bell pepper, and diced red bell pepper. Sauté vegetables for about 8–10 minutes until softened.
  2. Add thinly sliced sirloin steak and cook for 5–7 minutes until browned.
  3. Pour in beef broth, diced tomatoes, Worcestershire sauce, dried thyme, and red pepper flakes. Season with salt and black pepper to taste. Simmer for 30-60 minutes on low heat.
  4. In a separate saucepan, melt butter over medium heat. Whisk in flour and cook for 2 minutes to form a roux. Gradually add milk, whisking until smooth.
  5. Stir in cream cheese, provolone cheese, and mozzarella cheese until melted and creamy.
  6. Pour cheese sauce into the soup pot, stirring to combine. Heat gently for 5 minutes, adjusting the consistency with more broth if needed.
  7. Ladle soup into bowls, garnishing with extra cheese and parsley if desired. Serve with crusty rolls.

Nutrition

Serving: 1bowlCalories: 450kcalCarbohydrates: 30gProtein: 25gFat: 25gSaturated Fat: 12gPolyunsaturated Fat: 1gMonounsaturated Fat: 10gCholesterol: 80mgSodium: 800mgPotassium: 600mgFiber: 3gSugar: 5gVitamin A: 500IUVitamin C: 60mgCalcium: 250mgIron: 3mg

Notes

Use high-quality beef and properly sauté vegetables for the best flavor. Letting the soup rest overnight improves flavor.

Tried this recipe?

Let us know how it was!

Dumpling Ramen Soup That Will Warm Your Soul and Satisfy

There’s nothing quite like the warmth of a steaming bowl of soup to chase away the chill of a busy day. Today, I’m excited to share my Dumpling Ramen Soup, a comforting dish that combines rich broth, delightful dumplings, and tender noodles in one pot. This recipe is a lifesaver for weeknight dinners, as it comes together in a flash and is fully adaptable for dietary needs—whether you’re going gluten-free or exploring vegetarian options. It’s not just hearty and satisfying; it’s a wholesome way to sneak in some veggies, making it perfect for the whole family. Ready to dive into a bowl that tastes like a hug? Let’s get cooking!

Why Is This Dumpling Ramen Soup So Special?

Comforting warmth: Each bowl of this Dumpling Ramen Soup is like a cozy hug on a chilly evening, making it perfect for comforting weeknight meals.

Customizable goodness: With options for gluten-free and vegetarian adaptations, it’s easy to tailor this dish to meet your dietary preferences while still delivering unforgettable flavor.

Quick and easy: Whipping up this delicious soup takes minimal effort and ingredients, so you can enjoy a homemade meal without the hassle.

Umami-packed broth: The rich, savory broth features an irresistible depth of flavor, ensuring every spoonful delights your taste buds.

Veggie-licious: Packed with fresh bok choy and optional greens, this soup offers a delicious way to include a variety of vegetables in your diet.

Elevate your soup game with this delightful dish, perfect alongside other hearty options like Sausage Tortellini Soup or even a warm slice of crusty bread for dipping!

Dumpling Ramen Soup Ingredients

For the Broth
Sesame Oil – Adds richness and warmth; substitute with olive oil for a lighter flavor.
Medium Shallots – Offer a mild onion flavor; regular onions can be used if shallots are unavailable.
Shiitake Mushrooms – Contribute umami depth; use button mushrooms or your favorite variety as a substitute.
Garlic – Adds aromatic flavor; fresh garlic is recommended for the best results.
Fresh Ginger – Provides a warm, zesty kick; ground ginger is a backup, but fresh is best.
Lower-Sodium Chicken Bone Broth – Serves as the soup base; vegetable broth is a great vegan alternative.
Lower-Sodium Tamari – Adds depth and saltiness; regular soy sauce can replace it if gluten is not an issue.
Rice Vinegar – Provides acidity and balances flavors; substitute with apple cider vinegar if needed.

For the Dumplings and Noodles
Dumplings/Potstickers – Provide protein and texture; opt for frozen vegetable dumplings for a vegan option.
Dried Ramen Noodles – The main carbohydrate component; gluten-free ramen can replace traditional noodles.

For the Vegetables and Garnish
Baby Bok Choy – Offers vibrant color and crunch; can be replaced with spinach or Swiss chard.
Green Onions – Used for garnish and fresh flavor; can be swapped with chives or omitted.
Crushed Red Pepper – Adds heat; adjust according to your taste or omit for a milder soup.
Black Sesame Seeds – For garnish, adding visual appeal and a slight nuttiness; optional for decoration.

Each of these ingredients combines to create a nourishing Dumpling Ramen Soup that warms both body and soul. Happy cooking!

Step‑by‑Step Instructions for Dumpling Ramen Soup

Step 1: Heat the Oil
In a large stockpot, warm 2 tablespoons of sesame oil over medium heat. You’ll know it’s ready when the oil shimmers slightly. This step infuses your base with richness, setting the stage for a flavorful Dumpling Ramen Soup.

Step 2: Sauté the Vegetables
Add chopped baby bok choy to the pot and sauté for about 4 minutes, stirring often until the leaves are tender and vibrant. The bok choy should soften but retain some crunch. Once ready, transfer it to a bowl and set it aside.

Step 3: Cook Aromatics
In the same pot, add sliced shallots, shiitake mushrooms, minced garlic, and grated fresh ginger. Sauté these aromatics for 2-3 minutes until the garlic releases its fragrant aroma. This adds depth to your soup, ensuring the Dumpling Ramen Soup is packed with flavor.

Step 4: Add the Broth Base
Pour in the lower-sodium chicken bone broth, lower-sodium tamari, and rice vinegar. Stir everything well and bring the mixture to a gentle simmer over medium heat. This will create a savory broth perfect for your dumplings and ramen, allowing the flavors to meld beautifully.

Step 5: Prepare the Ramen Noodles
In a separate pot, cook dried ramen noodles according to the package directions, typically around 4-5 minutes. Once cooked to your liking, drain them and set aside. This will allow you to add perfectly chewy noodles to your flavorful Dumpling Ramen Soup.

Step 6: Cook the Dumplings
Gently add the dumplings into the simmering broth, cooking them according to the package instructions, usually for about 6-8 minutes until heated through. Keep an eye on them as they cook, ensuring they’re tender and ready to join the soup.

Step 7: Combine and Heat Through
Once the dumplings are cooked, return the sautéed bok choy to the pot and mix gently. Let everything simmer together for an additional minute to heat through. This step integrates the flavors, resulting in a harmonious Dumpling Ramen Soup.

Step 8: Serve and Garnish
Divide the cooked ramen noodles into bowls, ladle the rich broth and dumplings over them, and add the bok choy. Garnish with chopped green onions, a sprinkle of crushed red pepper, and black sesame seeds for added flavor and crunch. Enjoy your vibrant and comforting soup!

Dumpling Ramen Soup Variations

Customize your Dumpling Ramen Soup with wonderful twists and substitutions for a unique flavor experience!

  • Gluten-Free:
    Swap traditional ramen noodles for gluten-free ramen or rice noodles, ensuring everyone can enjoy this delightful dish.

  • Vegan Delight:
    Use vegetable broth and frozen vegetable dumplings to craft a fully vegan rendition of this beloved soup. It’s just as comforting!

  • Spicy Kick:
    Add a splash of chili oil or a few slices of fresh red chili to turn up the heat and give your soup an exciting zing.

  • Protein Boost:
    Try adding sliced chicken or shrimp for an extra protein punch, elevating your soup to a hearty meal. Just adjust the cooking time accordingly!

  • Herb Infusion:
    Stir in a handful of fresh cilantro or basil just before serving for a burst of freshness and added complexity to the flavor profile.

  • Creamy Twirl:
    For a touch of luxury, drizzle in some coconut milk to your broth to make it even richer and creamier. It’s a velvety twist!

  • Loaded Veggies:
    Incorporate additional vegetables like carrots, bell peppers, or snap peas for extra crunch and nutrition. The more, the merrier!

  • Dumpling Variety:
    Experiment with different types of dumplings, such as shrimp, pork, or mushroom, catering to your family’s taste preferences.

Each of these adaptations allows you to create a bowl of Dumpling Ramen Soup that’s unique to your palate, while ensuring warmth and satisfaction. In need of more inspiration? Consider pairing this soup with delicious options like Mexican Soup Flavorful for your next culinary adventure!

What to Serve with Dumpling Ramen Soup

Nothing completes a comforting bowl of soup quite like the perfect side dishes that enhance its warmth and flavor.

  • Crusty Bread: Perfect for dipping, the crunchy exterior and soft interior let you soak up every last drop of that rich broth. Serve warm for an extra treat!

  • Edamame: Lightly salted and full of protein, these tasty green pods offer a fresh, crunchy contrast to the comforting warmth of the soup.

  • Pickled Vegetables: These tangy additions brighten the palate and introduce a delightful sharpness that beautifully balances the savory broth.

  • Gyoza: Pairing your ramen soup with these delightful pan-fried dumplings brings an added layer of texture and a satisfying bite, making the meal feel indulgent.

  • Sesame Cucumber Salad: Crisp cucumbers drizzled with sesame oil and sprinkled with sesame seeds add a refreshing crunch that cuts through the richness of the soup.

  • Spicy Kimchi: For those who love a kick, the spicy fermented crunch of kimchi enhances the soup’s umami flavors, resulting in an exciting taste experience that tingles the senses.

Enjoy these accompanying dishes alongside your Dumpling Ramen Soup for a complete and heartwarming dining experience!

Make Ahead Options

These Dumpling Ramen Soup ingredients are perfect for meal prep enthusiasts! You can chop the baby bok choy and slice the shallots up to 24 hours in advance; just refrigerate them in an airtight container to maintain their freshness. Additionally, you can prepare the broth (steps 1 through 4) up to 3 days ahead and store it in the fridge, ensuring maximum flavor. When you’re ready to enjoy your soup, simply reheat the broth, cook the dumplings and ramen noodles according to package instructions, and combine everything just before serving. This way, you can savor a comforting bowl of Dumpling Ramen Soup that feels fresh and delicious, even on the busiest of nights!

Tips for the Best Dumpling Ramen Soup

  • Separate Storage: To maintain the best texture, store dumplings and noodles apart from the broth. This prevents them from becoming soggy if you have leftovers.

  • Flavor Adjustments: Don’t hesitate to tweak the sweetness or saltiness of your broth by adjusting the amounts of lower-sodium tamari and rice vinegar—it’s your soup, after all!

  • Simmer for Depth: To deepen the flavor, let the broth simmer for longer before adding the dumplings. A gentle simmer allows the ingredients to meld beautifully, enhancing your Dumpling Ramen Soup.

  • Fresh Ingredients Matter: For the most aromatic and vibrant flavor, use fresh garlic and ginger instead of dried. They’ll make a noticeable difference in your soup!

  • Experiment with Greens: Baby bok choy is fabulous, but feel free to swap it for spinach or Swiss chard for a different twist, keeping it nutritious and delicious.

How to Store and Freeze Dumpling Ramen Soup

Fridge: Store leftovers in an airtight container for up to 3 days. This helps maintain the flavor and quality of your delicious Dumpling Ramen Soup.

Freezer: For longer storage, freeze the soup (without noodles) in freezer-safe containers for up to 2 months. This allows you to enjoy a comforting meal any time!

Reheating: To reheat, thaw overnight in the refrigerator, then warm slowly on the stovetop. Another option is to microwave individual portions, stirring occasionally for even heating.

Noodles: If you have leftover noodles, store them separately in the fridge for the best texture, as they can become overly soft when stored in broth.

Dumpling Ramen Soup Recipe FAQs

How do I select the best dumpling ingredients?
Absolutely! When selecting dumplings, look for those with a clean ingredient list and minimal preservatives. If you’re opting for frozen dumplings, choose ones filled with fresh vegetables or lean proteins. For homemade dumplings, make sure your dough is pliable and not overly dry, which can impact the cooking process.

What’s the best way to store leftover dumpling ramen soup?
To maintain the best texture, store the dumplings and noodles separately from the broth in airtight containers. The broth can stay fresh in the fridge for up to 3 days, while the dumplings and noodles should ideally be consumed within 2-3 days too. This prevents them from becoming soggy, giving you delicious leftovers to enjoy!

Can I freeze Dumpling Ramen Soup?
Yes, you can! For freezing, I recommend storing the soup without noodles in freezer-safe containers. It can be frozen for up to 2 months. When you’re ready to enjoy it, thaw overnight in the refrigerator, then reheat on the stovetop for the best results. If you do freeze leftover noodles, keep them in a separate container, adding them back in when reheating.

How can I troubleshoot gluey noodles in my soup?
Very! If your noodles turn out gluey, it often means they weren’t cooked properly. Make sure to follow the package directions carefully and avoid overcooking. Rinse them in cold water after cooking to stop the cooking process and remove excess starch before adding them to the soup. Firm noodles are key for that perfect texture in your Dumpling Ramen Soup!

Are there any dietary concerns with this recipe?
Absolutely! This Dumpling Ramen Soup is easily adaptable for various diets. For gluten-free options, use gluten-free ramen noodles and tamari instead of soy sauce. If you’re concerned about allergens or specific dietary needs, consider using vegetable broth for a vegan alternative and check the dumpling packaging for allergens like nuts or soy. It’s always smart to read labels to ensure you’re adhering to your dietary restrictions.

What’s the best way to enhance the flavor of my soup?
For a bolder taste, let your broth simmer longer before adding the dumplings—this allows all the flavors to meld beautifully! Adding fresh herbs like cilantro just before serving can also add an extra burst of flavor. You could even experiment with a dash of chili oil or sesame oil for an additional kick, elevating your Dumpling Ramen Soup experience!

Dumpling Ramen Soup

Dumpling Ramen Soup That Will Warm Your Soul and Satisfy

This Dumpling Ramen Soup is a comforting dish that combines rich broth, dumplings, and noodles, perfect for dinner on a busy day.
Prep Time 10 minutes
Cook Time 25 minutes
Total Time 35 minutes
Servings: 4 bowls
Course: Dinner
Cuisine: Asian
Calories: 350

Ingredients
  

For the Broth
  • 2 tablespoons Sesame Oil adds richness; substitute with olive oil if desired
  • 2 Medium Shallots mild onion flavor; substitute with regular onions if unavailable
  • 8 ounces Shiitake Mushrooms for umami depth; use button mushrooms or your favorite variety
  • 2 cloves Garlic fresh recommended for best flavor
  • 1 tablespoon Fresh Ginger provides a zesty kick; ground ginger as backup
  • 4 cups Lower-Sodium Chicken Bone Broth vegetable broth is vegan alternative
  • 3 tablespoons Lower-Sodium Tamari add saltiness; substitute with regular soy sauce if gluten is not an issue
  • 2 tablespoons Rice Vinegar provides acidity; apple cider vinegar can be used in place
For the Dumplings and Noodles
  • 12 ounces Dumplings/Potstickers choose frozen vegetable dumplings for a vegan option
  • 4 ounces Dried Ramen Noodles gluten-free ramen can replace traditional noodles
For the Vegetables and Garnish
  • 4 pieces Baby Bok Choy can be substituted with spinach or Swiss chard
  • 2 Green Onions for garnish; can be swapped with chives
  • 1 teaspoon Crushed Red Pepper optional for heat
  • 1 tablespoon Black Sesame Seeds optional for garnish

Equipment

  • large stockpot
  • separate pot for noodles

Method
 

Cooking Instructions
  1. Heat the sesame oil in a large stockpot over medium heat until it shimmers.
  2. Add chopped baby bok choy and sauté for about 4 minutes until tender. Set aside.
  3. In the same pot, add sliced shallots, shiitake mushrooms, minced garlic, and grated ginger. Sauté for 2-3 minutes until aromatic.
  4. Pour in the chicken bone broth, tamari, and rice vinegar. Stir and bring to a gentle simmer.
  5. Cook the ramen noodles in a separate pot according to package directions. Drain and set aside.
  6. Add the dumplings to the broth and cook according to package instructions, about 6-8 minutes.
  7. Return the bok choy to the pot and simmer together for an additional minute.
  8. Serve the ramen noodles in bowls, ladle the broth and dumplings over, and garnish with green onions, crushed red pepper, and sesame seeds.

Nutrition

Serving: 1bowlCalories: 350kcalCarbohydrates: 40gProtein: 15gFat: 15gSaturated Fat: 2gCholesterol: 20mgSodium: 800mgPotassium: 600mgFiber: 3gSugar: 2gVitamin A: 50IUVitamin C: 35mgCalcium: 10mgIron: 15mg

Notes

Store leftover dumplings and noodles separate from broth to avoid sogginess. Adjust flavors as desired.

Tried this recipe?

Let us know how it was!

Cozy Easy Pumpkin French Toast Casserole for Fall Mornings

The aroma of autumn wafts through your kitchen as you prepare the most delightful breakfast treat—a make-ahead Easy Pumpkin French Toast Casserole. This comforting dish layers soft French bread with pure pumpkin and the warm spices of fall, creating a cozy morning moment that’s just a bake away. The best part? You can prep it the night before, saving you precious time on busy mornings. Plus, the crunchy cinnamon streusel topping contrasts beautifully with the custardy interior, making it a crowd-pleaser for family gatherings or brunch with friends. Are you ready to dive into this heartwarming recipe that celebrates the season? Let’s get started!

Why is this casserole a must-try?

Simplicity, this Easy Pumpkin French Toast Casserole takes minimal effort—just prep the night before and pop it in the oven on busy mornings! Warm flavors come alive with the perfect blend of pure pumpkin and cozy fall spices, creating that inviting aroma everyone loves. Perfectly balanced, the crunchy cinnamon streusel topping contrasts delightfully with the soft, custardy base, making each bite a true delight. Versatility shines through as you can easily switch ingredients—try substituting sweet potato or brioche for unique twists. This casserole is a fantastic addition to any brunch or family gathering, ensuring that everyone leaves with a smile.

Easy Pumpkin French Toast Casserole Ingredients

For the Casserole

  • French Bread – Cut into 1-inch cubes; stale bread works best for optimal texture.
  • Cream Cheese – At room temperature; this adds richness and smoothness to the custard.
  • Pure Pumpkin – Not pumpkin pie filling; it’s essential for flavor and moisture.
  • Granulated Sugar – Adds sweetness; consider a sugar substitute for a lower-calorie option.
  • Homemade Pumpkin Spice – For flavor; ensure freshness for the best aroma.
  • Eggs – Provide structure and help bind the casserole; flax eggs can be used for a vegan version if needed.
  • Milk – Adds moisture to the custard; can be substituted with almond or oat milk for a dairy-free option.
  • Heavy Cream – Increases richness; half-and-half or a non-dairy cream alternative can be used.
  • Vanilla Extract – Enhances flavor; fresh vanilla bean offers a deeper profile.

For the Streusel Topping

  • All-Purpose Flour – Adds body and texture; gluten-free flour can be swapped if needed.
  • Brown Sugar – Sweetens the streusel and adds depth; consider coconut sugar for a healthier alternative.
  • Cinnamon, Nutmeg, Salt – For flavor enhancement; adjust spices based on personal preference.
  • Cold Unsalted Butter – Creates a crumbly texture; vegan butter or coconut oil may be used.
  • Chopped Pecan Pieces – Adds crunch and nutty flavor; substitute with walnuts, or omit for nut-free diets.

Step‑by‑Step Instructions for Easy Pumpkin French Toast Casserole

Step 1: Prepare the Baking Dish
Begin by spraying a 9×13-inch baking dish with non-stick cooking spray to prevent the casserole from sticking. This will ensure that your Easy Pumpkin French Toast Casserole releases easily after baking. Set the baking dish aside while you gather and prepare the rest of the ingredients.

Step 2: Assemble the Bread Cubes
In a large bowl, combine 1-inch cubed French bread until they are well-distributed. Make sure to use stale bread for the best texture, as it absorbs the custard mixture better. This step sets the foundation of your casserole, giving it the perfect balance of flavor and absorbency.

Step 3: Mix Cream Cheese and Pumpkin
In another bowl, beat the room temperature cream cheese and pure pumpkin together until fluffy and smooth. This should take about 2-3 minutes with a hand mixer on medium speed. Next, add in granulated sugar and homemade pumpkin spice, mixing well until everything is thoroughly combined.

Step 4: Incorporate Eggs
Gradually add the eggs to the cream cheese and pumpkin mixture while mixing on low speed. This technique will help to incorporate the eggs without overbeating, ensuring a smooth custard for your Easy Pumpkin French Toast Casserole. Continue until fully combined, creating a rich and creamy mixture.

Step 5: Combine Custard with Bread
In a separate measuring cup, mix the milk, heavy cream, and vanilla extract together. Pour this liquid mixture into the bread and egg mixture, stirring gently until every piece of bread is evenly coated. This should take about 2-3 minutes, ensuring that the bread absorbs all those flavorful elements.

Step 6: Refrigerate Overnight
Transfer the ready mixture into the prepared baking dish and spread it evenly. Cover the dish with plastic wrap, making sure it’s tightly sealed, and refrigerate overnight. This helps the flavors meld together and gives the bread time to soak up the custard, making for a deliciously moist casserole.

Step 7: Prepare the Streusel Topping
For the streusel, mix together flour, brown sugar, cinnamon, nutmeg, and salt in a bowl. Cut in cold unsalted butter using a pastry cutter or your fingers until the mixture becomes crumbly. Finally, mix in chopped pecans if using. Store this in the fridge until you’re ready to bake the casserole.

Step 8: Bake the Casserole
Preheat your oven to 350°F (175°C). Once preheated, uncover your casserole and sprinkle the prepared streusel evenly over the top. This crunchy topping adds a wonderful contrast to the soft custardy layer beneath.

Step 9: Monitor Baking Time
Place the casserole in the oven and bake uncovered for 60-65 minutes. The casserole should turn golden brown and set in the center when done. To check, insert a knife into the middle; it should come out clean, indicating that your Easy Pumpkin French Toast Casserole is perfectly baked and ready to be served.

Easy Pumpkin French Toast Casserole Variations

Feel free to unleash your creativity and personalize this dish to perfectly suit your taste!

  • Dairy-Free: Use almond or oat milk and coconut cream instead of dairy to make this a cozy dish for everyone.

  • Vegan: Substitute eggs with flax eggs and cream cheese with a plant-based alternative for a delightful vegan version that doesn’t skimp on flavor.

  • Sweet Potato Twist: Swap the pumpkin puree for mashed sweet potato for a different, yet equally autumnal experience that’s rich in flavor and nutrients.

  • Bread Variety: Experiment with different types of bread, like brioche or croissants, to add a buttery richness to your casserole.

  • Nutty Crunch: Add sliced almonds or walnuts to the streusel topping for an extra nutty note and delightful crunch that pairs beautifully with the soft custard beneath.

  • Fall Spice Boost: Enhance the spice factor by adding a pinch of ginger or cloves to bring some extra warmth to the mix.

  • Fruit Add-In: Toss in some cranberries or sliced apples to add a touch of tartness that beautifully balances the sweetness of the casserole.

  • Chocolate Lovers: Stir in some chocolate chips for a decadent twist; the melty chocolate makes for a wonderfully indulgent breakfast treat.

With these variations, you can truly transform your Easy Pumpkin French Toast Casserole into countless delightful experiences, each one more tempting than the last! If you’re craving a slightly different breakfast experience, consider diving into a delicious Creme Brulee French Toast or a classic French Toast Casserole for a change-up.

Make Ahead Options

These Easy Pumpkin French Toast Casserole preparations are perfect for busy mornings and can save you valuable time! You can assemble the entire casserole up to 24 hours in advance; simply prepare the custard and soak the bread cubes as described, then cover tightly with plastic wrap and refrigerate. To maintain quality, be sure to store the streusel topping separately in the fridge until you’re ready to bake. When it’s time to enjoy your dish, just sprinkle the streusel on top, preheat the oven to 350°F, and bake uncovered for 60-65 minutes until golden brown. With these make-ahead options, you’ll have a delightful breakfast ready to go without any morning rush!

Tips for the Best Easy Pumpkin French Toast Casserole

  • Stale Bread Matters: Using stale French bread allows for better absorption of the custard, enhancing the texture of your casserole. Fresh bread may turn mushy.

  • Room Temperature Ingredients: Bring cream cheese and eggs to room temperature before mixing. This helps create a smoother custard, avoiding lumps in your Easy Pumpkin French Toast Casserole.

  • Overnight Soak: Don’t skip the overnight refrigeration step! It lets the flavors meld together and ensures the bread absorbs the custard thoroughly for a moist, flavorful result.

  • Watch the Baking Time: Keep an eye on your casserole as it bakes. Overbaking can dry it out. Test for doneness with a knife that should come out clean when inserted into the center.

  • Customize the Topping: Feel free to get creative with your streusel topping! Use different nuts or spices based on your preference for a unique twist.

What to Serve with Easy Pumpkin French Toast Casserole

Elevate your cozy breakfast experience with delightful pairings that complement the rich flavors of this seasonal favorite.

  • Crispy Bacon: The salty, savory crunch of bacon contrasts beautifully with the sweet custard, creating a well-rounded breakfast plate.

  • Fresh Fruit Salad: A vibrant mix of seasonal fruits adds a refreshing, juicy touch, balancing the richness of the casserole.

  • Maple Syrup: A classic companion, this sweet drizzle enhances the pumpkin’s warm flavor, inviting you to savor each bite.

Indulging in this Easy Pumpkin French Toast Casserole is already a treat, but adding some crispy bacon brings a satisfying crunch, while a fruit salad lightens up the plate with freshness. Don’t forget the maple syrup—it’s practically a requirement!

  • Whipped Cream: A dollop of light, airy whipped cream on top offers a creamy texture that melds perfectly with the casserole’s warmth.

  • Chai Tea: This spiced tea complements the flavors of pumpkin and cinnamon, adding a cozy beverage option for your breakfast table.

  • Pumpkin Spice Latte: Keep the season’s spirit alive with this warm drink, echoing the casserole’s festive flavors while providing a comforting sip.

Combining these elements will not only enhance your breakfast but also create a heartwarming atmosphere for family gatherings or cozy weekends at home!

Storage Tips for Easy Pumpkin French Toast Casserole

Fridge: Store leftovers in an airtight container for up to 3 days. This keeps the casserole fresh and ready for quick breakfasts or snacks.

Freezer: For extended storage, wrap the casserole tightly in plastic wrap and then in aluminum foil; freeze for up to 2 months. Thaw in the fridge overnight before reheating.

Reheating: Reheat individual portions in the microwave for 1-2 minutes or in the oven at 350°F (175°C) for about 15-20 minutes, until warmed through.

Serving Tip: Enjoy warm, ideally with a drizzle of maple syrup or a sprinkle of powdered sugar to elevate your Easy Pumpkin French Toast Casserole experience!

Easy Pumpkin French Toast Casserole Recipe FAQs

What type of bread is best for this casserole?
Absolutely! Stale French bread is ideal for this Easy Pumpkin French Toast Casserole as it absorbs the custard beautifully without becoming mushy. Fresh bread can lead to a soggy texture, so using slightly older bread is recommended for the best results.

How should I store leftovers of the casserole?
Very! Store any leftovers in an airtight container in the refrigerator for up to 3 days. This keeps the casserole fresh and ready for quick breakfasts. Reheat in the oven or microwave before serving to enjoy it warm again.

Can I freeze the Pumpkin French Toast Casserole?
Absolutely! For freezing, wrap the casserole tightly in plastic wrap and then in aluminum foil. It can be frozen for up to 2 months. Be sure to thaw it overnight in the fridge before reheating. To reheat, bake covered at 350°F (175°C) for about 20-25 minutes or until warmed through.

What should I do if the casserole is too dry after baking?
If your casserole turns out too dry, it may have baked too long. Keep an eye on it towards the end of the baking time to prevent this. You can serve it with a drizzle of maple syrup or whipped cream on the side, which can add moisture and enhance flavor.

Are there any dietary considerations I should be aware of?
Certainly! This casserole contains dairy and eggs, which can be allergens for some people. To adapt for dietary restrictions, you may substitute the cream cheese with a non-dairy cream cheese alternative and use flax eggs for a vegan version. Additionally, if nuts are a concern, feel free to omit the pecans or replace them with a suitable alternative.

What if I can’t find pure pumpkin puree?
No worries at all! If you can’t find pure pumpkin puree, you can substitute it with butternut squash puree or even mashed bananas for a different taste. This gives you flexibility while still creating that wonderful fall flavor in your Easy Pumpkin French Toast Casserole.

Easy Pumpkin French Toast Casserole

Cozy Easy Pumpkin French Toast Casserole for Fall Mornings

Enjoy a delightful make-ahead Easy Pumpkin French Toast Casserole, perfect for autumn mornings.
Prep Time 15 minutes
Cook Time 1 hour 5 minutes
Refrigeration Time 8 hours
Total Time 9 hours 20 minutes
Servings: 8 slices
Course: Breakfast
Cuisine: American
Calories: 350

Ingredients
  

For the Casserole
  • 10 cups French Bread Cut into 1-inch cubes; stale bread works best for texture.
  • 8 oz Cream Cheese At room temperature.
  • 1 cup Pure Pumpkin Not pumpkin pie filling.
  • 1/2 cup Granulated Sugar Consider a sugar substitute for lower calories.
  • 1 tbsp Homemade Pumpkin Spice Ensure freshness for the best aroma.
  • 6 large Eggs Flax eggs can be used for a vegan version.
  • 2 cups Milk Can substitute with almond or oat milk.
  • 1 cup Heavy Cream Substitutes include half-and-half or non-dairy alternatives.
  • 2 tsp Vanilla Extract Fresh vanilla bean offers a deeper flavor.
For the Streusel Topping
  • 1 cup All-Purpose Flour Can be swapped with gluten-free flour.
  • 1/2 cup Brown Sugar Coconut sugar can be a healthier alternative.
  • 1 tsp Cinnamon
  • 1/2 tsp Nutmeg
  • 1/4 tsp Salt
  • 1/2 cup Cold Unsalted Butter Vegan butter or coconut oil may be used.
  • 1/2 cup Chopped Pecan Pieces Substitute with walnuts or omit for nut-free diets.

Equipment

  • 9x13 inch baking dish
  • Mixing bowls
  • Hand mixer
  • Measuring cup
  • pastry cutter

Method
 

Step-by-Step Instructions
  1. Spray a 9x13-inch baking dish with non-stick cooking spray.
  2. Combine 1-inch cubed French bread in a large bowl.
  3. Beat cream cheese and pure pumpkin together until smooth.
  4. Gradually add the eggs to the mixture while mixing on low speed.
  5. Mix milk, heavy cream, and vanilla extract in a measuring cup.
  6. Pour the liquid mixture into the bread and egg mixture and stir gently.
  7. Transfer the mixture into the prepared baking dish and refrigerate overnight.
  8. Mix flour, brown sugar, cinnamon, nutmeg, and salt for the streusel.
  9. Cut in cold unsalted butter until crumbly, then add chopped pecans.
  10. Preheat your oven to 350°F (175°C) and uncover the casserole.
  11. Sprinkle the prepared streusel over the top of the casserole.
  12. Bake uncovered for 60-65 minutes until golden brown and set.

Nutrition

Serving: 1sliceCalories: 350kcalCarbohydrates: 45gProtein: 8gFat: 15gSaturated Fat: 9gPolyunsaturated Fat: 3gMonounsaturated Fat: 3gCholesterol: 85mgSodium: 400mgPotassium: 250mgFiber: 2gSugar: 15gVitamin A: 100IUVitamin C: 10mgCalcium: 10mgIron: 8mg

Notes

Store leftovers in an airtight container for up to 3 days, or freeze for up to 2 months. Reheat in the microwave or oven before serving.

Tried this recipe?

Let us know how it was!

Refreshing Shredded Thai Salad with Avocado for Summer Bliss

You might not expect a single salad to transport you straight into the heart of summer, but this Shredded Thai Salad with Avocado does just that. With its vibrant colors and tantalizing textures, it’s a feast for the eyes that also pleases the palate. Not only is this dish refreshing and gluten-free, but it also requires no cooking, making it perfect for those days when you want something light yet satisfying. Picture crisp green cabbage mingling with creamy avocado and crunchy peanuts, all tossed in a zesty dressing that ties it together beautifully. Whether you’re making it for a casual gathering or a wholesome meal at home, this salad is bound to impress and nourish. Ready to dive into a delightful culinary adventure? Let’s whip up this no-cook wonder that celebrates the season!

Why is this salad a summer favorite?

Refreshing, this Shredded Thai Salad with Avocado bursts with flavors that evoke sunshine and fresh ingredients. No-Cook Delight: Forget the oven; you can toss this together in minutes, perfect for busy days or hot evenings. Customizable: Easily adapt it with grilled chicken or fresh fruit for a unique twist each time. Nutrient-Packed: With healthy fats from avocado and a plethora of veggies, it’s guilt-free indulgence. Crowd-Pleaser: Whether at picnics or family gatherings, this vibrant salad will wow your guests. It’s like a summer party in a bowl!

Shredded Thai Salad with Avocado Ingredients

• Get ready to create a vibrant dish!

For the Salad

  • Green Cabbage – Serves as the crunchy base; optional to replace with Napa cabbage for a different profile.
  • Carrots – Adds natural sweetness and vibrant color; grated for that perfect texture, or swap with bell peppers.
  • Red Bell Pepper – Imparts a sweet, juicy kick; try yellow or orange bell peppers for a fun variation!
  • Green Onions – Offers a mild yet crunchy element; red onions or shallots can work just as well.
  • Fresh Cilantro – Elevates the salad with fresh herbal notes; parsley is a great alternative if cilantro isn’t your favorite.
  • Avocado – Brings creaminess and richness; if you don’t have any, try diced mango for a fruity twist!
  • Roasted Peanuts – Contributes a delightful crunch and nutty flavor; swap with cashews for a different nutty option, or use sunflower seeds for a nut-free choice.

For the Dressing

  • Fish Sauce – Essential for that umami flavor that makes this salad sing; vegetarian option available using soy sauce.
  • Freshly Squeezed Lime Juice – Provides acidity and brightness; fresh juice is best, but bottled works in a pinch.
  • Sugar – Balances flavors beautifully; feel free to substitute with honey or your favorite sweetener.
  • Sriracha Sauce – Adds the perfect kick; you can adjust or omit depending on your heat tolerance.

Step‑by‑Step Instructions for Shredded Thai Salad with Avocado

Step 1: Prepare the Veggies
Begin by washing and drying your vegetables to ensure freshness. Using a sharp knife or mandoline, shred about 4 cups of green cabbage to create a crunchy base. Next, grate 2 medium carrots, slice 1 red bell pepper, and thinly chop 3 green onions. Aim for uniform sizes to enhance texture when you mix everything together. Place all the veggies in a large mixing bowl.

Step 2: Make the Dressing
In a medium bowl, whisk together 2 tablespoons of fish sauce, the juice from 2 freshly squeezed limes, 1 tablespoon of sugar, and 1 teaspoon of Sriracha sauce until the sugar dissolves completely. Taste and adjust the seasoning if necessary; you want a balanced combination of savory, tart, and spicy notes. This dressing will be the flavorful backbone of your Shredded Thai Salad with Avocado.

Step 3: Toss It Together
Now, drizzle the prepared dressing over the shredded vegetables in your mixing bowl. With clean hands or large salad tongs, gently toss everything together until the veggies are evenly coated with the dressing. This merging of flavors will create a beautiful foundation for your salad. Add in ½ cup of chopped fresh cilantro and ½ cup of roasted peanuts for extra flavor and crunch, mixing them in carefully.

Step 4: Add Avocado Last
It’s time to fold in the diced avocado. Gently add 1 large diced avocado to the salad mix, taking care not to mash the delicate pieces. This creamy fruit will provide a lovely contrast to the crisp vegetables, making your Shredded Thai Salad both delicious and visually appealing. Stir just enough to incorporate the avocado without breaking it apart.

Step 5: Chill Before Serving
To allow the flavors to meld beautifully, cover the salad and refrigerate it for about 15 to 30 minutes. This chilling time not only enhances the taste but also makes the salad refreshingly cool, perfect for warm days. When ready to serve, give it one last toss and taste for seasoning again, adjusting if necessary before serving.

Shredded Thai Salad with Avocado Variations

Feel free to get creative and customize your Shredded Thai Salad with Avocado to suit your taste buds and dietary needs!

  • Protein-Packed: Add grilled chicken or crispy tofu for a satisfying lift. Both options complement the flavors beautifully while making this dish even more filling.

  • Fruit Fusion: Experiment with juicy mango or cool cucumber for added sweetness and refreshing texture. These ingredients create a lovely balance against the savory elements of the salad.

  • Nutty Twist: Sprinkle in sesame seeds or sunflower seeds for an added crunch and nutty flavor. Not only do they enhance the texture, but they also contribute a delightful depth to the overall dish.

  • Herb Swap: If cilantro isn’t your favorite, replace it with fresh parsley or even mint. These herbs provide a unique flavor layer and keep the salad bright and lively.

  • Spicy Kick: For those who love heat, consider adding sliced jalapeños or a dash more sriracha. This variation creates a dynamic flavor explosion that’s sure to excite heat lovers.

  • Creamy Variation: Substitute avocado with creamy diced mango or a dollop of Greek yogurt to add richness. This twist enriches the salad while keeping it light and refreshing.

  • Zesty Upgrade: Add zest from a lime to your dressing for an extra burst of citrus flavor that uplifts the entire dish. You’ll find it brings a lovely brightness to each bite.

  • Crunch Factor: Toss in some crispy wonton strips or tortilla chips for a delightful crunch. It’s a fun surprise that adds texture while complementing the other ingredients beautifully.

These variations not only allow you to cater to different tastes but also to explore new dimensions in your Shredded Thai Salad with Avocado. Customizing your dish can turn it into your own signature creation! Enjoy it freshly made at the table or alongside your favorite grilled dishes, much like in a delightful Shrimp Avocado Bowls meal, or with a delicious crunch from a Chocolate Granola Cups with Peanut Butter Filling dessert to finish.

Expert Tips for Shredded Thai Salad with Avocado

  • Freshness Matters: Always use fresh ingredients for the best taste. Wilted vegetables can dull the vibrant flavors of your Shredded Thai Salad with Avocado.

  • Dress Just Before Serving: To keep the salad crisp, mix the dressing and salad just before serving. This prevents the veggies from becoming soggy and losing their crunch.

  • Uniform Sizing: Chop all your vegetables to a similar size. This not only enhances the salad’s aesthetic appeal but also ensures even flavor distribution with every bite.

  • Avocado Timing: Add the avocado just before serving to avoid browning. This will keep your salad looking fresh and appetizing.

  • Customize Wisely: Feel free to adjust the recipe according to your taste preferences. Adding protein like grilled chicken or tofu can turn this into a filling meal while keeping your Shredded Thai Salad with Avocado gluten-free.

Storage Tips for Shredded Thai Salad with Avocado

  • Fridge: Store your Shredded Thai Salad with Avocado in an airtight container for up to 3 days. However, for the best taste and texture, enjoy it fresh on the first day!

  • Airtight Packaging: If you have leftovers, ensure that the salad is tightly sealed to prevent moisture from causing the veggies to wilt and the avocado to brown.

  • Reheating: While this salad is best served cold, if you’d like to enjoy it warm, consider removing avocados and microwaving the veggies briefly, but avoid heating for too long to retain freshness.

  • Add Avocado Last: If making ahead for a gathering, keep the avocado separate and add it just before serving. This keeps the creamy texture intact and avoids browning.

What to Serve with Shredded Thai Salad with Avocado

To elevate your dining experience, consider these delightful pairings that harmonize with the vibrant flavors of your salad.

  • Grilled Chicken: Juicy and tender, grilled chicken adds a satisfying protein boost that complements the fresh crunch of the salad beautifully.

  • Chilled Quinoa Salad: A nutty, fluffy quinoa salad can provide a wholesome, gluten-free side that enhances the overall meal. Toss in some seasonal veggies for extra color!

  • Coconut Rice: Creamy coconut rice offers a subtle sweetness that balances the zing of your Thai salad, creating a harmonious blend of flavors.

  • Sesame Snap Peas: These crisp, lightly sautéed snap peas bring an added crunch and nutty flavor, perfectly brightening each bite.

  • Mango Salsa: This sweet and tangy salsa echoes the fruity notes in the salad and offers a refreshing contrast that makes your taste buds dance.

  • Chilled White Wine: A crisp, chilled white wine, such as Sauvignon Blanc, enhances the freshness of your salad while providing a refreshing palate cleanser.

  • Frozen Yogurt with Lime Zest: For dessert, thislight and tangy treat mirrors the bright flavors in your salad while providing a cool, creamy finish to your meal.

Each of these pairings will resonate with the refreshing notes of your Shredded Thai Salad with Avocado, ensuring your meal is both delightful and satisfying!

Make Ahead Options

These Shredded Thai Salad with Avocado are perfect for meal prep enthusiasts! You can prepare the vegetables (cabbage, carrots, and bell pepper) and store them in an airtight container in the fridge for up to 3 days. Additionally, make the dressing and keep it separate to maintain its vibrant flavors. Just before serving, combine the chilled veggies with the dressing, cilantro, and peanuts, and gently fold in the avocado to prevent browning. This way, you’ll have a refreshing salad ready to go on busy weeknights, allowing you to enjoy the delightful flavors without any fuss!

Shredded Thai Salad with Avocado Recipe FAQs

How can I tell if my avocado is ripe?
Absolutely! A ripe avocado will yield slightly to gentle pressure when squeezed. Look for an even dark green to purplish color without any dark spots all over. If it feels too hard, it likely needs more time to ripen; if it feels very soft, it’s best to use it soon.

Can I store leftovers of the Shredded Thai Salad with Avocado?
Yes, you can store leftover salad in an airtight container in the fridge for up to 3 days. However, to keep it fresh and crunchy, I recommend eating it within the first day. Just remember to keep the avocado separate until serving to prevent browning!

What’s the best way to freeze the salad?
Freezing is not recommended for this Shredded Thai Salad with Avocado since the textures of the veggies and avocado can change dramatically. If you still want to freeze components, consider freezing just the dressing in an airtight container for up to 3 months, then thaw and add it to fresh vegetables when you’re ready to serve.

What should I do if my salad turns out too salty?
Very! If you find your salad too salty, try adding more shredded cabbage and carrots to balance out the flavors. You can also incorporate a little extra lime juice or a pinch of sugar to help soften the salty notes. Mix and taste until you reach the desired flavor.

Is this salad safe for people with nut allergies?
Absolutely! You can easily make the Shredded Thai Salad with Avocado nut-free by substituting the roasted peanuts with sunflower seeds or pumpkin seeds. Just ensure that any dressings or sauces you use are also free of nut contamination. Always check labels if you’re unsure!

Shredded Thai Salad with Avocado

Refreshing Shredded Thai Salad with Avocado for Summer Bliss

This Shredded Thai Salad with Avocado is a refreshing, gluten-free dish bursting with flavors, perfect for summer.
Prep Time 15 minutes
Chilling Time 30 minutes
Total Time 45 minutes
Servings: 4 servings
Course: Salad
Cuisine: Thai
Calories: 250

Ingredients
  

For the Salad
  • 4 cups Shredded Green Cabbage Could substitute with Napa cabbage
  • 2 medium Grated Carrots Can swap with bell peppers
  • 1 large Red Bell Pepper Yellow or orange bell peppers can be used
  • 3 stalks Green Onions Red onions or shallots are alternatives
  • 1/2 cup Fresh Cilantro Parsley is a substitute
  • 1 large Avocado Diced; can substitute with mango
  • 1/2 cup Roasted Peanuts Cashews or sunflower seeds can be alternatives
For the Dressing
  • 2 tablespoons Fish Sauce Can use soy sauce as vegetarian option
  • 2 tablespoons Freshly Squeezed Lime Juice Fresh juice is preferred
  • 1 tablespoon Sugar Honey or other sweeteners can be substituted
  • 1 teaspoon Sriracha Sauce Adjust according to heat preference

Equipment

  • Mixing Bowl
  • Sharp knife
  • mandoline
  • whisk

Method
 

Step-by-Step Instructions
  1. Wash and dry all vegetables. Shred 4 cups of green cabbage, grate 2 carrots, slice 1 red bell pepper, and thinly chop 3 green onions. Place in a large mixing bowl.
  2. In a medium bowl, whisk together 2 tablespoons of fish sauce, juice of 2 fresh limes, 1 tablespoon sugar, and 1 teaspoon Sriracha until the sugar dissolves.
  3. Drizzle the dressing over the shredded vegetables and toss together until coated. Add in 1/2 cup of chopped cilantro and 1/2 cup of peanuts.
  4. Gently fold in the diced avocado, taking care not to mash the pieces.
  5. Cover the salad and refrigerate for 15 to 30 minutes before serving, then toss and taste for seasoning.

Nutrition

Serving: 1salad bowlCalories: 250kcalCarbohydrates: 30gProtein: 6gFat: 12gSaturated Fat: 2gPolyunsaturated Fat: 2gMonounsaturated Fat: 8gSodium: 600mgPotassium: 400mgFiber: 7gSugar: 4gVitamin A: 600IUVitamin C: 40mgCalcium: 60mgIron: 2mg

Notes

Use fresh ingredients for the best flavor and mix the dressing just before serving to maintain crispness.

Tried this recipe?

Let us know how it was!

Chickpea Feta Avocado Salad for a Quick Healthy Delight

Stepping into my kitchen, I can’t help but feel a rush of excitement as I uncover the vibrant ingredients for my Chickpea Feta Avocado Salad. With a friendship born from Mediterranean flavors, this dish transforms simple staples into something extraordinary in just 15 minutes. Imagine the creamy avocado melting into the hearty chickpeas, punctuated by the tangy feta and a burst of fresh herbs—what’s not to love? Not only is this salad a charming excuse to indulge in wholesome eating, but it’s also a fantastic option for those hectic days when cooking feels overwhelming. Trust me, whether you’re looking for a nourishing lunch or a refreshing side dish for dinner, this recipe is sure to brighten your table. Ready to explore how this colorful medley can elevate your meals? Let’s dive into the recipe!

Why is this salad a must-try?

Simplicity: This Chickpea Feta Avocado Salad requires no complicated techniques, making it perfect for both beginner and seasoned cooks.

Flavor Explosion: With each bite, enjoy a delightful balance of creamy avocado, savory feta, and hearty chickpeas, creating a refreshing dish that tantalizes your taste buds.

Versatile: Customize to your liking! Add extra veggies like bell peppers or swap chickpeas for edamame for a twist.

Quick Preparation: Ready in just 15 minutes, it’s ideal for meal prep or last-minute soirées, ensuring you won’t compromise on nutrition even on busy days.

Nutritionally Rich: Packed with protein, fiber, and healthy fats, this salad is not just delicious—it’s a nourishing choice that supports your well-being.

Ready to elevate your culinary repertoire? Pair it with a side of Feta Fried Eggs for a full Mediterranean experience!

Chickpea Feta Avocado Salad Ingredients

• Dive into the fresh flavors with these essentials for your Chickpea Feta Avocado Salad!

For the Salad

  • Chickpeas – Packed with protein and fiber, canned ones are great for easy prep.
  • Avocado – Creamy and rich in healthy fats; make sure it’s ripe but firm for the best texture.
  • Feta Cheese – A salty indulgence that enriches the salad; opt for high-quality feta for superior flavor.
  • Red Onion – Adds a crunchy and sharp contrast; slice thinly for optimal flavor distribution.
  • Fresh Parsley – Brightens the dish with an herbal note; if fresh isn’t available, dried can work in half the amount.
  • Fresh Mint – This aromatic herb lifts the salad to a Mediterranean delight; it’s optional but recommended for freshness.

For the Dressing

  • Olive Oil – The dressing’s heart, extra virgin offers a robust flavor; let it shine in your dish!
  • Lemon Juice – Balances and brightens the flavors; always choose freshly squeezed for the best impact.
  • Garlic – Adds depth; mince it well to release all its wonderful aroma.
  • Dried Oregano – Infuses a traditional Mediterranean flavor note; sprinkle in for added fragrance.
  • Salt and Pepper – Essential seasonings; adjust to your preference for a perfect finish.

Embrace these ingredients and watch how they come together to create a delightful Chickpea Feta Avocado Salad that will elevate your meals effortlessly!

Step‑by‑Step Instructions for Chickpea Feta Avocado Salad

Step 1: Combine Fresh Ingredients
In a large bowl, add the drained and rinsed chickpeas, diced avocado, crumbled feta, and thinly sliced red onion. Toss in freshly chopped parsley and mint if using, ensuring an even distribution of ingredients. Look for a vibrant mix of colors, which signifies a fresh start to your Chickpea Feta Avocado Salad. Set the bowl aside while you prepare the dressing.

Step 2: Whisk the Dressing
In a separate small bowl, pour in the extra virgin olive oil and freshly squeezed lemon juice. Add minced garlic and dried oregano into the mixture. Whisk everything together until well combined, and season with salt and pepper to taste. Aim for a balanced flavor that enhances the overall freshness of your Chickpea Feta Avocado Salad, creating a lovely aromatic dressing.

Step 3: Combine Salad and Dressing
Carefully pour the dressing over the salad ingredients in the large bowl. Using a gentle motion, toss the salad to coat all the components evenly, being cautious not to over-mix, which can cause the avocado to break down. Aim for a harmonious blend, celebrating the textures and flavors in the final Chickpea Feta Avocado Salad.

Step 4: Serve or Chill
Enjoy your fresh salad immediately or allow it to chill in the refrigerator for about 15-30 minutes before serving. Chilling enhances the flavor infusion, producing a refreshing dish that’s perfect for any setting. Ensure it’s well chilled for that delightful crispness when you serve your vibrant Chickpea Feta Avocado Salad.

Make Ahead Options

These Chickpea Feta Avocado Salad components are perfect for meal prep! You can chop the veggies and prepare the dressing up to 24 hours in advance, storing them separately in the refrigerator to maintain freshness. To prevent the avocado from browning, simply dice it right before serving or toss it with lemon juice and refrigerate. The dressed salad isn’t recommended for storage, but you can assemble everything just before mealtime to ensure a delightful, fresh crunch. When ready to serve, combine the prepped ingredients and dressing, gently toss, and enjoy a vibrant salad that feels as good as homemade on busy days!

What to Serve with Chickpea Feta Avocado Salad?

Dive into a world of delightful pairings that enhance the vibrant flavors of your Chickpea Feta Avocado Salad!

  • Grilled Chicken Breast: Juicy and tender, grilled chicken adds a satisfying protein element that complements the salad’s fresh flavors beautifully.

  • Pita Bread: Soft, warm pita is perfect for scooping up this salad, making each bite even more enjoyable as you combine textures.

  • Quinoa: A light and nutty side, quinoa not only adds heartiness but also brings its own subtle taste that works well with the salad’s components.

  • Stuffed Bell Peppers: These colorful, hearty vegetables filled with rice or grains make for a wholesome complement, creating a Mediterranean feast on your plate.

  • Lemon Hummus: This zesty dip adds creaminess while enhancing the fresh flavors of the salad. Spread it on pita or enjoy it as a crunchy vegetable dip.

  • Sparkling Water with Mint: Refreshing and light, mint-infused sparkling water calms the palate while mirroring the salad’s flavor profile.

For a charming and holistic dining experience, consider these pairings to celebrate the joy of wholesome, home-cooked meals!

Expert Tips for Chickpea Feta Avocado Salad

  • Avocado Care: Toss diced avocado with lemon juice right after cutting to prevent browning and maintain its vibrant color.

  • Quality Ingredients: Always choose good-quality feta cheese for the best flavor. It makes a noticeable difference in your Chickpea Feta Avocado Salad!

  • Mixing Tip: Be gentle when combining the salad ingredients to keep the avocado intact. Over-mixing can lead to a mushy texture.

  • Fresh Herbs: For an extra layer of flavor, consider using fresh herbs like basil or cilantro along with parsley and mint.

  • Storage Precautions: To keep leftovers fresh, store in an airtight container without mixing in the dressing until you’re ready to enjoy.

  • Additional Crunch: Enhance the texture of your salad by adding diced cucumber or bell peppers for a refreshing crunch that complements the other ingredients.

Chickpea Feta Avocado Salad Variations

Feel free to experiment with this recipe, as little tweaks can lead to delightful twists on the classic!

  • Dairy-Free: Use crumbled tofu or a dairy-free feta alternative instead of regular feta for a plant-based option.
    The creaminess of avocado paired with a nutty alternative can create a surprisingly delightful flavor.

  • Extra Crunch: Add diced bell peppers or cucumbers for an additional layer of crunch.
    The freshness and the pop of colors make your salad even more appealing visually and texturally.

  • Spicy Kick: Incorporate sliced jalapeños or a pinch of cayenne pepper for an exciting heat boost.
    The combination of creamy avocado with a hint of spice will electrify your senses!

  • Grain Boost: Mix in cooked quinoa or farro for an added dose of texture and heartiness.
    This substitution not only expands the volume but also enhances the nutritional profile of your meal.

  • Herb Variety: Swap parsley and mint for fresh basil or cilantro, introducing a different flavor dimension.
    This simple change offers a refreshing twist and allows you to personalize your dish based on the herbs you enjoy.

  • Mediterranean Zest: Toss in some sun-dried tomatoes or olives for an intense burst of Mediterranean flavor.
    These additions amplify the essence of the classic Mediterranean experience in your salad.

  • Protein Packed: Substitute chickpeas with edamame or black beans for a protein-rich alternative.
    Each option provides a unique flavor shift while keeping your salad nutritious and satisfying.

This Chickpea Feta Avocado Salad is all about delicious possibilities! For another vibrant meal option, give the Blt Chicken Salad a try!

How to Store and Freeze Chickpea Feta Avocado Salad

Fridge: Store your Chickpea Feta Avocado Salad in an airtight container in the refrigerator for up to 2 days to maintain its freshness.

Avoid Browning: To keep the avocado from browning, combine the salad without the dressing and add it just before serving.

Freezer: Freezing is not recommended for this salad as the textures of the avocado and feta will not hold up well when thawed.

Reheating: This salad is best served cold and should not be reheated. Enjoy it fresh for the full flavor experience!

Chickpea Feta Avocado Salad Recipe FAQs

What should I look for when selecting avocados?
You want to choose avocados that are ripe but still firm to the touch. A perfectly ripe avocado will have a slight give when gently pressed but shouldn’t be overly soft or have dark spots all over, indicating overripeness. If they feel too hard, let them ripen at room temperature for a few days.

How should I store leftovers of Chickpea Feta Avocado Salad?
Store any leftovers in an airtight container in the refrigerator for up to 2 days. To prevent the avocado from browning, it’s best to keep the dressing separate until you’re ready to serve the salad again. This way, the salad remains vibrant and fresh!

Can I freeze Chickpea Feta Avocado Salad?
Freezing is not recommended for this salad as the texture of the avocado and feta cheese can become mushy and unappetizing when thawed. It’s a salad best enjoyed fresh, so make only what you’ll eat within a couple of days!

Why is my salad watery, and how can I fix it?
If your salad turns out watery, it could be due to the cucumbers or tomatoes releasing too much moisture, or the chickpeas being too wet. To avoid this, make sure to drain and rinse your canned chickpeas thoroughly. You can also pat additional ingredients dry with a paper towel before mixing them in. If you find your salad is already watery, you can drain excess liquid before serving or mix in some chopped lettuce to absorb it.

Is this salad suitable for those with dietary restrictions?
Absolutely! This Chickpea Feta Avocado Salad is gluten-free and can easily be adjusted for various dietary needs. If you’re watching your dairy intake, you can use vegan feta or omit the cheese altogether. Always check the ingredient labels for any specific allergens and feel free to customize the herbs and other components based on preferred flavors and dietary guidelines.

Chickpea Feta Avocado Salad

Chickpea Feta Avocado Salad for a Quick Healthy Delight

Enjoy a delightful Chickpea Feta Avocado Salad, a vibrant dish packed with protein and healthy fats.
Prep Time 15 minutes
Total Time 15 minutes
Servings: 4 servings
Course: Salad
Cuisine: Mediterranean
Calories: 300

Ingredients
  

For the Salad
  • 2 cups canned chickpeas drained and rinsed
  • 1 ripe avocado diced
  • 1 cup feta cheese crumbled
  • 1/4 cup red onion thinly sliced
  • 1/4 cup fresh parsley chopped
  • 2 tablespoons fresh mint chopped (optional)
For the Dressing
  • 1/4 cup extra virgin olive oil
  • 2 tablespoons lemon juice freshly squeezed
  • 1 clove garlic minced
  • 1 teaspoon dried oregano
  • to taste salt
  • to taste pepper

Equipment

  • Large bowl
  • small bowl
  • whisk

Method
 

Preparation Steps
  1. In a large bowl, add the drained and rinsed chickpeas, diced avocado, crumbled feta, and thinly sliced red onion. Toss in freshly chopped parsley and mint if using, ensuring an even distribution of ingredients.
  2. In a separate small bowl, combine the extra virgin olive oil and freshly squeezed lemon juice. Add minced garlic and dried oregano, whisking until well combined. Season with salt and pepper to taste.
  3. Carefully pour the dressing over the salad ingredients in the large bowl. Toss the salad gently to coat all the components evenly.
  4. Enjoy your fresh salad immediately or allow it to chill in the refrigerator for about 15-30 minutes before serving.

Nutrition

Serving: 1servingCalories: 300kcalCarbohydrates: 25gProtein: 10gFat: 20gSaturated Fat: 5gPolyunsaturated Fat: 3gMonounsaturated Fat: 12gCholesterol: 15mgSodium: 500mgPotassium: 600mgFiber: 8gSugar: 3gVitamin A: 200IUVitamin C: 10mgCalcium: 150mgIron: 3mg

Notes

Toss diced avocado with lemon juice right after cutting to prevent browning. Store leftovers in an airtight container without dressing until ready to serve.

Tried this recipe?

Let us know how it was!

Apple Cinnamon Overnight Oats for a Cozy Morning Boost

On those hectic mornings when time slips through my fingers, there’s nothing like a comforting bowl of Apple Cinnamon Overnight Oats to save the day. Bursting with the delightful combo of sweet apples and warm cinnamon, this quick breakfast has become my go-to for a nourishing start. Perfect for meal prep, it only takes about 10 minutes to assemble, and it’s vegan and gluten-free, too! With these oats, I’m enjoying a wholesome meal that’s not only delicious but also packed with fiber and protein. Plus, just imagine waking up to the enticing aroma waiting for you in the fridge! Ready to make your mornings sweeter and healthier? Let’s dive into the recipe!

Why Are Overnight Oats So Popular?

Ease: This recipe takes just 10 minutes to prepare, making it a dream for busy mornings.

Flavorful: The combination of sweet apples and warming cinnamon provides a cozy taste sensation that feels like a hug in a bowl.

Meal Prep: Make a week’s worth in advance, and enjoy a nutritious breakfast throughout your busy week—perfect for those who love to meal prep!

Nutritious: Each serving is rich in fiber and protein, ensuring you stay full and satisfied for hours.

Versatile: Switch up the fruits or add nut butter if you prefer a different flavor or texture. For an equally delicious breakfast option, check out my Bananas Foster Cinnamon recipe!

Crowd-Pleasing: Everybody will love these oats—whether you’re serving them for a family breakfast or enjoying them solo, they are a guaranteed hit!

Apple Cinnamon Overnight Oats Ingredients

For the Oats
Rolled Oats or Quick Oats – These are the foundation for your dish, providing a chewy texture. Instant oats can be used in a pinch, though they change the overall texture.
Chia Seeds – These little seeds pack a nutritional punch, boosting fiber and omega-3 content, while also thickening your oats.

For the Creaminess
Greek or Skyr Yogurt (dairy or plant-based) – This adds creaminess and protein; opt for non-dairy yogurt for a vegan-friendly version.
Non-Dairy Milk – Choose your favorite variety, such as almond, cashew, or oat milk, to hydrate your oats according to your dietary needs.

For the Sweetness
Pure Maple Syrup – This natural sweetener elevates the flavor; feel free to adjust the amount based on your sweetness preference. Agave syrup or honey can be great alternatives if you’re not strictly vegan.

For Flavor
Vanilla Extract – A splash adds just the right aromatic touch; you can omit this if you don’t have it on hand.
Diced Apples (Honeycrisp or Cosmic Crisp recommended) – They are essential for the sweet crunch; feel free to substitute with pears or any seasonal fruit you adore.
Ground Cinnamon – This classic spice brings warmth and is known to enhance antioxidant properties, making your oats even healthier.
Nutmeg, Ginger, Allspice (optional) – Feel free to sprinkle in these spices for an extra flavor kick, adjusting to your personal taste.

Now that you’ve gathered your ingredients for the Apple Cinnamon Overnight Oats, you’re one step closer to a delicious, healthy breakfast!

Step‑by‑Step Instructions for Apple Cinnamon Overnight Oats

Step 1: Combine the Base Ingredients
In a large mixing bowl, start by adding 1 cup of rolled oats and 2 tablespoons of chia seeds. Pour in 1 cup of your favorite non-dairy milk and ½ cup of Greek or plant-based yogurt. Drizzle in 2 tablespoons of pure maple syrup and 1 teaspoon of vanilla extract. Now, mix these ingredients thoroughly until everything is well-combined and forms a creamy base.

Step 2: Fold in the Flavors
Next, add 1 to 2 diced Honeycrisp or Cosmic Crisp apples into the mixture, along with 1 teaspoon of ground cinnamon for that warm, comforting flavor. If you desire an extra spice kick, sprinkle in a pinch of nutmeg, ginger, or allspice to enhance the taste further. Gently fold the apple and spices into the oat mixture until evenly distributed, ensuring you get that delightful apple cinnamon taste in every bite.

Step 3: Refrigerate Overnight
Cover the bowl tightly with plastic wrap or transfer the mixture into individual jars for easy serving. Place it in the refrigerator and let it chill for at least 2 hours or overnight. This is essential for the oats to absorb the liquid and flavors, creating a creamy texture that’s perfect for your Apple Cinnamon Overnight Oats.

Step 4: Serve and Enjoy
The next morning, remove your Apple Cinnamon Overnight Oats from the fridge. If the mixture seems too thick, stir in a splash of additional milk until you reach your desired consistency. Serve chilled, and consider topping it with extra diced apples or a drizzle of nut butter for added richness and flavor.

Expert Tips for Apple Cinnamon Overnight Oats

  • Apples Freshness Trick: Toss diced apples in lemon juice before mixing to prevent browning and keep that vibrant color.

  • Mix Thoroughly: Ensure all ingredients are well-combined to avoid uneven texture in your Apple Cinnamon Overnight Oats. Water or insufficient mixing can lead to bland bites.

  • Personalize the Spice: Feel free to adjust the spices based on your preferences. Just a pinch more cinnamon or nutmeg can elevate the flavor profile significantly!

  • Perfect Consistency: If your oats thicken in the fridge, simply stir in a splash of non-dairy milk before serving for that creamy goodness.

  • Meal Prep Variety: Consider preparing a few jars with different fruits or toppings to mix it up and keep breakfast exciting throughout the week!

What to Serve with Apple Cinnamon Overnight Oats?

Wake up your mornings with delightful accompaniments that perfectly pair with the creamy goodness designed for wholesome fun!

  • Creamy Almond Butter: A dollop adds richness and healthy fats, elevating your oats to the next level of deliciousness.

  • Fresh Berries: Juicy strawberries or blueberries provide a bright, acidic contrast, enhancing the sweetness of the apples.

  • Crunchy Granola: Top with your favorite granola for a delightful crunch, adding texture and a satisfying bite.

  • Toasted Nuts: Chopped walnuts or pecans bring nutty flavors and a satisfying crunch; toss them on just before serving.

  • Coconut Yogurt: For additional creaminess without dairy, a scoop of coconut yogurt adds a light, tropical flavor that complements the spices beautifully.

  • Chia Seed Jam: A spoonful of homemade chia jam can infuse another burst of fruitiness—try peach or berry for a lovely twist.

  • Herbal Tea: A warm cup of herbal tea, like chamomile or mint, wakes up the flavors and provides a soothing, cozy beverage to sip alongside your oats.

  • Dark Chocolate Shavings: For those with a sweet tooth, a sprinkle of dark chocolate adds a luxurious touch that pairs perfectly with the cinnamon.

Apple Cinnamon Overnight Oats Variations & Substitutions

Feel free to put your creative spin on these tasty Apple Cinnamon Overnight Oats—each variation will lead to new delightful experiences!

  • Nut-Free: Use seeds like sunflower or pumpkin seeds instead of nuts to maintain the crunch without allergens.

  • Fruit Swap: Try substituting diced apples with berries or ripe bananas for a delicious flavor twist. These alternatives will also alter the sweetness and texture significantly!

  • Sugar Alternatives: For a lower-calorie option, use stevia or monk fruit sweetener instead of maple syrup. They will keep your oats deliciously sweet without the added sugar.

  • Protein Boost: Add a scoop of your favorite protein powder to the base mix for an extra protein punch. This will make your breakfast even more satisfying and help you power through your day!

  • Flavor Enhance: A pinch of cardamom or pumpkin spice works beautifully in this recipe, adding unique touches that elevate the overall flavor. You could also explore flavors inspired by my Overnight Creme Brulee French Toast for even more variety.

  • Creamy Option: For a silkier texture, mix in silken tofu or a plant-based cream cheese. This adds luxuriousness to your oats that you’ll adore.

  • Cinnamon Roll Vibe: For a fun twist, drizzle in a bit of frosting made from powdered sugar and almond milk prior to serving—talk about indulgence! This is a sweet homage to the flavor profile of my creamy Cinnamon Roll casserole.

Every spoonful of your personalized Apple Cinnamon Overnight Oats can be a new adventure—take your pick and enjoy!

How to Store and Freeze Apple Cinnamon Overnight Oats

Fridge: Store in an airtight container for up to 5 days. If the oats thicken, simply stir in a splash of non-dairy milk to adjust the consistency.

Freezer: For longer storage, freeze portions in individual jars for up to 3 months. Thaw in the refrigerator overnight before enjoying.

Reheating: If desired warm, simply microwave the mixture in 30-second intervals until heated through, ensuring it’s heated evenly for the best taste.

Make-Ahead: Perfect for meal prep; whip up several jars at once and enjoy a quick, nutritious breakfast throughout your busy week with these Apple Cinnamon Overnight Oats.

Make Ahead Options

These Apple Cinnamon Overnight Oats are perfect for meal prep enthusiasts seeking a quick breakfast solution! You can mix all the ingredients, including oats, chia seeds, yogurt, non-dairy milk, maple syrup, diced apples, and spices, up to 24 hours in advance. Simply combine everything in a bowl or divide into individual jars, cover them tightly, and refrigerate overnight to allow the flavors to meld beautifully. For the best quality, make sure to store the oats in an airtight container to prevent any unwanted odor absorption. When you’re ready to serve, just give them a good stir, add a splash of milk if needed, and enjoy your delicious, nutritious meal that’s just as delightful as freshly made!

Apple Cinnamon Overnight Oats Recipe FAQs

How should I choose my apples for the oats?
When selecting apples, look for firm, crisp varieties like Honeycrisp or Cosmic Crisp, as they hold their shape and provide a crunch. Avoid apples with dark spots all over or soft spots, as these indicate overripeness. If you want a different flavor, you can substitute with pears or seasonal fruits, which work wonderfully in the recipe.

How should I store leftover Apple Cinnamon Overnight Oats?
Store your leftovers in an airtight container in the refrigerator for up to 5 days. If the oats seem thicker than you’d like after a few days, simply stir in a splash of non-dairy milk to revive the creamy texture. Always give it a good shake or stir before enjoying!

Can I freeze Apple Cinnamon Overnight Oats?
Absolutely! To freeze, divide your prepared oats into individual jars or containers and seal them well. They can be frozen for up to 3 months. When you’re ready to enjoy, just transfer one jar to the refrigerator to thaw overnight. For a warm treat, you can microwave them in 30-second intervals until heated through.

What do I do if my oats are too thick?
If your oats become too thick after chilling, just stir in a little non-dairy milk to adjust the consistency. This not only restores creaminess but also enhances the flavor. You can do this right before you’re ready to serve, ensuring each bite is deliciously satisfying!

Are there any dietary considerations I should be aware of?
These Apple Cinnamon Overnight Oats are vegan and gluten-free, making them suitable for many dietary preferences. However, if you’re accommodating allergies, be cautious with the nuts or seeds you plan to add. Always double-check ingredient labels for potential allergens, particularly if you use pre-packaged non-dairy yogurts or milks.

Can I personalize the recipe?
Definitely! This recipe is highly versatile. You can swap out the apples for other fruits like berries or bananas, and you can add different spices like nutmeg or allspice for a unique twist. I’ve often experimented with adding various nuts or seeds to give it that extra crunch and nutrition enhancement, making each batch a reflection of your own taste!

Apple Cinnamon Overnight Oats

Apple Cinnamon Overnight Oats for a Cozy Morning Boost

Quick, delicious, and nutritious Apple Cinnamon Overnight Oats, perfect for busy mornings.
Prep Time 10 minutes
Refrigeration Time 2 hours
Total Time 2 hours 10 minutes
Servings: 2 bowls
Course: Breakfast
Cuisine: Vegan
Calories: 300

Ingredients
  

For the Oats
  • 1 cup Rolled Oats or Quick Oats
  • 2 tablespoons Chia Seeds
For the Creaminess
  • 1/2 cup Greek or Skyr Yogurt (dairy or plant-based)
  • 1 cup Non-Dairy Milk choose your favorite variety
For the Sweetness
  • 2 tablespoons Pure Maple Syrup adjust to taste
For Flavor
  • 1 teaspoon Vanilla Extract optional
  • 1-2 cups Diced Apples (Honeycrisp or Cosmic Crisp recommended)
  • 1 teaspoon Ground Cinnamon
  • 1 pinch Nutmeg optional
  • 1 pinch Ginger optional
  • 1 pinch Allspice optional

Equipment

  • Mixing Bowl
  • Refrigerator
  • Measuring cups and spoons

Method
 

Combine the Base Ingredients
  1. In a large mixing bowl, add 1 cup of rolled oats and 2 tablespoons of chia seeds. Pour in 1 cup of non-dairy milk and ½ cup of Greek or plant-based yogurt. Drizzle in 2 tablespoons of pure maple syrup and 1 teaspoon of vanilla extract. Mix thoroughly until well combined.
Fold in the Flavors
  1. Add 1 to 2 diced apples and 1 teaspoon of ground cinnamon into the mixture. Sprinkle in a pinch of nutmeg, ginger, or allspice if desired. Gently fold until evenly distributed.
Refrigerate Overnight
  1. Cover the bowl with plastic wrap or transfer to individual jars. Refrigerate for at least 2 hours or overnight.
Serve and Enjoy
  1. Remove from fridge, stir in a splash of milk if too thick, and serve chilled. Top with extra diced apples or nut butter if desired.

Nutrition

Serving: 1bowlCalories: 300kcalCarbohydrates: 45gProtein: 10gFat: 9gSaturated Fat: 1gPolyunsaturated Fat: 0.5gMonounsaturated Fat: 3gCholesterol: 5mgSodium: 150mgPotassium: 300mgFiber: 8gSugar: 12gVitamin A: 100IUVitamin C: 5mgCalcium: 150mgIron: 1mg

Notes

Consider tossing diced apples in lemon juice to prevent browning. Adjust spices according to your preference. Perfect for meal prep with various toppings.

Tried this recipe?

Let us know how it was!

Cheesy Chicken Garlic Bread Sandwich Recipe for Cozy Nights

There’s something undeniably satisfying about biting into a perfectly toasted sandwich, and that’s exactly what my Cheesy Chicken Garlic Bread Sandwich brings to the table. As soon as you pull this baby out of the oven, the heavenly aroma of garlic wafts through the air, teasing your senses with promises of melty cheese and tender chicken. This recipe is a lifesaver for those busy weeknights, offering a quick preparation that delivers big on flavor. Plus, the best part? It’s incredibly customizable, allowing you to swap in your favorite ingredients. Whether you’re looking to impress friends at a casual gathering or simply wanting to indulge yourself after a long day, this delicious comfort food is here to save the day. Ready to dig in and discover how easy it is to create this mouthwatering delight? Let’s get started!

Why is this sandwich a must-try?

Melt-in-your-mouth goodness: The combination of crispy garlic bread with gooey cheese and juicy chicken creates a delightful experience in every bite.
Quick and easy: Perfect for busy weeknights, this sandwich can be prepared in under 30 minutes, making it a convenient addition to your dinner rotation.
Customizable delight: Swap the chicken for turkey or add your favorite vegetables; the possibilities are endless! You can even try adding some spice with jalapeños if you’re feeling adventurous.
Crowd-pleaser: Whether you’re hosting friends or enjoying a cozy night in, this dish is sure to impress, just like my Cheesy Spinach Artichoke Chicken Bake.
Irresistible aroma: Just imagine the enticing smell of garlic wafting through your home, creating the perfect atmosphere for gathering around the table!

Cheesy Chicken Garlic Bread Sandwich Ingredients

For this Cheesy Chicken Garlic Bread Sandwich, gathering high-quality ingredients is essential for maximizing flavor and texture.

For the Chicken

  • Boneless Chicken Breast – A lean and protein-rich choice; consider turkey for a lighter option.
  • Salt – Enhances the natural flavors; adjust to taste when seasoning the chicken.
  • Pepper – Adds a mild kick; freshly ground black pepper provides the best results.

For the Garlic Butter

  • Butter – Use unsalted butter for better control of seasoning; olive oil can be a healthier alternative.
  • Garlic – Fresh garlic is preferred for its aromatic qualities; minced garlic enhances the spread.
  • Italian Herbs (Thyme, Parsley) – Adds layers of flavor; feel free to experiment with your favorite herbs.

For the Sandwich

  • Mozzarella Cheese – Perfect for that gooey texture; try cheddar or provolone for a twist.
  • Bread – Choose thick slices or a loaf for the best crunch and structure; garlic bread works wonderfully.

With these simple yet fundamental ingredients, you’re well on your way to creating a delicious Cheesy Chicken Garlic Bread Sandwich that’s perfect for any occasion!

Step‑by‑Step Instructions for Cheesy Chicken Garlic Bread Sandwich Recipe

Step 1: Preheat the Oven
Begin by preheating your oven to 400°F (200°C) to ensure it’s hot enough for crisping the garlic bread. While the oven heats up, take a baking dish and spray it with nonstick cooking spray to prepare for your Cheesy Chicken Garlic Bread Sandwiches, ensuring they don’t stick as they bake.

Step 2: Sear the Chicken
Season your boneless chicken breasts generously with salt and pepper on both sides. Heat a skillet over medium-high heat and add a drizzle of olive oil. Once the oil is shimmering, carefully add the chicken and sear for about 6-7 minutes on each side, until they are golden brown and reach an internal temperature of 165°F, ensuring they stay juicy.

Step 3: Prepare Garlic Butter
While the chicken is cooking, melt 4 tablespoons of unsalted butter in a small saucepan over low heat. Once melted, add the minced garlic and cook for 1-2 minutes, stirring frequently until fragrant. To elevate the flavor of your garlic butter, mix in your favorite Italian herbs, creating a savory spread that will enhance your Cheesy Chicken Garlic Bread Sandwich.

Step 4: Assemble the Sandwiches
Take your favorite thick slices of bread and spread a generous amount of the garlic butter on one side of each slice. On the non-buttered side, layer the seared chicken and sprinkle a generous portion of mozzarella cheese. Top with another slice of bread, buttered side up, to create the perfect cheesy and garlicky sandwich ready for baking.

Step 5: Bake to Perfection
Place the assembled sandwiches onto the prepared baking dish and put them in the preheated oven. Bake for 10-15 minutes, or until the cheese is bubbly and the bread is golden brown. The delightful aromas will fill your kitchen, signaling that your Cheesy Chicken Garlic Bread Sandwich is nearly ready.

Step 6: Serve and Enjoy
Once baked, carefully remove the sandwiches from the oven and let them cool for a minute. Slice them in half to reveal that gooey, cheesy center. Serve hot, drizzled with your favorite sauce if desired, and relish every bite of this comforting Cheesy Chicken Garlic Bread Sandwich, perfect for cozy nights in!

How to Store and Freeze Cheesy Chicken Garlic Bread Sandwich

Fridge: Store leftovers in an airtight container; they can last up to 3 days. Be sure to reheat in the oven to restore the sandwich’s crispy texture.

Freezer: If you want to freeze sandwiches, wrap them tightly in plastic wrap and then aluminum foil. They can be frozen for up to 2 months.

Reheating: To reheat, remove any wrapping and place in a preheated oven at 350°F (175°C) for about 10-15 minutes, or until heated through and crispy.

Tips: For best results, avoid freezing any sandwich with fresh vegetables, as they may become soggy upon thawing. Enjoy your Cheesy Chicken Garlic Bread Sandwich warm!

What to Serve with Cheesy Chicken Garlic Bread Sandwich

There’s nothing quite like the satisfaction of a hearty meal that brings everyone together around the table, especially when paired with tasty sides.

  • Crispy Potato Wedges: These golden, crunchy wedges add a satisfying contrast that complements the sandwich’s cheesy, gooey texture. Dip them in your favorite sauce for an extra kick!

  • Mixed Green Salad: A fresh salad with a zesty vinaigrette provides a light, refreshing balance to the richness of the sandwich, making each bite even more delightful.

  • Garlic Parmesan Roasted Vegetables: Roasted veggies seasoned with garlic and parmesan share a flavor harmony with the sandwich while adding nutritional value and a colorful touch to your plate.

  • Creamy Coleslaw: This crunchy, creamy side pairs wonderfully, offering a nice contrast to the warm, melty sandwich. The crunch of the cabbage refreshes your palate, making every bite enjoyable.

  • Spicy Pickles: For a tangy twist! The heat and acidity of pickles enhance the comfort food feel and offer a delightful contrast to the sandwich’s rich flavors.

  • Homemade Tomato Soup: This classic pairing is perfect for dipping your sandwich! The warmth and acidity of the soup enhance the cheesy goodness, creating a cozy dining experience, especially on chilly nights.

  • Iced Lemonade or Sweet Tea: Quench your thirst with a refreshing drink that stands in contrast to the savory sandwich, adding a balance of flavors that elevate your meal.

Expert Tips for Cheesy Chicken Garlic Bread Sandwich

  • Juicy Chicken: Use a meat thermometer to check for an internal temperature of 165°F; this ensures your chicken stays juicy and avoids overcooking.

  • Garlic Butter Magic: For robust flavor, melt your butter slowly and let the garlic cook just enough to become fragrant without browning; this keeps your garlic butter smooth and tasty.

  • Creative Add-ins: Feel free to add veggies like spinach or bell peppers to boost nutrition; just be careful not to overfill, as it may make the sandwich messy.

  • Choosing Bread: Opt for thick slices or a crusty loaf to hold up well when baking; thin bread may become soggy and lose that delightful crunch.

  • Storage Solutions: Keep leftovers in an airtight container in the fridge for up to three days; reheat in the oven to maintain the perfect crispiness of this Cheesy Chicken Garlic Bread Sandwich recipe.

Make Ahead Options

These Cheesy Chicken Garlic Bread Sandwiches are perfect for meal prep enthusiasts looking to save time during busy weeknights! You can marinate the boneless chicken breasts in salt, pepper, and your favorite Italian herbs up to 24 hours in advance, ensuring they absorb all the flavors. Additionally, the garlic butter can be prepared and stored in the refrigerator for up to 3 days. When you’re ready to serve, simply assemble the sandwiches using the prepped ingredients, spread the garlic butter on the bread, layer the chicken and cheese, and bake until the bread is golden and the cheese is bubbly. This will keep your sandwiches just as delicious as if they were made fresh!

Cheesy Chicken Garlic Bread Sandwich Variations

Feel free to make this recipe your own by experimenting with these delightful twists!

  • Dairy-Free: Swap mozzarella for dairy-free cheese alternatives, making it perfect for those with lactose sensitivities. Your sandwich will still be creamy, just with a different texture!

  • Spicy Kick: Add chopped jalapeños to your chicken for a zesty punch. This fiery addition elevates the flavor profile and gives your sandwich an exciting twist.

  • Vegetarian Delight: Replace chicken with roasted vegetables like zucchini or bell peppers for a satisfying meatless option. It not only boosts nutrition but adds a colorful flair.

  • Herb Swap: Try different fresh herbs like basil or oregano instead of the usual thyme and parsley. This will provide a new aromatic experience and enhance overall flavor.

  • Extra Crunch: Consider adding crispy bacon or fried onions for a delightful crunch that complements the creamy cheese. It’ll take your comfort food to the next level!

  • Flavor Boost: Incorporate sun-dried tomatoes or artichoke hearts for a Mediterranean flair. They pair beautifully with garlic and cheese, adding a rich depth of flavor.

  • Bread Variety: Switch out traditional bread for garlic ciabatta or focaccia to shake things up. The unique texture will enhance your sandwich and offer an exciting twist to every bite.

  • Try a Sauce: Drizzle some pesto or spicy aioli before serving to give your sandwich an extra layer of flavor. It’s an easy way to customize each bite to your liking.

Don’t forget, if you’re seeking more cheesy goodness, check out my Cheesy Spinach Artichoke Chicken Bake or indulge in the rich flavors of Garlic Butter Baked Chicken. Enjoy crafting your delicious masterpieces!

Cheesy Chicken Garlic Bread Sandwich Recipe FAQs

What is the best way to select ripe garlic?
Absolutely! When choosing garlic, look for heads that are firm and plump, without any dark spots or green shoots. The papery skin should be dry and intact. If you notice dark spots, it’s a sign that the garlic is past its prime. Fresh garlic not only enhances flavor but also adds that wonderful aroma to your sandwich!

How should I store leftover Cheesy Chicken Garlic Bread Sandwiches?
Very simply! Store leftover sandwiches in an airtight container in the fridge for up to 3 days. When ready to enjoy again, I recommend reheating them in the oven at 350°F (175°C) for about 10-15 minutes. This will help restore the sandwich’s crispy texture and melty cheese—a true delight!

Can I freeze these sandwiches? If so, how?
Yes, you can absolutely freeze them! Wrap each sandwich tightly in plastic wrap, and then cover in aluminum foil to prevent freezer burn. They can be stored in the freezer for up to 2 months. When you’re ready to eat, simply unwrap and reheat in a preheated oven at 350°F (175°C) for about 10-15 minutes, and you’ll have a tasty meal ready to go!

What should I do if the cheese doesn’t melt properly?
If you find that the cheese isn’t melting well, it could be due to the type of cheese used or oven temperature. Mozzarella usually melts beautifully but try to use it at room temperature for better melting. If baking at the right temperature (400°F/200°C) for 10-15 minutes doesn’t yield gooey cheese, briefly broiling the sandwich for 1-2 minutes at the end can help achieve that melty goodness.

Can I make this sandwich without gluten?
Absolutely! You can use gluten-free bread as a substitute for the regular bread. Just ensure that the garlic butter spread does not contain any gluten ingredients. This way, you can savor the flavors of your Cheesy Chicken Garlic Bread Sandwich without worry!

Is there any way to make this sandwich healthier?
Very much so! You can use whole grain or sprouted bread for added fiber and nutrients. Opt for skinless chicken breast or even lean turkey as a protein source. Consider skipping the butter for a drizzle of olive oil or an avocado spread. By incorporating vegetables like spinach or mushrooms, you not only boost the nutrition but also add a lovely depth of flavor!

Cheesy Chicken Garlic Bread Sandwich Recipe

Cheesy Chicken Garlic Bread Sandwich Recipe for Cozy Nights

This Cheesy Chicken Garlic Bread Sandwich is a satisfying, quick-to-make comfort food perfect for cozy nights.
Prep Time 15 minutes
Cook Time 15 minutes
Total Time 30 minutes
Servings: 2 sandwiches
Course: Lunch
Cuisine: American
Calories: 550

Ingredients
  

For the Chicken
  • 2 pieces Boneless Chicken Breast Consider turkey for a lighter option.
  • to taste Salt Enhances the natural flavors.
  • to taste Pepper Freshly ground black pepper provides the best results.
For the Garlic Butter
  • 4 tablespoons Butter Use unsalted for better control of seasoning.
  • 2 cloves Garlic Fresh garlic is preferred.
  • to taste Italian Herbs (Thyme, Parsley) Feel free to experiment with your favorite herbs.
For the Sandwich
  • 1 cup Mozzarella Cheese Try cheddar or provolone for a twist.
  • 4 slices Bread Choose thick slices or a loaf for the best crunch.

Equipment

  • Skillet
  • baking dish
  • Small saucepan

Method
 

Step-by-Step Instructions
  1. Preheat your oven to 400°F (200°C) and prepare a baking dish with nonstick cooking spray.
  2. Season the chicken breasts with salt and pepper. Heat a skillet with olive oil and sear the chicken for about 6-7 minutes on each side until golden brown.
  3. Melt the butter in a small saucepan over low heat, add minced garlic, and cook for 1-2 minutes until fragrant. Mix in your Italian herbs.
  4. Spread garlic butter on one side of each slice of bread. On the non-buttered side, layer the chicken and sprinkle with mozzarella cheese, then top with another slice of bread, buttered side up.
  5. Bake the sandwiches in the preheated oven for 10-15 minutes until cheese is bubbly and bread is golden brown.
  6. Remove from the oven, let them cool for a minute, slice in half, serve hot, and enjoy.

Nutrition

Serving: 1sandwichCalories: 550kcalCarbohydrates: 45gProtein: 30gFat: 30gSaturated Fat: 15gPolyunsaturated Fat: 3gMonounsaturated Fat: 10gCholesterol: 95mgSodium: 800mgPotassium: 600mgFiber: 2gSugar: 3gVitamin A: 500IUVitamin C: 2mgCalcium: 300mgIron: 2mg

Notes

For best results, avoid freezing any sandwich with fresh vegetables, as they may become soggy upon thawing. Enjoy your Cheesy Chicken Garlic Bread Sandwich warm!

Tried this recipe?

Let us know how it was!

Stay Connected

Get recipes via email: