Get my cookbooks

Slow Cooker Meatball Subs That Bring Family Together

As I stirred the marinara sauce, the aroma wafted through my kitchen, instantly transporting me to a cozy Italian deli. Slow Cooker Meatball Subs have become a staple in my home, delighting friends and family with their mouthwatering charm. This recipe brilliantly marries tender meatballs with rich sauce, all nestled in soft, toasted hoagie buns, making it an effortless dinner option for busy evenings. Not only is it family-friendly and easy to prepare, but the slow cooker also allows the flavors to meld beautifully, creating a comforting meal without hours of fuss. Whether you’re hosting a gathering or simply enjoying a cozy night in, these subs promise to satisfy even the heartiest of appetites. Ready to take the plunge and transform your dinner game? Let’s dive into this recipe!

Why are Slow Cooker Meatball Subs amazing?

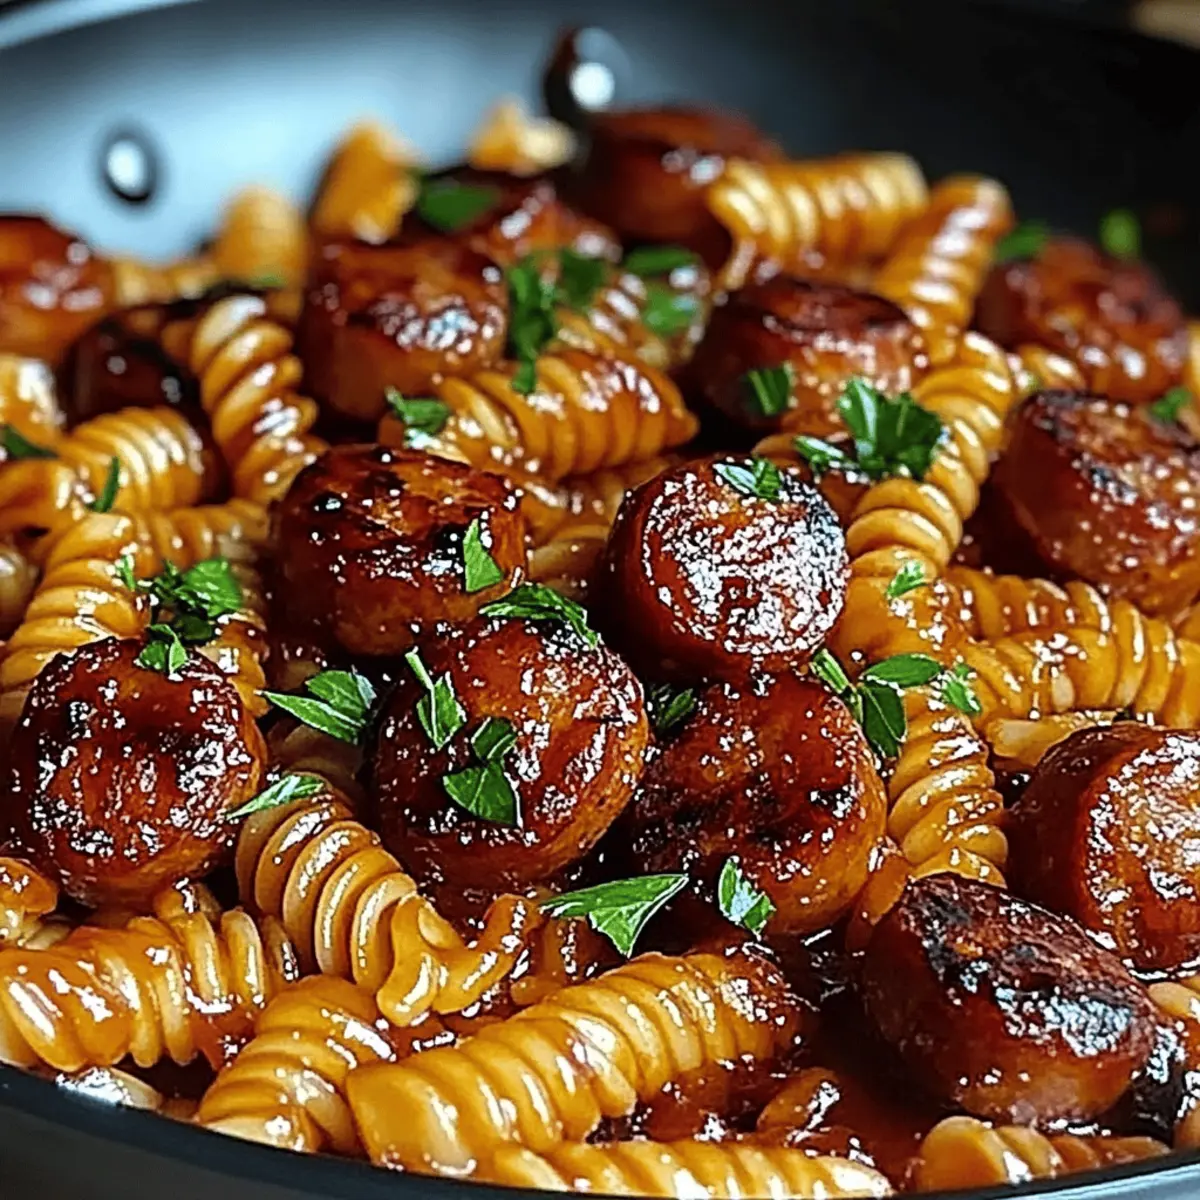
Flavorful and savory, these meatball subs are a delightful twist on a classic, bringing the taste of Italy right into your home. Effortlessly crafted, simply toss your frozen meatballs and marinara in the slow cooker, and let time work its magic! Family-friendly and satisfying, they’re a surefire hit with both kids and adults alike. Versatile options allow you to easily adjust ingredients for your taste, like swapping marinara for barbecue sauce or adding sautéed peppers. For more delicious ideas, check out our Korean BBQ Meatballs with Spicy Mayo for a zesty twist or try the Apart Nduja Meatball for something unique!

Slow Cooker Meatball Subs Ingredients

• Classic, easy, and family-friendly!

For the Meatballs

  • Frozen Italian-style Meatballs – Choose fully cooked varieties to save time; you can also use homemade meatballs for a personal touch.
  • Marinara Sauce – Adds rich flavor and moisture; feel free to substitute with spaghetti sauce if you prefer.

For the Buns

  • Hoagie Buns – The perfect vessel for your subs; brat or hot dog buns work just as well!

For the Cheese

  • Mozzarella Cheese – Use half-slices for a creamy melt that fits the buns perfectly.
  • Shredded Mozzarella – Extra cheesiness on top makes each bite more indulgent.
  • Grated Parmesan – A sprinkle adds a touch of gourmet flair and flavor.

For the Flavor

  • Pepperoni Slices – Enhance the flavor with a hint of spice; salami is a tasty substitute if desired.
  • Italian Seasoning – Boost the dish’s overall flavor; feel free to adjust based on your taste preferences.

Step‑by‑Step Instructions for Slow Cooker Meatball Subs

Step 1: Prepare the Meatballs
Begin by taking your frozen Italian-style meatballs and arranging them in a greased slow cooker. Evenly distribute them on the bottom, allowing for even cooking. Pour the marinara sauce generously over the meatballs, making sure to coat them well. This sauce will imbue the meatballs with rich flavor as they cook, creating a mouthwatering aroma in your kitchen.

Step 2: Slow Cook the Mixture
Cover the slow cooker with its lid and set it to cook on low for 6-7 hours or high for 3-4 hours. During this time, the meatballs will heat through and absorb the flavors of the marinara sauce. As the cooking time progresses, you’ll know it’s ready when the meatballs are hot and tender, soaking in a beautiful red sauce.

Step 3: Preheat the Oven
While your meatballs are happily cooking, take the time to preheat your oven to 350°F (175°C). This is the perfect temperature for toasting your hoagie buns, ensuring they are warm and crispy when you assemble your subs. Preheating allows for quick and efficient cooking when it’s time to use the oven.

Step 4: Slice the Hoagie Buns
Now, slice the hoagie buns lengthwise without completely cutting through; you want them to open like a book. This step is crucial for holding all the delicious filling without making a mess. Lay the buns on a baking sheet, preparing them for the layers of cheesy goodness that are to come.

Step 5: Build Your Subs
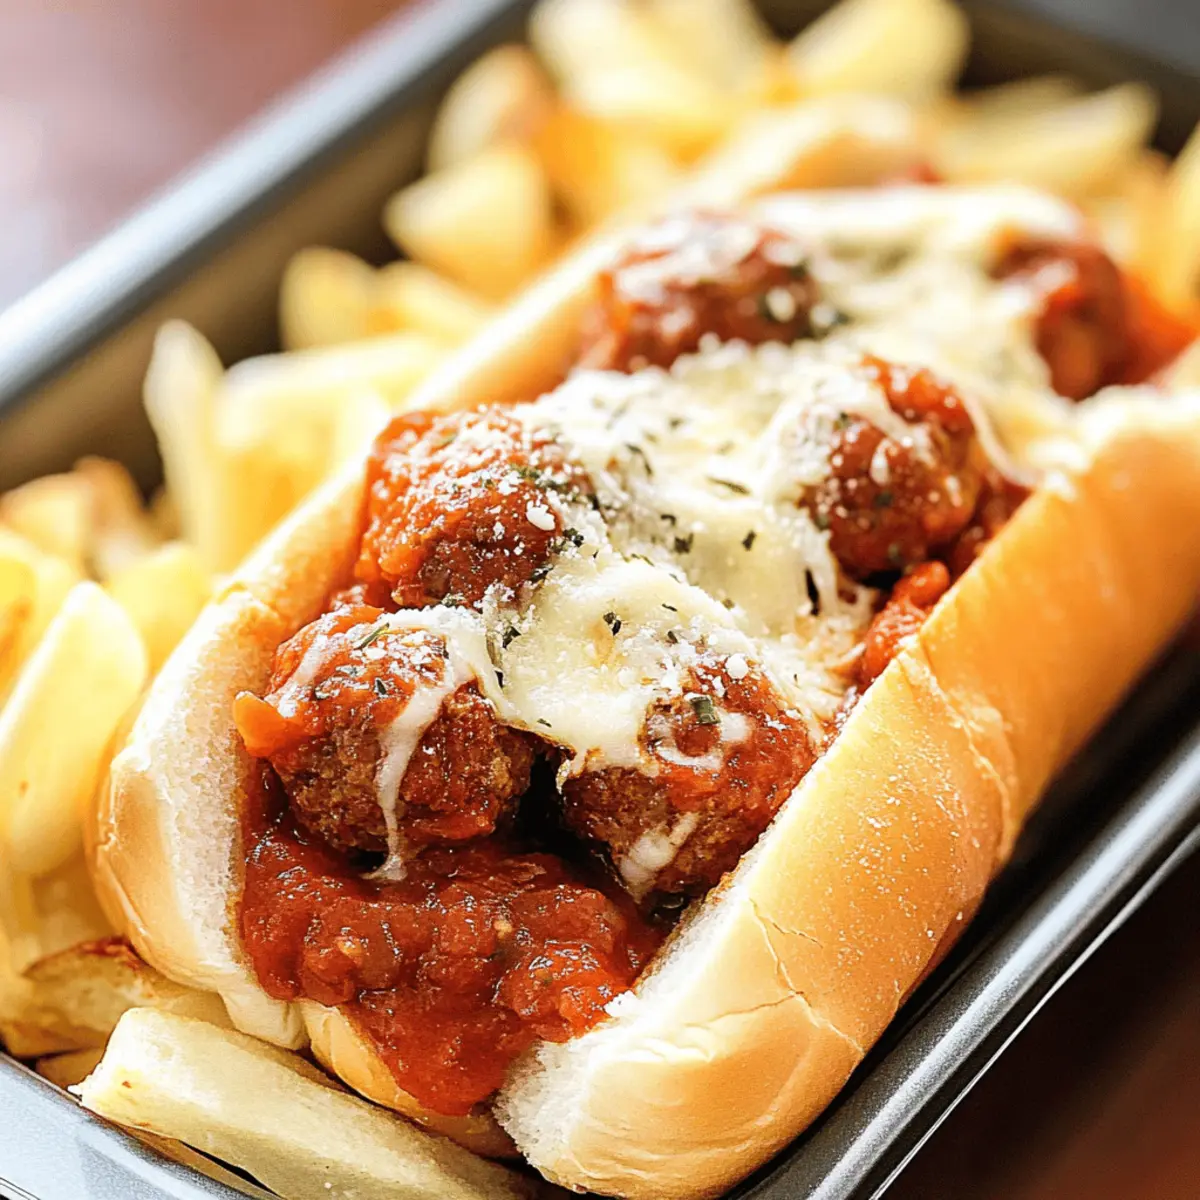
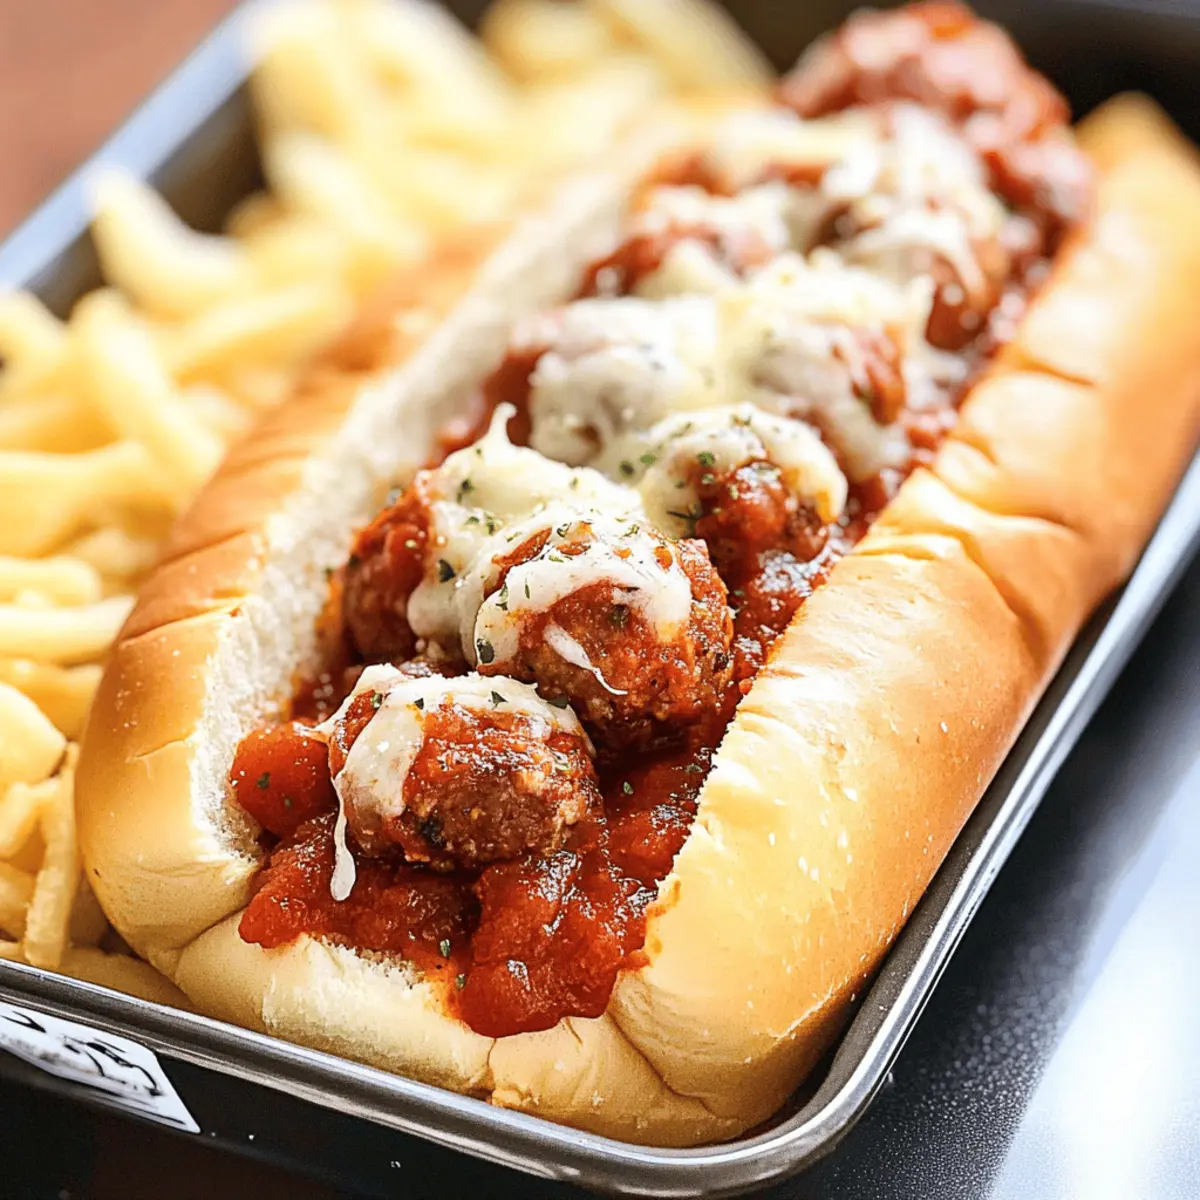
Layer two half-slices of mozzarella cheese on the bottom of each hoagie bun, followed by a few pieces of pepperoni to enhance the flavor. Carefully spoon 6 meatballs along with a generous amount of marinara sauce onto each bun. This will create a hearty filling that everyone will love, bursting with flavor in every bite.

Step 6: Top with Cheese
Finish assembling your Slow Cooker Meatball Subs by sprinkling 2 tablespoons of shredded mozzarella cheese on top of the meatballs. Follow this with 1 tablespoon of grated Parmesan cheese and a sprinkle of Italian seasoning to elevate the flavor profile. The combination of cheeses will create a melty, delicious layer that brings everything together.

Step 7: Bake the Subs
Place the baking sheet with the assembled meatball subs in the preheated oven and bake for 5-6 minutes. Keep an eye on them, and remove them when the cheese is melted and the buns are golden and slightly toasted. This final step provides a crispy texture, enhancing the overall experience of your Slow Cooker Meatball Subs.

How to Store and Freeze Slow Cooker Meatball Subs

Fridge: Store leftovers in an airtight container for up to 3-4 days. Reheat in the microwave or oven until warmed through, ensuring the meatballs are piping hot.

Freezer: For extended storage, wrap individual subs in plastic wrap and then foil to avoid freezer burn, keeping them fresh for up to 2 months.

Reheating: When you’re ready to enjoy a frozen sub, let it thaw in the fridge overnight. Reheat in the oven at 350°F (175°C) for about 15-20 minutes, ensuring the cheese gets melty again.

Tips: Avoid reheating in the microwave, as it may lead to soggy buns. Instead, oven reheating keeps the sub’s crispy texture intact while reviving those delightful flavors.

Expert Tips for Slow Cooker Meatball Subs

  • Cook Time Adjustments: Make sure to adjust the cooking time if you’re using a different brand of frozen meatballs. Always check that they are heated through before serving.

  • Prevent Soggy Buns: To avoid soggy hoagie buns, layer the mozzarella and pepperoni at the bottom; this creates a protective barrier against the marinara sauce.

  • Storage Solutions: Leftovers can be kept in an airtight container in the fridge for 3-4 days or frozen for up to 2 months, keeping your Slow Cooker Meatball Subs fresh and delightful!

  • Cheese Choices: Experiment with different cheeses! Switching to provolone or gouda can add a unique twist and exciting flavor to your subs.

  • Veggie Additions: For extra flavor and nutrition, consider adding sautéed peppers or onions on top of the meatballs before the cheese—perfect for a customized meal!

Make Ahead Options

These Slow Cooker Meatball Subs are perfect for meal prep enthusiasts! You can prepare the meatballs in marinara sauce up to 24 hours in advance by combining them in your slow cooker and refrigerating the entire mixture. When you’re ready to enjoy, simply allow the slow cooker to work its magic as usual, cooking for 6-7 hours on low or 3-4 hours on high. You can also slice the hoagie buns and layer the cheese and pepperoni ahead of time, storing them in the fridge for easy assembly. To maintain quality, keep the prepared buns in an airtight container, and avoid pre-assembling the subs until just before baking. This way, your Slow Cooker Meatball Subs will be just as delicious as if made fresh!

Slow Cooker Meatball Subs Variations & Substitutions

Dive into a world of flavors and textures by customizing your Slow Cooker Meatball Subs to suit your taste buds!

  • BBQ Sauce: Swap marinara for your favorite barbecue sauce for a sweet and tangy twist!

  • Cheese Choices: Experiment with different cheeses like provolone or gouda to create a unique taste experience. Each cheese brings its personality—embrace the variety!

  • Veggie Boost: Add sautéed peppers or onions for an extra layer of flavor and nutrition. They’ll caramelize beautifully and enhance the overall dish!

  • Spicy Kick: Incorporate jalapeño slices for some heat, perfect for spice lovers looking to turn up the flavor.

  • Whole Wheat Buns: Use whole wheat hoagie buns for a healthier option that still holds up against the hearty fillings.

  • Herb Infusion: Add fresh basil or oregano into the marinara sauce for an aromatic enhancement that elevates the dish.

  • Meat Options: Trade out Italian-style meatballs for turkey or chicken meatballs if you’re looking for a lighter variation.

For a fun and tangy experience, why not try them with our Korean BBQ Meatballs with Spicy Mayo? Their uniqueness can spark creativity in your kitchen! Don’t forget to explore the delicious Apart Nduja Meatball sliders for another mouthwatering option!

What to Serve with Slow Cooker Meatball Subs

As you savor the warm, cheesy deliciousness of your meatball subs, consider these tempting accompaniments to create a well-rounded meal.

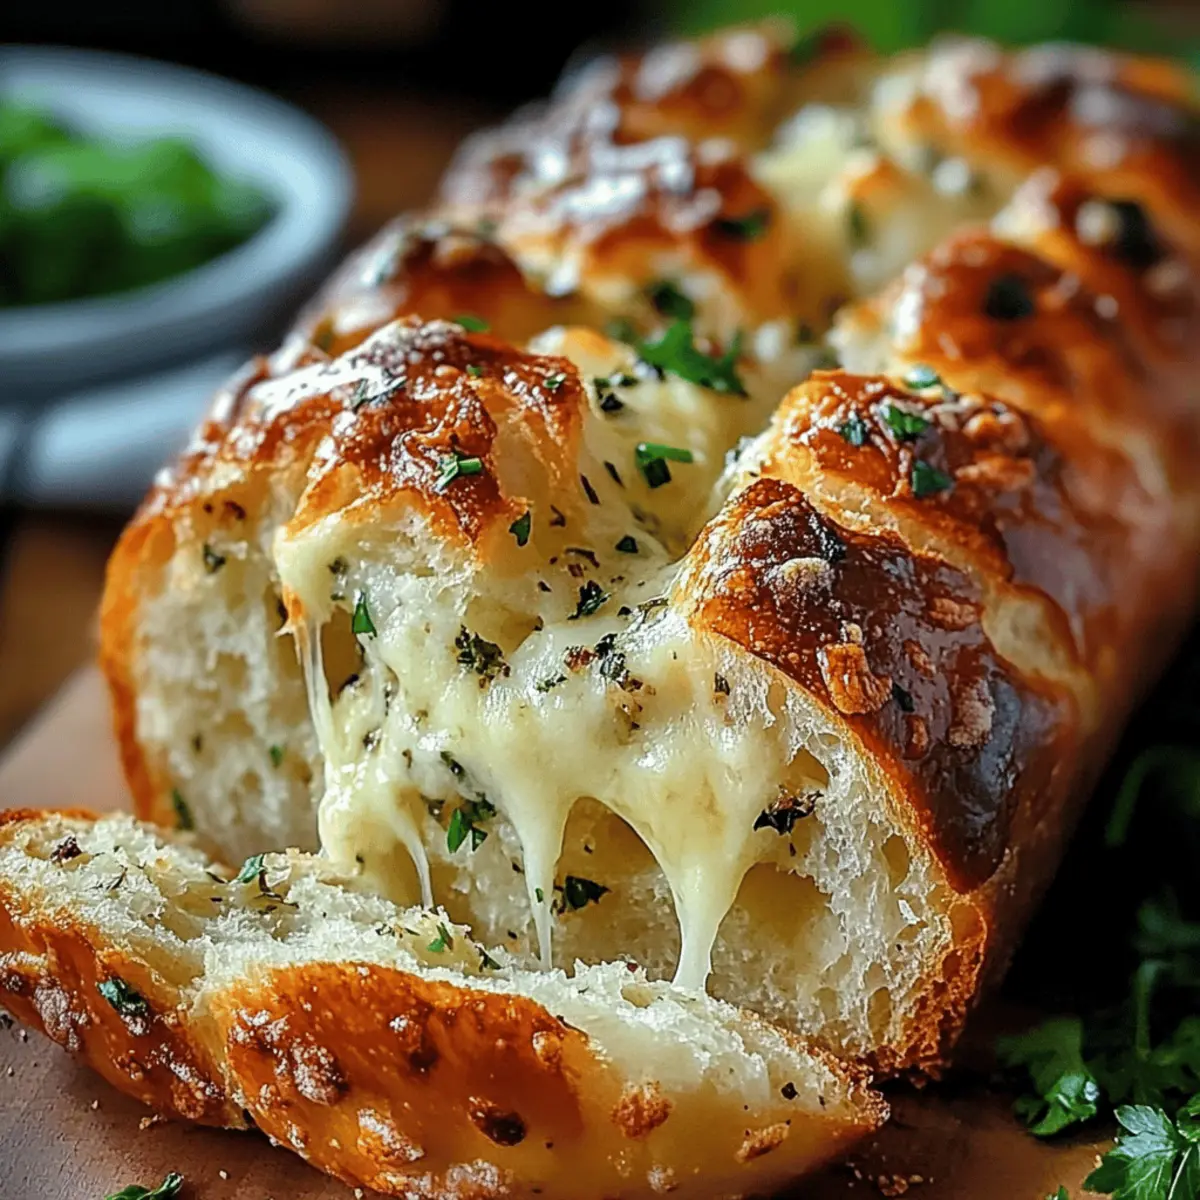
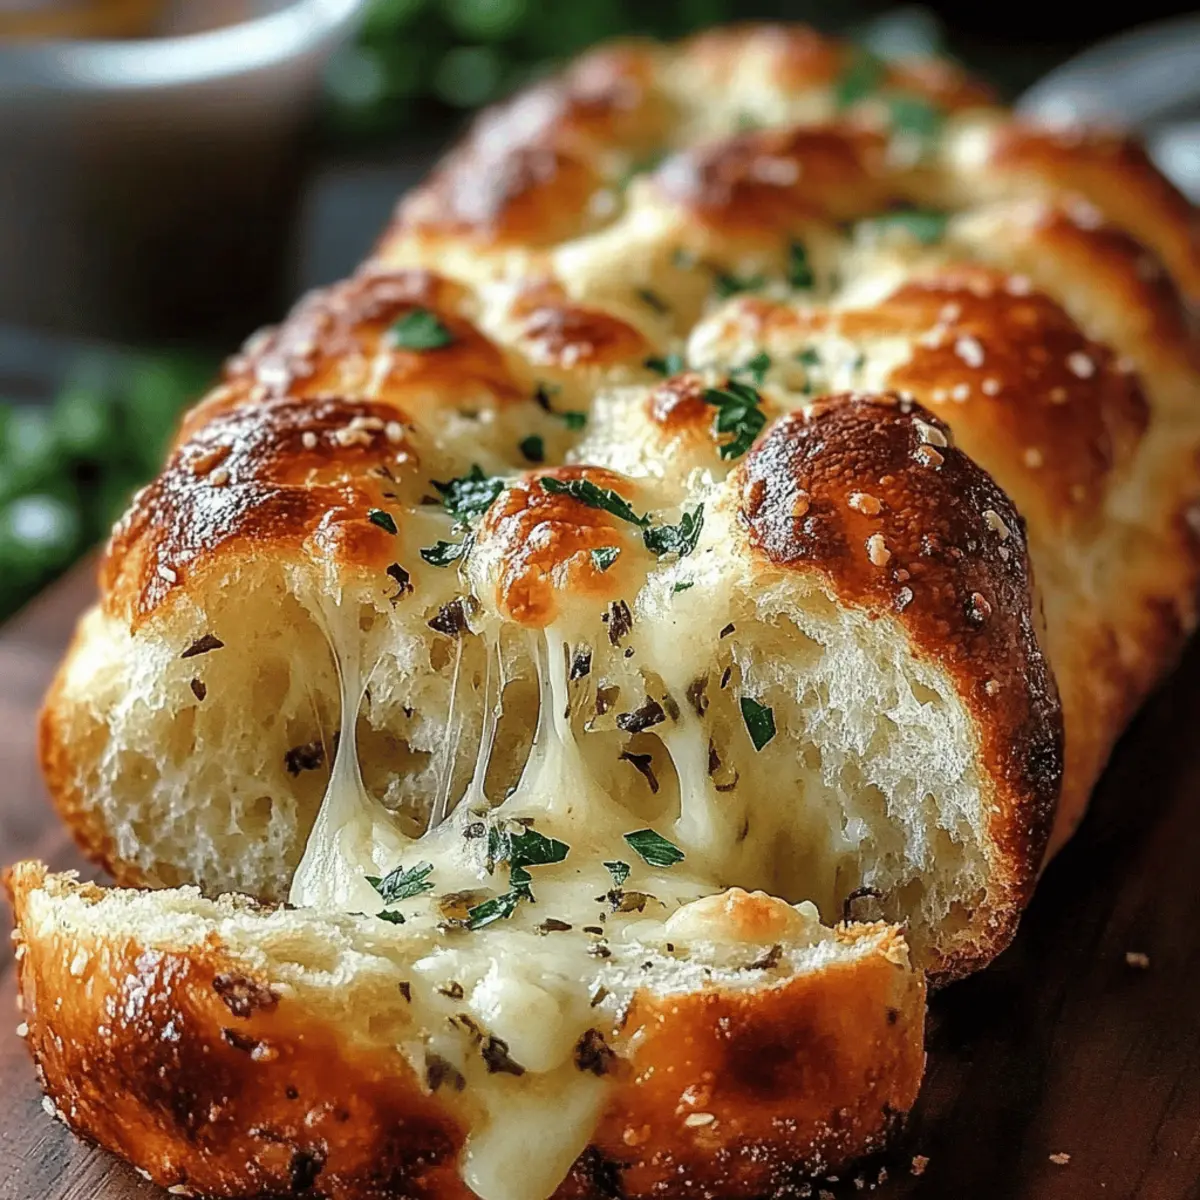
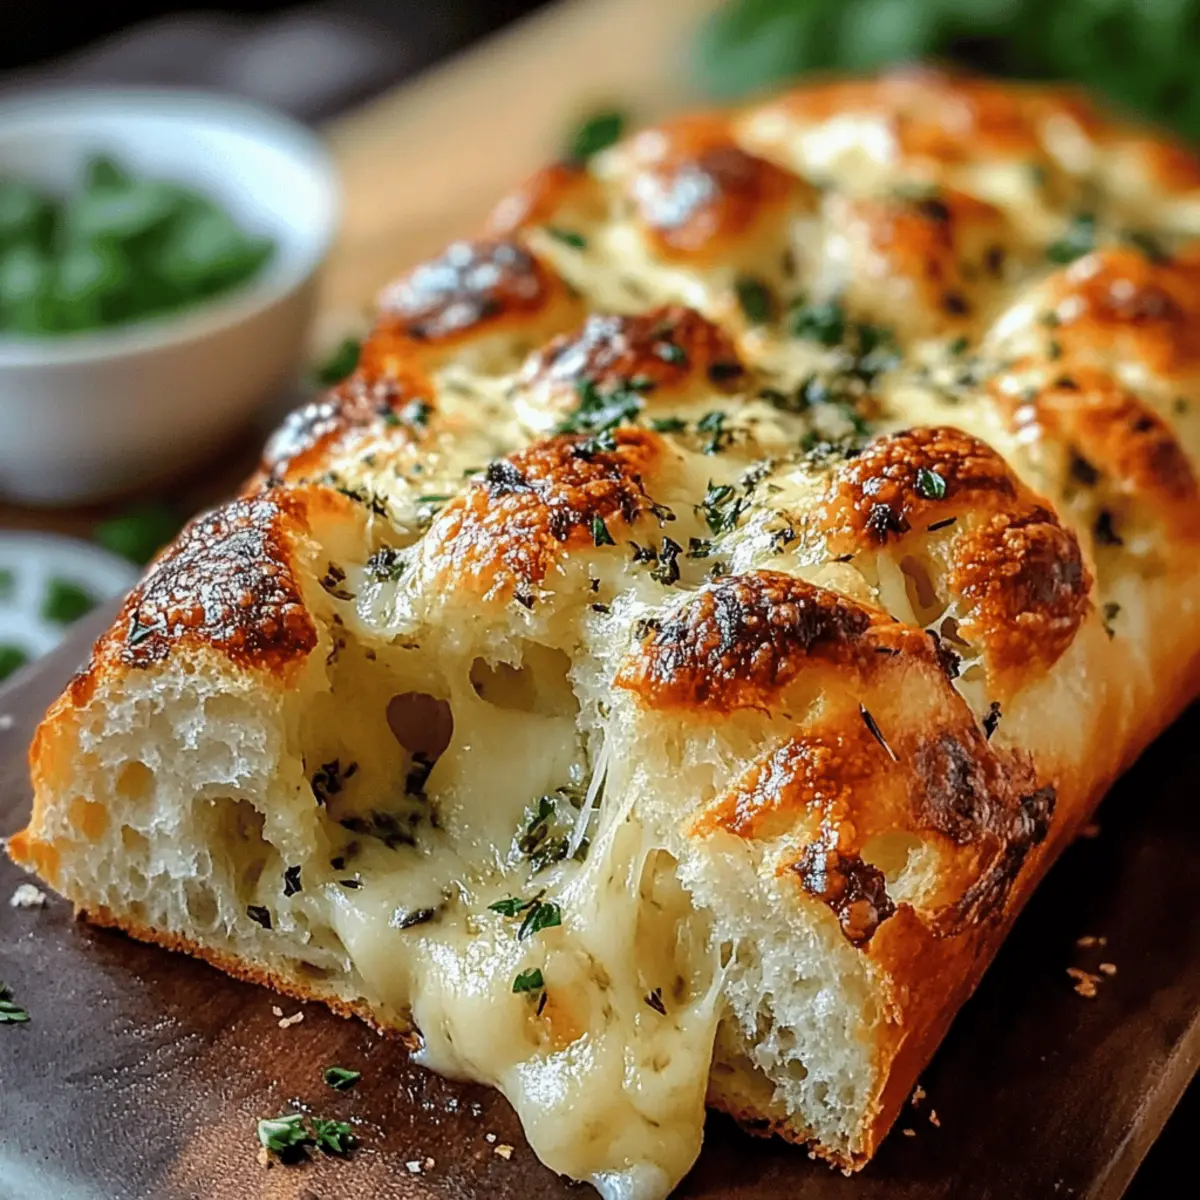
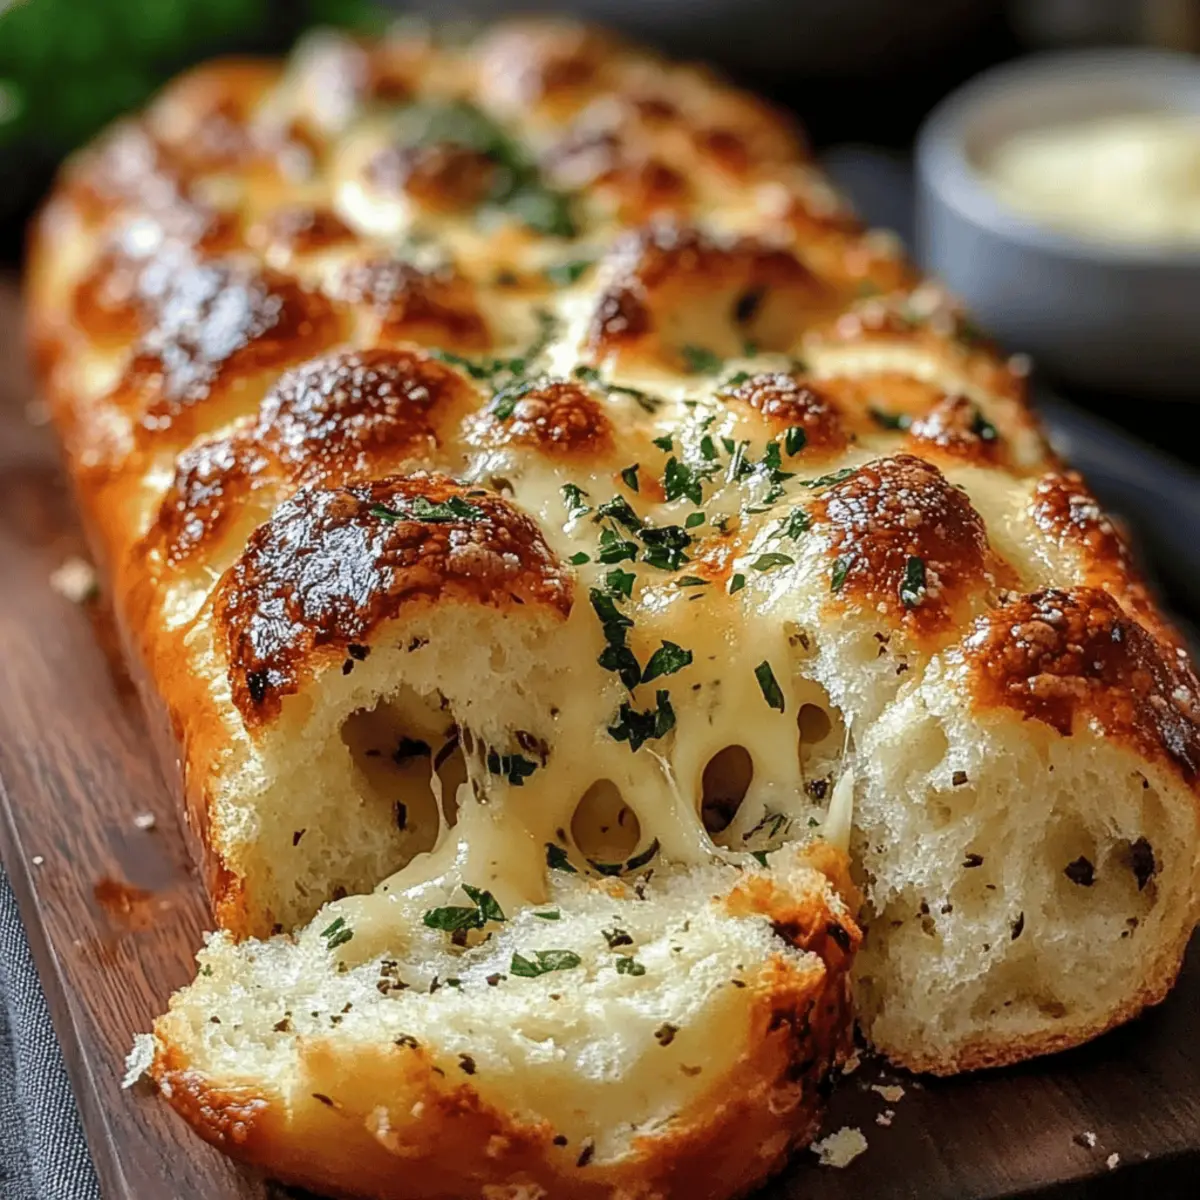
  • Crispy Garlic Bread: This buttery delight adds a crunchy texture, perfect for mopping up any leftover marinara.

  • Mixed Green Salad: A fresh salad brings a light and refreshing balance, with a zingy vinaigrette that cuts through the richness of the subs.

  • Baked Sweet Potato Fries: Their sweetness complements the savory meatballs beautifully while adding a delightful crunch to the meal.

  • Italian Antipasto Platter: Serve a colorful assortment of olives, cheeses, and cured meats to elevate the Italian theme and delight your guests.

  • Roasted Vegetables: The natural sweetness of roasted bell peppers and zucchini offers a delicious contrast to the hearty flavors of the subs.

  • Ice-cold Lemonade: A refreshing drink that brightens up the meal, its citrusy notes enhance the overall experience while keeping it light and fun.

  • Chocolate Chip Cookies: End your meal on a sweet note with these classic treats, providing the perfect, comforting conclusion after your savory feast.

Slow Cooker Meatball Subs Recipe FAQs

How do I choose the right frozen meatballs?
Absolutely! When selecting frozen Italian-style meatballs, look for options that are labeled “fully cooked” to save time. I often recommend checking the ingredient list to ensure you’re getting quality meat without unnecessary fillers. If you prefer a homemade touch, you can make your own meatballs, mixing ground beef or turkey with breadcrumbs, spices, and egg.

How do I store leftovers?
Very simply! Leftovers can be kept in an airtight container in the fridge for about 3-4 days. When reheating, ensure the meatballs are heated through. I usually place them in the microwave for quick warming; however, reheating in the oven brings them back to life wonderfully!

Can I freeze Slow Cooker Meatball Subs?
Yes, indeed! To freeze, wrap each sub individually in plastic wrap and then in foil to prevent freezer burn. You can enjoy your Slow Cooker Meatball Subs for up to 2 months. When you’re ready to eat, just let them thaw in the fridge overnight, then reheat in the oven at 350°F (175°C) for about 15-20 minutes until they’re warm and cheesy again.

What should I do if my meatballs are overcooked?
If you ever find your meatballs overcooked and a bit dry, don’t fret! Adding a splash of additional marinara sauce when serving can rehydrate them beautifully. Alternatively, mixing in grated mozzarella cheese can also provide moisture and enhance the overall flavor. Remember, cooking times can vary depending on the brand, so keep an eye on them!

Are there any dietary considerations for pets or allergies?
Absolutely! If you’re preparing these Slow Cooker Meatball Subs for anyone in your family with allergies, be cautious with ingredients like cheese and bread, as they contain gluten and dairy. And if you’re wondering about sharing with pets, it’s best to keep human food to yourself, as certain ingredients like garlic and onions can be harmful to dogs and cats. Always prioritize their health and safety!

Can I make Slow Cooker Meatball Subs vegetarian?
Very much so! To create a vegetarian version, you can substitute frozen meatballs with plant-based alternatives made from lentils, beans, or veggies. There are also many great brands of meatless meatballs available in stores. Pair them with marinara sauce and your favorite toppings for a delicious twist that everyone will enjoy!

Slow Cooker Meatball Subs

Slow Cooker Meatball Subs That Bring Family Together

These Slow Cooker Meatball Subs bring family together with flavorful meatballs and rich sauce.
Prep Time 15 minutes
Cook Time 6 hours
Total Time 6 hours 15 minutes
Servings: 4 subs
Course: Dinner
Cuisine: Italian
Calories: 450

Ingredients
  

For the Meatballs
  • 24 meatballs Frozen Italian-style Meatballs Use fully cooked varieties
  • 2 cups Marinara Sauce Substitute with spaghetti sauce if preferred
For the Buns
  • 4 buns Hoagie Buns Brat or hot dog buns can work too
For the Cheese
  • 4 slices Mozzarella Cheese Use half-slices for melting
  • ½ cup Shredded Mozzarella For topping
  • 2 tablespoons Grated Parmesan For sprinkling
For the Flavor
  • ½ cup Pepperoni Slices Salami is an alternative
  • 1 tablespoon Italian Seasoning Adjust according to taste

Equipment

  • Slow Cooker
  • Oven
  • Baking Sheet

Method
 

Step-by-Step Instructions
  1. Arrange frozen Italian-style meatballs in a greased slow cooker and pour marinara sauce over them.
  2. Cover and cook on low for 6-7 hours or high for 3-4 hours until meatballs are hot and tender.
  3. Preheat oven to 350°F (175°C) for toasting hoagie buns.
  4. Slice hoagie buns lengthwise, ensuring they open like a book.
  5. Layer two half-slices of mozzarella cheese, followed by pepperoni, then spoon 6 meatballs and sauce onto each bun.
  6. Sprinkle 2 tablespoons of shredded mozzarella and 1 tablespoon of grated Parmesan on top.
  7. Bake for 5-6 minutes until cheese is melted and buns are slightly toasted.

Nutrition

Serving: 1subCalories: 450kcalCarbohydrates: 45gProtein: 22gFat: 20gSaturated Fat: 10gPolyunsaturated Fat: 1gMonounsaturated Fat: 10gCholesterol: 50mgSodium: 990mgPotassium: 450mgFiber: 2gSugar: 4gVitamin A: 400IUCalcium: 250mgIron: 2mg

Notes

For better texture, avoid microwaving to reheat. Use oven to maintain bun crispness.

Tried this recipe?

Let us know how it was!

Crispy Homemade Pizza Rolls That Will Wow Your Taste Buds

I still remember the thrill of biting into a warm, cheesy pizza roll on a lazy Sunday afternoon. The satisfying crunch followed by that gooey, savory filling is a nostalgic treat that many hold dear. Today, we’re bringing that beloved snack into the modern kitchen with my delightful recipe for Crispy Air Fryer Pizza Rolls. Not only are these little gems easy to whip up, but they also offer a healthier twist without sacrificing the taste we all crave. Whether you’re planning a cozy movie night or a lively gathering with friends, these customizable pizza rolls are sure to be a hit. You can fill them with your favorite ingredients, ensuring every bite echoes your personal tastes. Ready to create a snack that’s both nostalgic and innovative? Let’s dive into the delicious world of air fryer pizza rolls together!

Why Are Pizza Rolls So Irresistible?

Crispy exterior and gooey filling: These air fryer pizza rolls boast a perfect crunch followed by a melty center that’s hard to resist. Endless customization options allow you to experiment with fillings, so you can create a new flavor variation every time. Quick and easy: They come together in just 20 minutes, making them a perfect last-minute snack. Healthier option: Utilizing an air fryer means less oil and a significantly lighter bite without compromising on flavor. Perfect for movie nights or casual get-togethers, everyone will love this nostalgic treat! If you’re looking for even more tasty inspiration, check out these Foster Cinnamon Rolls for a sweet finish after your savory snack.

Pizza Rolls Ingredients

For the Dough

  • Pizza Dough – Use store-bought for convenience or make your own for that homemade touch.

For the Filling

  • Shredded Mozzarella Cheese – Provides the ideal gooey texture; feel free to swap in cheddar or pepper jack for a flavor kick.
  • Pepperoni – Adds a savory burst; try replacing it with cooked sausage, bell peppers, or olives for delicious variations.
  • Italian Seasoning – Enhances the flavor profile; it’s optional but highly recommended for an authentic taste.

For the Seasoning

  • Salt – Season to taste; sea salt or kosher salt works beautifully.

For Dipping

  • Marinara Sauce – Perfect for dipping; ranch dressing or sriracha mayo are great alternatives to mix it up!

Get ready to make unforgettable pizza rolls that will wow your taste buds!

Step‑by‑Step Instructions for Crispy Air Fryer Pizza Rolls

Step 1: Prepare the Dough
If using store-bought pizza dough, let it sit at room temperature for 20 minutes to relax. Then, on a lightly floured surface, roll the dough out to about 1/4 inch thick, ensuring it’s even to allow for consistent cooking. This will be the base for your crispy air fryer pizza rolls.

Step 2: Cut & Fill
Using a sharp knife or a pizza cutter, cut the rolled-out dough into 3×3 inch squares. In the center of each square, place a tablespoon of shredded mozzarella cheese and a few slices of pepperoni. For an extra burst of flavor, sprinkle some Italian seasoning on top before moving to the next step.

Step 3: Seal
Fold each dough square over the filling to create triangles or rectangles. Press the edges firmly to seal in the deliciousness. If you prefer a little flair, crimp the edges with a fork for a decorative touch. This step is crucial to ensure your pizza rolls don’t ooze out during cooking.

Step 4: Preheat Air Fryer
Before you start cooking, make sure to preheat your air fryer to 375°F (190°C) for about 5 minutes. This step is vital for achieving that perfect crispy texture on your pizza rolls. While waiting, prepare your cooking space for the next step.

Step 5: Cook
Lightly spray the air fryer basket with olive oil to prevent sticking. Carefully arrange your pizza rolls in a single layer in the basket, ensuring they’re not crowded. Cook for 8-10 minutes, shaking the basket halfway through for even browning and crispiness. Keep a close eye on them; they should turn golden brown and crispy.

Step 6: Serve
Once cooked, carefully remove the pizza rolls from the air fryer and let them cool for a few minutes. Serve them warm with a side of marinara sauce or your favorite dipping sauce, making these crispy air fryer pizza rolls the perfect nostalgic snack for any occasion.

What to Serve with Crispy Air Fryer Pizza Rolls

Craving the perfect accompaniments to elevate your air fryer pizza rolls into a complete meal?

  • Garden Salad: Fresh greens with a light vinaigrette add a refreshing crunch, complementing the richness of the pizza rolls beautifully.
  • Garlic Bread: This classic side is perfect for scooping up extra marinara sauce, enhancing the overall flavor experience. The crispy texture pairs well with the chewy rolls.
  • Crispy Potato Wedges: Soft on the inside and crunchy on the outside, these wedges offer a satisfying contrast to the cheesy filling of the rolls. Season them generously for the ultimate side!
  • Homemade Coleslaw: A tangy, crunchy coleslaw adds brightness to your plate, balancing the rich flavors and giving a delightful crunch for texture.
  • Spicy Sriracha Mayo: For those who love a kick, this creamy dip amplifies the flavors of your pizza rolls, awakening the taste buds with an explosion of taste.
  • Craft Beer: Pairing your pizza rolls with a crisp craft beer not only quenches your thirst but also enhances the flavors, making for a delightful snacking experience.
  • Cheesy Nachos: Dip into cheesy nachos alongside your pizza rolls for a completely indulgent snack table; the gooey melted cheese will delight cheese lovers!
  • Chocolate Chip Cookies: Sweeten the deal with warm, gooey chocolate chip cookies for dessert, creating a perfect harmony of savory and sweet as the meal wraps up.

Make Ahead Options

These Crispy Air Fryer Pizza Rolls are an excellent choice for meal prep! You can prepare the pizza rolls up to 24 hours in advance. Simply follow the steps to fill and seal the rolls, then place them in a single layer on a baking sheet and refrigerate. To maintain their delicious quality, make sure to cover them with plastic wrap to prevent drying out. When you’re ready to serve, take them out of the fridge and arrange them in the air fryer basket before cooking. Cook for an additional minute or two since they will be chilled, and you’ll have warm, crispy pizza rolls ready in no time! Happy cooking!

Expert Tips for Crispy Air Fryer Pizza Rolls

  • Preheat Properly: Guarantee perfect crispiness by preheating your air fryer. This ensures even cooking throughout the rolls.

  • Avoid Overcrowding: To prevent soggy pizza rolls, arrange them in a single layer. Cook in batches if needed for optimal results.

  • Seal Edges Well: Make sure to firmly press the dough edges to avoid any filling leakage. This keeps your delicious gooey filling intact.

  • Stretch Your Dough: Roll out the dough evenly to about 1/4 inch thick. Uneven dough can lead to inconsistent cooking and texture in your pizza rolls.

  • Experiment with Fillings: Feel free to swap out traditional pepperoni with veggies, different cheeses, or even pulled chicken. Customizing your pizza rolls can elevate the dish!

  • Shake for Even Cooking: Shake the air fryer basket midway through cooking. This helps in achieving that golden brown by allowing even heat distribution.

Storage Tips for Pizza Rolls

Fridge: Store leftover pizza rolls in an airtight container for up to 3 days to maintain freshness and flavor.

Freezer: For longer storage, freeze pizza rolls in a single layer on a baking sheet, then transfer to a freezer-safe bag for up to 2 months.

Reheating: To enjoy leftover pizza rolls, reheat in the air fryer at 350°F (175°C) for 5-7 minutes for a crispy texture, ensuring they’re heated through.

Wrapping: When refrigerating or freezing, wrap pizza rolls in plastic wrap or foil to prevent freezer burn and keep them tasty!

Pizza Rolls Variations & Substitutions

Feel free to let your creativity shine and customize these pizza rolls to match your unique cravings!

  • Dairy-Free: Substitute mozzarella with vegan cheese or nutritional yeast for a cheesy flavor without the dairy.
  • Veggie-Packed: Add cooked vegetables like spinach, mushrooms, or zucchini for a colorful twist that amplifies flavor and nutrition.
  • Spicy Kick: Mix in sliced jalapeños or crushed red pepper flakes to your filling for a delightful heat that will awaken your taste buds.
  • Sweet Twist: Swap the marinara for a side of BBQ sauce or honey mustard for a surprising sweet and savory combination, perfect for those with adventurous palates.
  • Herb Infusion: Incorporate fresh herbs like basil or oregano into your filling to elevate the flavor profile and embrace that Italian essence.
  • Meat Lovers: Replace pepperoni with crumbled sausage, diced ham, or even shredded chicken for a heartier option that meat lovers will adore.
  • Cheesy Layers: Use a mix of cheeses like cheddar and provolone alongside mozzarella for a rich, melty experience that will keep everyone coming back for more.
  • Puff Pastry Alternative: For a flakier option, try using puff pastry instead of pizza dough; just adjust the cooking time accordingly for a delightful textural contrast.

After enjoying your crispy pizza rolls, why not indulge in some sweet bites too? Consider trying out these Foster Cinnamon Rolls to round off your casual gathering with an unforgettable dessert!

Crispy Air Fryer Pizza Rolls Recipe FAQs

What kind of dough should I use for pizza rolls?
You can use either store-bought pizza dough for convenience or make your own for a personal touch. If making homemade dough, ensure to let it rise properly according to your recipe. Store-bought dough is typically easier and quicker for a busy day!

How should I store leftover pizza rolls?
Store leftover pizza rolls in an airtight container in the refrigerator for up to 3 days. If you’re looking to keep them longer, freezing is a great option. Simply place them on a baking sheet in a single layer, freeze until solid, and then transfer to a freezer-safe bag. They’ll last for up to 2 months in the freezer!

Can I freeze the pizza rolls before cooking them?
Absolutely! To freeze, assemble the pizza rolls as described but don’t cook them first. Arrange them in a single layer on a baking sheet and freeze until firm. Then, transfer them to a freezer-safe bag. When you’re ready to enjoy, cook them directly from frozen, adding a couple of extra minutes to the cooking time for perfect results!

What if my pizza rolls open while cooking?
If you find that some of your pizza rolls open up while cooking, it could be due to insufficient sealing. Make sure to press the edges firmly together, perhaps even crimping them with a fork to ensure they stay sealed. You can also try rolling the dough slightly thicker to provide more stability. If they do ooze a bit, don’t fret; they will still taste delicious!

Are there any dietary considerations for pizza rolls?
Yes! These crispy air fryer pizza rolls can easily be adapted to fit various dietary needs. Opt for gluten-free dough for a gluten-sensitive diet or swap out traditional fillings for vegetarian options to cater to plant lovers. Always check labels for potential allergens in store-bought ingredients.

Pizza Rolls

Crispy Homemade Pizza Rolls That Will Wow Your Taste Buds

Make delicious and customizable Pizza Rolls that are crispy on the outside and gooey on the inside for an unforgettable snack.
Prep Time 20 minutes
Cook Time 10 minutes
Total Time 30 minutes
Servings: 4 rolls
Course: Appetizers
Cuisine: Italian
Calories: 250

Ingredients
  

For the Dough
  • 1 package Pizza Dough Use store-bought for convenience or make your own.
For the Filling
  • 1 cup Shredded Mozzarella Cheese Feel free to swap in cheddar or pepper jack.
  • 1/2 cup Pepperoni Try replacing it with cooked sausage, bell peppers, or olives.
  • 1 teaspoon Italian Seasoning Optional but highly recommended for flavor.
For the Seasoning
  • to taste Salt Sea salt or kosher salt works well.
For Dipping
  • 1 cup Marinara Sauce Ranch dressing or sriracha mayo are great alternatives.

Equipment

  • Air Fryer
  • Rolling Pin
  • Pizza Cutter
  • airtight container

Method
 

Step-by-Step Instructions
  1. Let the store-bought pizza dough sit at room temperature for 20 minutes. Roll it out to about 1/4 inch thick.
  2. Cut the rolled-out dough into 3x3 inch squares. Place a tablespoon of shredded mozzarella cheese and a few slices of pepperoni in the center of each square.
  3. Fold each square over the filling to create triangles or rectangles and press the edges firmly to seal.
  4. Preheat your air fryer to 375°F (190°C) for about 5 minutes.
  5. Lightly spray the air fryer basket with olive oil, arrange pizza rolls in a single layer, and cook for 8-10 minutes.
  6. Let the pizza rolls cool for a few minutes before serving with marinara sauce or your favorite dipping sauce.

Nutrition

Serving: 3rollsCalories: 250kcalCarbohydrates: 30gProtein: 10gFat: 12gSaturated Fat: 6gPolyunsaturated Fat: 1gMonounsaturated Fat: 4gCholesterol: 25mgSodium: 580mgPotassium: 150mgFiber: 1gSugar: 1gVitamin A: 500IUCalcium: 200mgIron: 1mg

Notes

Store leftover pizza rolls in an airtight container for up to 3 days, or freeze for longer storage. Reheat in the air fryer for a crispy texture.

Tried this recipe?

Let us know how it was!

Nutmeg Ginger Apple Snaps: Cozy Cookies for Fall Bliss

As the autumn leaves dance outside my window, the enticing aroma of spices fills my kitchen, transforming it into a cozy haven. I’m diving into the enchanting world of Nutmeg Ginger Apple Snaps, a delightful cookie recipe perfect for those who crave a homemade treat that’s equally fun and festive. These spiced cookies not only deliver on nostalgia with their rich combination of ginger, cinnamon, and nutmeg, but they also boast a freeze-friendly nature, making them a wonderful option for impromptu gatherings or quiet evenings at home. Topped with sweet, tender apple slices, they truly evoke the comforting vibes of a favorite fall film. So, are you ready to bake a batch and fill your kitchen with warmth?

Why Are Nutmeg Ginger Apple Snaps Irresistible?

Irresistible Warmth: The combination of spices and apples creates a cozy autumn flavor that will wrap you in warmth with every bite.
Quick and Easy: Making these cookies is a breeze, allowing even novice bakers to whip up these treats with minimal fuss.
Versatile for All Occasions: Whether it’s a festive gathering or a quiet evening, these cookies adapt wonderfully, just like my Vietnamese Caramel Ginger dish.
Nostalgic Appeal: Inspired by the fun and whimsy of “Fantastic Mr. Fox,” they add a delightful touch of nostalgia to your dessert table.
Make-Ahead Possibility: With a freeze-friendly nature, you can batch-bake these cookies and have a delicious treat ready at a moment’s notice, perfect for unexpected visitors!

These Nutmeg Ginger Apple Snaps are sure to become your new favorite autumn indulgence!

Nutmeg Ginger Apple Snaps Ingredients

For the Cookies

  • All-Purpose Flour – Provides structure and bulk; whole wheat flour can create a denser cookie.
  • Ground Cinnamon – Adds warmth and sweetness; consider sprinkling extra on top for enhanced flavor.
  • Ground Ginger – Elevates spiciness and aroma; fresh grated ginger is an excellent way to boost the flavor profile.
  • Grated Nutmeg – Delivers a distinct, fragrant spice note; always opt for fresh for the best taste.
  • Ground Cloves – Enhances the overall spice profile; feel free to adjust or omit based on your preference.
  • Salt – Balances and enhances all flavors; it’s essential for achieving a harmonious taste.
  • Butter (softened) – Adds richness and moisture; ensure it’s well softened for easy creaming.
  • Granulated Sugar – Acts as the primary sweetener, contributing to texture; coconut sugar can be a great substitute for added depth.
  • Brown Sugar – Infuses moisture and chewiness into each bite.
  • Molasses – Imparts rich flavor and color; maple syrup works as a lighter alternative.
  • Fresh Grated Ginger – Boosts warmth and freshness; you can use ground ginger if fresh isn’t available.
  • Vanilla Extract – Enhances the flavor; for a gourmet touch, a vanilla bean provides an even richer experience.
  • Eggs – Essential for binding the ingredients together; no substitutes are recommended, but an egg wash can add shine.

For the Topping

  • Gala Apples – Adds sweetness and moisture; you’re welcome to substitute with any sweet apple variety, like Fuji or Honeycrisp, sliced thin for presentation.
  • Coarse Sugar and Cake Sparkles – Provides a decorative finish; any coarse sugar will do, or leave out the sparkles for a simpler look.

These Nutmeg Ginger Apple Snaps promise to fill your home with the delightful scents and flavors of autumn!

Step‑by‑Step Instructions for Nutmeg Ginger Apple Snaps

Step 1: Preheat the Oven
Start by preheating your oven to 325°F (163°C) to create the perfect baking environment for your Nutmeg Ginger Apple Snaps. While the oven heats, line a baking sheet with parchment paper to prevent sticking and ensure easy removal of your cookies once they are baked.

Step 2: Mix the Dry Ingredients
In a medium bowl, sift together 2 cups of all-purpose flour, 1 teaspoon of ground cinnamon, 1 teaspoon of ground ginger, 1/4 teaspoon of grated nutmeg, 1/4 teaspoon of ground cloves, and 1/2 teaspoon of salt. This step not only combines the spices but also aerates the flour, which helps your cookies to rise beautifully.

Step 3: Cream the Butter and Sugars
In a large mixing bowl, cream together 1/2 cup of softened butter, 1/2 cup of granulated sugar, 1/2 cup of brown sugar, 1/4 cup of molasses, and 1 tablespoon of fresh grated ginger. Beat them with an electric mixer on medium speed until the mixture is fluffy and light in color, which should take about 2-3 minutes.

Step 4: Add Eggs and Vanilla
Next, add one large egg and 1 teaspoon of vanilla extract to the butter mixture. Beat everything together on medium speed until fully incorporated, ensuring the egg provides moisture and stability to your Nutmeg Ginger Apple Snaps dough.

Step 5: Incorporate the Dry Ingredients
Gradually add the dry flour mixture to the creamed butter mixture. Use a spatula or mix on low speed until just combined. Be careful not to over-mix, as you want your cookie dough to remain tender and inviting for the best texture when baked.

Step 6: Shape the Cookies
Using your hands or a cookie scoop, roll the dough into balls, about 2-3 tablespoons in size. Place them on your prepared baking sheet, flattening them slightly while ensuring they are spaced about 2 inches apart to allow for spreading during baking.

Step 7: Top with Apples
Slice Gala apples thinly and gently press a slice into the center of each cookie. To enhance their flavor and appearance, sprinkle a mixture of sugar and cinnamon over the apple slices, creating a delightful contrast to the warm spiced cookies.

Step 8: Bake to Perfection
Bake the Nutmeg Ginger Apple Snaps in your preheated oven for 20 minutes, or until the edges turn golden brown. Keep a close eye on them; once done, remove the baking sheet from the oven and allow the cookies to cool for a few minutes before transferring them to a wire rack to cool completely.

Expert Tips for Nutmeg Ginger Apple Snaps

  • Fresh Spices Matter: Use freshly grated nutmeg and ginger to maximize the spices’ aromas and flavor. Ground spices can lose potency over time.
  • Don’t Overmix: When incorporating the dry ingredients, mix just until combined. Overmixing can lead to tough cookies.
  • Cooling Technique: Allow your cookies to cool on a wire rack to maintain their soft centers and prevent sogginess.
  • Apple Placement: Press the apple slices into the cookies before baking for a beautifully integrated topping, enhancing moisture and flavor.
  • Storage Success: Keep your Nutmeg Ginger Apple Snaps in an airtight container at room temperature for up to a week. They can also be frozen for future enjoyment!

What to Serve with Nutmeg Ginger Apple Snaps?

As you savor each delightful bite of these spiced cookies, consider enhancing your experience with these comforting companions.

  • Creamy Vanilla Ice Cream: The smooth, cold creaminess balances the warm spices beautifully, creating a delightful contrast that melts in your mouth.
  • Hot Apple Cider: This spiced drink enhances the autumn flavors, wrapping you in warm comfort reminiscent of cozy fall evenings. It’s perfect for sipping alongside your cookies.
  • Candied Pecans: Adding a crunchy texture, these sweet and nutty bites offer an excellent contrast to the soft cookies. They also provide an extra touch of luxury to your dessert spread.
  • Maple Glazed Carrots: The natural sweetness and earthy flavors of the carrots echo the warmth of the spices in the cookies and make for a unique vegetarian side for those choosing savory options.
  • Chocolate Espresso: A rich, bold coffee option with notes of chocolate that beautifully complements the spices in the cookies, creating an indulgent, dessert-like drink experience.
  • Warm Pumpkin Soup: A smooth, creamy soup with hints of spice that pairs well, creating a lovely balance of sweet and savory when enjoyed together.
  • Chai Tea: The aromatic spices in chai elevate the flavor experience, enhancing the cozy vibe while adding a warm, comforting drink to your treat-studded table.
  • Spicy Ginger Lemonade: A refreshing, tangy drink that contrasts the cookies’ sweet warmth, cleansing the palate while still inviting more bites of those Nutmeg Ginger Apple Snaps.
  • Caramel Sauce: Drizzle a touch of warm caramel over the cookies for a decadent sweet addition that will invite guests to indulge further. Perfect for those with a sweet tooth!

Nutmeg Ginger Apple Snaps Variations & Substitutions

Feel free to explore these delightful adaptations of Nutmeg Ginger Apple Snaps and let your creativity shine in the kitchen!

  • Pears: Swap out the apples for beautifully ripe pears for a sweet and juicy alternative that pairs wonderfully with the spices.
  • Vegan Option: Replace butter with coconut oil and use flaxseed eggs for a delicious vegan twist that doesn’t compromise on flavor.
  • Gluten-Free: Use a 1:1 gluten-free flour blend instead of all-purpose flour to make these cookies friendly for gluten-sensitive pals.
  • Extra Spices: Add a pinch of cardamom or black pepper to the spice mix for a surprising depth of flavor that wakes up your taste buds.
  • Chocolaty Surprise: Fold in some dark chocolate chips to give the cookies a decadent twist—who can resist the harmony of chocolate and spices?
  • Crunchy Texture: Mix in chopped nuts like pecans or walnuts for a delightful crunch that contrasts beautifully with the soft apple topping.
  • Cinnamon Sugar Dust: Instead of coarse sugar on top, sprinkle with a cinnamon-sugar blend after baking for an extra cozy touch.
  • Dried Fruit: Incorporate chopped dried cranberries or raisins for a chewy texture and additional bursts of sweetness nestled within each bite.

These variations not only cater to different dietary needs, but they also keep your baking adventures exciting! If you’re in the mood for more flavorful inspiration, you might also enjoy my Asian Ginger Soy dish or perhaps a comforting Apple Crisp Cinnamon for dessert. Embrace the joy of customization and watch your Nutmeg Ginger Apple Snaps become a true family favorite!

How to Store and Freeze Nutmeg Ginger Apple Snaps

Room Temperature: Store cookies in an airtight container at room temperature for up to 1 week to maintain their soft texture and flavors.

Freezer: For longer storage, freeze the cookies in a single layer on a baking sheet before transferring to an airtight container or freezer bag. They can be stored for up to 3 months.

Reheating: To enjoy your Nutmeg Ginger Apple Snaps warm, simply microwave for a few seconds or place in a preheated oven at 350°F (175°C) for about 5-7 minutes.

Tip: Consider adding parchment paper between layers of cookies in the container to prevent sticking during storage.

Make Ahead Options

These Nutmeg Ginger Apple Snaps are perfect for busy home cooks looking to save time on dessert prep! You can prepare the cookie dough up to 24 hours in advance; simply cover it tightly and refrigerate it. Additionally, you can slice the apples and keep them in a separate airtight container to prevent browning, allowing you to top the cookies just before baking. When you’re ready to bake, roll the chilled dough into balls, place them on a baking sheet, and top with the prepared apple slices. Bake as directed for warm, delicious cookies that are just as delightful as freshly made!

Nutmeg Ginger Apple Snaps Recipe FAQs

How do I choose the right apples for my Nutmeg Ginger Apple Snaps?
When selecting apples, I recommend using Gala apples for their balance of sweetness and moisture, but feel free to experiment with other sweet varieties like Fuji or Honeycrisp. Look for apples that are firm with smooth, shiny skin, avoiding any with dark spots or bruises.

What’s the best way to store Nutmeg Ginger Apple Snaps?
To keep your cookies fresh, store the Nutmeg Ginger Apple Snaps in an airtight container at room temperature for up to 1 week. This will maintain their soft texture and flavors. If you want to keep them longer, consider freezing them!

How do I freeze Nutmeg Ginger Apple Snaps?
Absolutely! To freeze these delightful cookies, first, arrange them in a single layer on a baking sheet and place them in the freezer for about 1 to 2 hours until they’ve firmed up. Once frozen, transfer the cookies to an airtight container or a freezer bag, layering parchment paper in between to prevent sticking. They can be stored for up to 3 months! When you’re ready to enjoy them, just reheat them in the microwave or a preheated oven.

Can I make substitutions for any ingredients in the Nutmeg Ginger Apple Snaps?
Yes, you can adapt this recipe! For a dairy-free version, substitute the butter with coconut oil and use a flaxseed egg (1 tablespoon of ground flaxseed mixed with 2.5 tablespoons of water, allowed to sit for a few minutes) instead of the egg. Additionally, if you don’t have molasses on hand, maple syrup works well, offering a lighter flavor while still keeping the cookies moist.

How can I ensure my Nutmeg Ginger Apple Snaps don’t turn out too dry or crumbly?
To avoid a dry cookie, be careful not to overmix your dough after adding the dry ingredients; mix just until combined. Additionally, ensure your butter is at room temperature for successful creaming with sugars, and consider a slight underbake—about 18 minutes instead of 20 for a melt-in-your-mouth texture.

Are Nutmeg Ginger Apple Snaps suitable for a gluten-free diet?
While this recipe uses all-purpose flour, you can easily make it gluten-free by substituting it with a gluten-free all-purpose flour blend. Be sure to check for other gluten-containing ingredients in any substitutes you choose. Enjoy a delightful treat without the gluten!

Nutmeg Ginger Apple Snaps

Nutmeg Ginger Apple Snaps: Cozy Cookies for Fall Bliss

These Nutmeg Ginger Apple Snaps are delightful cookies, perfect for autumn with their rich combination of spices and sweet apple topping.
Prep Time 15 minutes
Cook Time 20 minutes
Cooling Time 10 minutes
Total Time 45 minutes
Servings: 24 cookies
Course: Dessert
Cuisine: American
Calories: 130

Ingredients
  

For the Cookies
  • 2 cups all-purpose flour can substitute with whole wheat for a denser cookie
  • 1 teaspoon ground cinnamon consider sprinkling extra on top
  • 1 teaspoon ground ginger fresh grated is an excellent alternative
  • 1/4 teaspoon grated nutmeg fresh is recommended for best taste
  • 1/4 teaspoon ground cloves adjust or omit based on preference
  • 1/2 teaspoon salt essential for balance
  • 1/2 cup butter (softened) ensure well softened for easy creaming
  • 1/2 cup granulated sugar coconut sugar can be a great substitute
  • 1/2 cup brown sugar infuses moisture and chewiness
  • 1/4 cup molasses maple syrup can be a lighter alternative
  • 1 tablespoon fresh grated ginger boosts warmth and freshness
  • 1 teaspoon vanilla extract for added flavor
  • 1 large egg no substitutes recommended
For the Topping
  • 2 Gala apples sliced thin can substitute with any sweet apple variety
  • to taste coarse sugar and cake sparkles for decorative finish

Equipment

  • Mixing Bowl
  • Baking Sheet
  • Parchment Paper
  • Electric mixer

Method
 

Step-by-Step Instructions
  1. Preheat your oven to 325°F (163°C) and line a baking sheet with parchment paper.
  2. Sift together 2 cups of all-purpose flour, 1 teaspoon of ground cinnamon, 1 teaspoon of ground ginger, 1/4 teaspoon of grated nutmeg, 1/4 teaspoon of ground cloves, and 1/2 teaspoon of salt.
  3. Cream together 1/2 cup of softened butter, 1/2 cup of granulated sugar, 1/2 cup of brown sugar, 1/4 cup of molasses, and 1 tablespoon of fresh grated ginger until fluffy.
  4. Add 1 large egg and 1 teaspoon of vanilla extract to the mixture and beat until fully incorporated.
  5. Gradually add the dry flour mixture to the creamed butter mixture and mix just until combined.
  6. Roll the dough into balls (2-3 tablespoons each) and place them on the baking sheet, flattening slightly.
  7. Press thin slices of Gala apples into the center of each cookie and sprinkle with sugar and cinnamon.
  8. Bake for 20 minutes or until the edges turn golden brown. Allow to cool for 10 minutes on the baking sheet before transferring to a wire rack.

Nutrition

Serving: 1cookieCalories: 130kcalCarbohydrates: 18gProtein: 1gFat: 6gSaturated Fat: 4gPolyunsaturated Fat: 0.5gMonounsaturated Fat: 1.5gCholesterol: 15mgSodium: 50mgPotassium: 50mgFiber: 0.5gSugar: 10gVitamin A: 50IUVitamin C: 1mgCalcium: 10mgIron: 0.5mg

Notes

Use freshly grated spices for maximum flavor and avoid overmixing to keep cookies tender. Store in an airtight container at room temperature for up to a week or freeze for up to three months.

Tried this recipe?

Let us know how it was!

Maple-Glazed Pumpkin Poptarts for Cozy Fall Mornings

As the crisp autumn air settles in, I find myself reminiscing about cozy kitchens filled with the warm, spiced aroma of pumpkin. That nostalgic feeling inspired me to create these delectable Maple-Glazed Pumpkin Poptarts, a twist on a classic favorite that brings a touch of homemade comfort to every bite. Simple to whip up in just 25 minutes, these flaky pastries combine a scrumptious pumpkin filling with a sweet maple glaze, making them perfect for breakfast or a delightful snack. You won’t just enjoy the crunch and texture; the joy of making these poptarts from scratch will reignite your passion for homemade desserts. Are you ready to fill your kitchen with the scents of fall and treat yourself to a delicious indulgence? Let’s get started!

Why make Maple-Glazed Pumpkin Poptarts?

Simplicity at its Best: With just a few ingredients and only 25 minutes of your time, these homemade poptarts are a breeze to prepare.
Irresistible Flavor: The sweet maple glaze pairs beautifully with the rich pumpkin filling, creating a delightful taste of autumn in every bite.
Nostalgic Comfort: These poptarts evoke fond childhood memories while offering a fresh, homemade twist that’s hard to resist.
Versatile Occasion: Perfect for breakfast, brunch, or as a snack with your favorite warm beverage, you’ll find yourself reaching for these time and time again.
Crowd-Pleasing Treat: Whether for family or friends, these flaky delights will impress everyone and become a go-to recipe for seasonal gatherings. For more delicious pumpkin recipes, check out our Joumou Haitian Pumpkin for a cozy meal that perfectly complements these poptarts.

Maple-Glazed Pumpkin Poptarts Ingredients

For the Pastry

  • Refrigerated Pie Crust Roll – Acts as the pastry base, providing structure and flakiness. Look for it near refrigerated biscuits in stores.

For the Filling

  • Canned Pumpkin – The main filling ingredient that contributes moisture and rich flavor. Fresh pumpkin puree can also be used as a substitute.
  • Brown Sugar – Adds sweetness and caramel notes to the filling. Use light brown sugar for optimal flavor.
  • Maple Flavoring – Enhances the maple taste in the filling and glaze. If unavailable, pure maple syrup can be substituted, but adjust sugar accordingly.
  • Pumpkin Pie Spice – Provides warmth and spice notes; essential for that autumn flavor. Mixed spice can be used in a pinch.
  • Dash of Salt – Balances sweetness and enhances flavors in both filling and glaze.

For the Glaze

  • Powdered Sugar – Main ingredient for the glaze, creating a sweet and glossy finish.
  • Milk – Helps achieve the right consistency for the glaze. Any milk (dairy or plant-based) can be used.

Step‑by‑Step Instructions for Maple-Glazed Pumpkin Poptarts

Step 1: Preheat the Oven
Begin by preheating your oven to 375°F (190°C). This ensures a hot environment for baking the poptarts, giving them that golden brown crispiness we all love. While the oven warms up, gather your ingredients and equipment, including mixing bowls and a rolling pin, to streamline the upcoming steps.

Step 2: Prepare the Filling
In a medium mixing bowl, combine the canned pumpkin, brown sugar, maple flavoring, pumpkin pie spice, and a dash of salt. Use a whisk to blend these ingredients together until smooth and well incorporated. This delectable pumpkin filling will be the heart of your Maple-Glazed Pumpkin Poptarts, so ensure it has a lovely creamy consistency before moving on.

Step 3: Roll Out the Dough
On a lightly floured surface, roll out your refrigerated pie crust into a rectangle measuring approximately 6×22 inches. Aim for an even thickness to maintain that flaky texture. Once rolled, carefully cut the dough into 8 equal rectangles, which will form the base and top of your poptarts, ensuring that they are uniform for even baking.

Step 4: Assemble the Poptarts
Take one of the dough rectangles and place it on a lined baking sheet. Spoon a generous dollop of the pumpkin filling into the center, making sure to leave some space around the edges. Then, gently place another dough rectangle on top, pressing the edges together to seal the filling inside. Crimp the edges with a fork to create a decorative finish and ensure a secure closure.

Step 5: Bake the Poptarts
Place your assembled poptarts into the preheated oven and bake for 9-11 minutes. Keep an eye on them as they bake; you’ll know they’re ready when the edges turn a lovely light golden brown. This step is crucial for achieving that beautiful flaky outer layer that perfectly complements the sweet filling.

Step 6: Make the Glaze
While the poptarts are baking, prepare the maple glaze. In a small bowl, whisk together the powdered sugar, maple flavoring, and milk until you achieve a smooth and glossy consistency. This sweet topping will add an irresistible finish to your Maple-Glazed Pumpkin Poptarts, enhancing both their look and taste.

Step 7: Glaze the Poptarts
Once the baked poptarts have cooled slightly, drizzle the prepared glaze over the tops. Be generous, allowing the glaze to cascade down the sides for a delightful finish. Allow the glaze to set for a few minutes before serving, which will give it a lovely sheen and make your poptarts even more inviting.

Make Ahead Options

These Maple-Glazed Pumpkin Poptarts are perfect for meal prep enthusiasts looking to save time on busy mornings! You can prepare the filling (canned pumpkin, brown sugar, maple flavoring, pumpkin pie spice, and salt) up to 3 days in advance; simply store it in an airtight container in the refrigerator. You can also roll out and assemble the poptarts and keep them covered in the fridge for up to 24 hours before baking. When you’re ready to enjoy, just pop them in the preheated oven and bake as directed. This way, you’ll get deliciously flaky poptarts with minimal effort, making your mornings stress-free and filled with the warm flavors of autumn!

Maple-Glazed Pumpkin Poptarts Variations & Substitutions

Feel free to explore these delicious twists that will elevate your homemade poptarts and add a personal flair to your baking!

  • Puff Pastry: Swap pie crust for puff pastry for an even flakier, airy texture that elevates your poptarts to heavenly heights.
  • Sweet Potato: Use sweet potato or butternut squash puree instead of canned pumpkin for a unique flavor while keeping the autumn spirit alive.
  • Nutty Crunch: Add chopped pecans or walnuts to the filling for a delightful crunch and additional nutty flavor that pairs beautifully with pumpkin.
  • Spice It Up: Enhance the filling with a pinch of cayenne pepper or ginger for an electrifying kick that will excite your taste buds.
  • Chocolate Drizzle: For a decadent treat, melt some dark chocolate and drizzle it over the glazed poptarts, adding a rich depth to the sweetness.
  • Maple Syrup: Swap maple flavoring with pure maple syrup, but reduce brown sugar slightly to maintain the right level of sweetness.
  • Coconut Whipped Cream: Serve your poptarts topped with coconut whipped cream for a tropical twist that complements the pumpkin flavor wonderfully.
  • Gluten-Free: Use gluten-free pie crust to adapt this recipe for those with dietary restrictions while retaining that delightful flakiness.

Whether you choose to stick with the classic recipe or try out one of these variations, you can’t go wrong! Seasonal baking never tasted so good. For another delicious pumpkin recipe, explore our Joumou Haitian Pumpkin for a cozy meal perfect for pairing with these delightful poptarts.

Expert Tips for Maple-Glazed Pumpkin Poptarts

  • Perfect Dough Thickness: Roll the pie crust thin, about 1/8 inch, to achieve the heavenly flaky texture without overbaking your poptarts.
  • Sealing the Edges: Be sure to seal the edges well with a fork to avoid any filling leakage during baking. A good seal means perfect Maple-Glazed Pumpkin Poptarts every time!
  • Watch the Baking Time: Keep an eye on your poptarts while they bake; the sweet spot is 9-11 minutes, getting that lovely golden brown without overcooking.
  • Cool Before Glazing: Let the poptarts cool for a few minutes before applying the glaze to prevent it from melting. This will enhance the glaze’s shine and flavor.
  • Experiment with Spices: Feel free to play around with different spices! Adding fresh nutmeg or cinnamon can elevate the delicious pumpkin flavor even more.

What to Serve with Maple-Glazed Pumpkin Poptarts

Warm your kitchen further while enjoying these delectable poptarts; pair them with delightful accompaniments that enhance the cozy fall experience.

  • Creamy Mashed Potatoes: Their buttery smoothness contrasts beautifully with the poptarts’ flaky texture, offering a comforting side for brunch.

  • Cinnamon-Spiced Apples: Sweet and warm spiced apples bring out the autumn flavors in the poptarts, adding a fruity softness to each bite. Their juicy, tangy profile perfectly balances the sweetness of the maple glaze.

  • Gingerbread Cookies: Sweet and spiced, gingerbread cookies resonate those nostalgic flavors of fall, making each poptart experience even more memorable.

  • Chai Tea Latte: The spiced warmth of chai tea beautifully complements the maple-glazed sweetness, creating a perfect harmony for a cozy snack.

  • Pumpkin Soup: A warm bowl of pumpkin soup brings a savory comfort that pairs delightfully with the sweetness of the poptarts, making for a well-rounded meal.

  • Apple Cider: Crisp and refreshing, this beloved fall drink enhances the cozy vibes while offering a tart counterpoint to the sweet poptarts.

  • Chocolate Drizzle: A delicate drizzle of dark chocolate atop the poptarts adds an unexpected twist, providing rich depth that complements their sweetness.

How to Store and Freeze Maple-Glazed Pumpkin Poptarts

Room Temperature: Store any leftover poptarts in an airtight container at room temperature for up to 3 days to maintain their flaky texture.

Fridge: If you prefer a longer shelf life, you can refrigerate the poptarts for up to a week. However, they may lose some flakiness when chilled.

Freezer: To freeze, wrap individual poptarts tightly in plastic wrap and place them in a freezer-safe bag or container for up to 2 months.

Reheating: For best results, reheat frozen poptarts in a toaster oven or conventional oven at 350°F (175°C) for about 10-12 minutes. This method will help restore their delightful crispness while enjoying your Maple-Glazed Pumpkin Poptarts!

Maple-Glazed Pumpkin Poptarts Recipe FAQs

What kind of pumpkin should I use for the filling?
Absolutely! You can use canned pumpkin for convenience, as it has the right texture and flavor. However, if you’re feeling adventurous, fresh pumpkin puree is a fantastic alternative. Just remember to cook and puree the pumpkin before using it in the filling to achieve that delightful creaminess.

How should I store leftover Maple-Glazed Pumpkin Poptarts?
To keep your delicious poptarts fresh, store any leftovers in an airtight container at room temperature for up to 3 days. If you prefer a longer shelf life, you can refrigerate them for up to a week, but do note they might lose some of their delightful flakiness.

Can I freeze Maple-Glazed Pumpkin Poptarts?
Very! To freeze, wrap each poptart individually in plastic wrap and place them in a freezer-safe bag or container. They will stay good for up to 2 months. When you’re ready to enjoy them, simply reheat in a toaster oven or conventional oven at 350°F (175°C) for about 10-12 minutes to bring back their lovely crispness.

What should I do if my poptarts are leaking during baking?
Don’t worry, this can happen! To prevent leakage, ensure that you’ve sealed the edges of the poptarts well by crimping with a fork. If you notice any spots where the filling is seeping out, you can press the edges together gently before they go in the oven, ensuring a secure seal.

Are there any dietary concerns with these poptarts?
The Maple-Glazed Pumpkin Poptarts contain ingredients that may not be suitable for everyone. If you’re cooking for someone with allergies, be mindful of the pie crust, which may contain gluten, and the filling, which includes sugar. For a gluten-free option, look for gluten-free pie crust alternatives. Enjoying these treats in moderation is key for a balanced diet!

Maple-Glazed Pumpkin Poptarts

Maple-Glazed Pumpkin Poptarts for Cozy Fall Mornings

Enjoy these delightful Maple-Glazed Pumpkin Poptarts, combining homemade pumpkin filling with a sweet glaze, perfect for breakfast or a snack.
Prep Time 25 minutes
Cook Time 11 minutes
Total Time 36 minutes
Servings: 8 poptarts
Course: Dessert
Cuisine: American
Calories: 250

Ingredients
  

For the Pastry
  • 1 roll Refrigerated Pie Crust Look for it near refrigerated biscuits in stores.
For the Filling
  • 1 can Canned Pumpkin Fresh pumpkin puree can also be used as a substitute.
  • 1/2 cup Brown Sugar Use light brown sugar for optimal flavor.
  • 1 teaspoon Maple Flavoring If unavailable, pure maple syrup can be substituted.
  • 1 teaspoon Pumpkin Pie Spice Mixed spice can be used in a pinch.
  • 1 dash Salt Balances sweetness and enhances flavors.
For the Glaze
  • 1 cup Powdered Sugar
  • 2 tablespoons Milk Any milk (dairy or plant-based) can be used.

Equipment

  • Mixing bowls
  • Rolling Pin
  • Baking Sheet
  • whisk

Method
 

Step-by-Step Instructions
  1. Preheat your oven to 375°F (190°C). Gather your ingredients and equipment.
  2. In a medium mixing bowl, combine canned pumpkin, brown sugar, maple flavoring, pumpkin pie spice, and a dash of salt. Whisk until smooth.
  3. On a lightly floured surface, roll out the refrigerated pie crust into a rectangle approximately 6x22 inches. Cut the dough into 8 equal rectangles.
  4. Place one dough rectangle on a lined baking sheet. Spoon pumpkin filling into the center, leaving space around edges. Place another dough rectangle on top and seal the edges.
  5. Bake the poptarts for 9-11 minutes until the edges are light golden brown.
  6. In a small bowl, whisk together powdered sugar, maple flavoring, and milk until smooth. This is your glaze.
  7. Once the poptarts have cooled slightly, drizzle the glaze over the tops and allow it to set before serving.

Nutrition

Serving: 1poptartCalories: 250kcalCarbohydrates: 36gProtein: 2gFat: 10gSaturated Fat: 2gPolyunsaturated Fat: 1gMonounsaturated Fat: 6gSodium: 120mgPotassium: 150mgFiber: 1gSugar: 15gVitamin A: 850IUVitamin C: 1mgCalcium: 20mgIron: 0.5mg

Notes

Store leftovers in an airtight container at room temperature for up to 3 days, or refrigerate for up to a week.

Tried this recipe?

Let us know how it was!

BBQ Sausage & Pasta: Quick One-Skillet Comfort Delight

The aroma of sweet and spicy notes wafting through the kitchen can be an instant pick-me-up after a long day. Today, I’m thrilled to share my One-Skillet Spicy Honey BBQ Sausage & Pasta—a dish that combines comfort food with simplicity, perfect for those busy weeknights when you just want to whip up something delicious without the fuss. With tender rotini soaking in a glossy honey BBQ sauce paired with smoky sausage, this meal not only promises quick prep but also allows you to adjust the spice level to suit your palate. Whether you’re cooking for family or meal prepping for the week ahead, this recipe is sure to delight and satisfy any hungry crowd. Curious about how to achieve this bold flavor in one skillet? Let’s dive in!

Why is this recipe a crowd favorite?

Simplicity at its best: This one-skillet meal requires minimal prep and cleanup, making it perfect for busy weeknights.

Customizable spice level: Whether you like it mild or fiery, you can easily tailor the flavors to suit your taste.

Rich flavors that satisfy: The combination of sweet honey and smoky sausage creates an irresistible taste that will keep everyone coming back for more.

Time-saving solution: In just 30 minutes, you can serve a delicious dinner that feels like a comforting indulgence.

Versatile ingredients: Feel free to swap in your favorite sausage or add vegetables for extra nutrition, making this dish adaptable for any occasion.

This One-Skillet Spicy Honey BBQ Sausage & Pasta is bound to become a go-to recipe, much like our Cajun Sausage Pasta or Parmesan Italian Sausage. Get ready to savor a satisfying meal without the hassle!

BBQ Sausage & Pasta Ingredients

Everything you need for this cozy dish!

For the Pasta

  • Rotini Pasta – A perfect choice to hold the luscious sauce; feel free to swap for penne or bowtie pasta for a fun twist.

For the Sausage

  • Sausage – Choose between Andouille, spicy Italian, kielbasa, or chicken sausage for varied flavors; bite-sized pieces ensure better caramelization.

For the Sauce

  • Olive Oil – Essential for sautéing; adds richness to both the sausage and garlic.
  • Garlic – Provides a wonderful aroma; sauté until golden for that deep, savory kick.
  • BBQ Sauce – The star of the show! Opt for sweet or spicy based on your palate’s preference.
  • Honey – Balances the savory notes and adds a delightful touch of sweetness.
  • Paprika & Chili Powder – Elevate the dish with depth and heat; adjust according to your desired spice level.
  • Salt & Pepper – Necessary seasoning to enhance the dish’s full flavor.

For Garnish

  • Fresh Parsley – Adds a pop of color and freshness, creating a beautiful contrast to the rich dish.

Step‑by‑Step Instructions for BBQ Sausage & Pasta

Step 1: Cook Pasta
Start by bringing a large pot of salted water to a vigorous boil over high heat. Add the rotini pasta and cook according to package instructions until al dente, usually around 8–10 minutes. Stir occasionally to prevent sticking. Once cooked, drain the pasta in a colander and set aside, making sure to reserve some pasta water for later use if needed.

Step 2: Sauté Sausage
In a large skillet, heat 1–2 tablespoons of olive oil over medium-high heat. Once shimmering, add the sliced sausage of your choice, spreading it across the skillet. Cook for about 5–7 minutes, stirring occasionally, until the sausage is nicely browned and caramelized. Remove the sausage from the skillet and set it aside on a plate, keeping the delicious drippings in the pan.

Step 3: Prepare Sauce
In the same skillet, if necessary, add a drizzle more olive oil before lowering the heat to medium. Toss in the minced garlic and sauté for about 1 minute, stirring constantly, until fragrant and lightly golden. Be careful not to burn the garlic, as it can turn bitter. This aromatic base will serve as a flavorful foundation for your BBQ sausage & pasta dish.

Step 4: Combine Ingredients
Next, pour in the BBQ sauce and honey into the skillet, mixing well to combine with the sautéed garlic. Add paprika, chili powder, salt, and pepper, adjusting them to your preferred spice level. Allow the sauce to simmer on low heat for 2–3 minutes, stirring occasionally until it thickens slightly and coats the back of a spoon, ensuring a rich texture for your pasta.

Step 5: Final Mix
Once the sauce has thickened, return the browned sausage and cooked rotini pasta to the skillet. Toss everything together until the pasta is thoroughly coated in the sticky, luscious honey BBQ sauce. Ensure that the sausage is evenly distributed throughout, creating a hearty, flavorful combination. Heat through for an additional 1–2 minutes until everything is warm and inviting.

Step 6: Serve and Garnish
Remove the skillet from the heat and transfer your BBQ sausage & pasta to serving plates. Garnish generously with fresh parsley for a vibrant touch and added flavor. This comforting dish is best enjoyed hot, so serve it immediately alongside your favorite sides, such as garlic bread or a fresh salad, to create a delightful meal experience.

How to Store and Freeze BBQ Sausage & Pasta

Fridge: Store leftovers in an airtight container for up to 4 days. This keeps the flavors intact while preventing any spoilage.

Freezer: For longer storage, freeze portions in airtight bags or containers for up to 3 months. Thaw in the fridge before reheating for best results.

Reheating: When ready to enjoy your BBQ sausage & pasta, reheat in a skillet over low heat with a splash of water or BBQ sauce to maintain moisture and flavor.

Room Temperature: Avoid leaving the dish out for more than 2 hours to ensure food safety and quality.

Make Ahead Options

These One-Skillet Spicy Honey BBQ Sausage & Pasta are perfect for meal prep enthusiasts! You can cook the rotini pasta and sauté the sausage up to 3 days in advance, allowing you to save precious time when hunger strikes. Simply refrigerate them separately in airtight containers to maintain their quality. When you’re ready to serve, just heat the skillet over medium heat, add the prepped sausage and pasta, pour in your BBQ sauce and honey, and toss until everything is heated through and evenly coated. This method not only keeps the flavors intact but also guarantees a delicious meal with minimal effort on busy weeknights!

What to Serve with One-Skillet Spicy Honey BBQ Sausage & Pasta

Elevate your dining experience by pairing your dish with delightful sides that complement its bold flavors and textures.

  • Crispy Garlic Bread: The crunchy exterior and buttery garlic flavor provide a perfect contrast to the creamy pasta, making each bite a burst of satisfaction.

  • Fresh Garden Salad: A vibrant medley of mixed greens, cucumbers, and cherry tomatoes adds a refreshing crunch, balancing the richness of the BBQ sausage and pasta.

  • Creamy Coleslaw: Its smooth texture and tangy flavor enhance the meal’s sweetness, bringing a pleasant cooling effect to the spice of the dish.

  • Sautéed Green Beans: The bright, earthy notes of crisp green beans provide nutritional value and a delightful crunch that complements the hearty pasta.

  • Charred Corn on the Cob: Sweet, smoky corn elevates every bite, while the texture plays beautifully against the saucy sausage and pasta, making it an ideal summer addition.

  • Chilled White Wine: A glass of chilled Sauvignon Blanc harmonizes with the sweet and spicy tones of the dish, enhancing your overall dining experience.

  • Tropical Fruit Salad: A refreshing fruit mixture with pineapple, mango, and berries adds a sweet and juicy contrast to the savory and smoky dish.

  • Chocolate Lava Cake: End your meal on a sweet note with a rich, gooey dessert that contrasts the spicy flavors while leaving you with a comforting, warm finish.

Each of these pairings creates a well-rounded meal, reinforcing the delightful experience of your BBQ sausage & pasta.

BBQ Sausage & Pasta Variations

Feel free to play with the flavors and ingredients in this dish—your kitchen adventure awaits!

  • Dairy-Free: Use non-dairy cheese or skip the cream for a lighter texture without losing flavor.
  • Vegetable Boost: Toss in diced bell peppers, onions, or spinach to enhance nutrition and flavor. Fresh veggies contribute lovely colors and textures to your meal.
  • Heat Level: Add jalapeños or crushed red pepper for an extra kick, elevating the dish to a spicy delight. Tailor the heat to fit your family’s flavor preferences!
  • Gluten-Free: Swap traditional pasta for gluten-free options, ensuring everyone can enjoy this dish without dietary restrictions. Just check the BBQ sauce to confirm it’s gluten-free too!
  • Herb Twist: Incorporate fresh thyme or basil into the sauce for an aromatic twist that brings an exciting layer of flavor. Fresh herbs can transform your comfort dish into something memorable.
  • Sweet & Spicy: Mix in a dash of hot sauce or a sprinkle of cayenne pepper to ignite the sweet and spicy symphony of flavors in this dish.
  • One-Pan Veggie Medley: Add broccoli or zucchini to the skillet during the sauce simmering step for an all-in-one meal experience packed with nutrients. Not only does it add flavor, but it also creates a vibrant dish!
  • Cheesy Delight: Stir in cream cheese or shredded cheddar for a richer, creamier pasta dish that everyone will love. The delightful gooeyness adds comfort—just like our Sausage Tortellini Soup!

Personalize your BBQ Sausage & Pasta to suit your taste and make it a family favorite, just like our classic Heartwarming Comfort Sausage! Happy cooking!

Expert Tips for BBQ Sausage & Pasta

  • Caramelization Focus: Ensure medium-high heat when cooking sausage; this enhances flavor while avoiding burnt sauce.
  • Spice Adjustment: Change sausage type or add more chili powder for heat; taste as you go for the best BBQ sausage & pasta experience.
  • Pasta Backup: Reserve a little pasta water before draining; this can help loosen the sauce if it thickens too much while cooking.
  • Meal Prep-Friendly: This dish can be stored in the fridge for up to 4 days; reheat in a skillet to maintain its delicious texture and flavor.
  • Add Nutrients: Incorporate vegetables like bell peppers or spinach for extra nutrition and color, making the recipe even more versatile.

BBQ Sausage & Pasta Recipe FAQs

How do I choose the right sausage for this recipe?
Absolutely! The best choice depends on your taste preference. For a spicy kick, I recommend Andouille or spicy Italian sausage. If you prefer a milder flavor, kielbasa or chicken sausage works beautifully. Just remember to cut the sausage into bite-sized pieces for even caramelization!

How should I store leftovers?
Very easy! You can store your BBQ sausage & pasta in an airtight container in the fridge for up to 4 days. Just be sure to let it cool to room temperature before sealing. This helps maintain its delicious flavors while preventing spoilage.

Can I freeze BBQ sausage & pasta?
Certainly! To freeze, portion the dish into airtight freezer bags or containers. It can be stored for up to 3 months. When you’re ready to enjoy it again, thaw it in the refrigerator overnight. For reheating, warm it in a skillet over low heat, adding a splash of water or BBQ sauce to refresh the consistency.

What can I do if my pasta is too sticky after cooking?
No worries! Sticky pasta can happen, especially if it’s overcooked or not stirred enough. To fix this, you can add a little olive oil or a spoonful of reserved pasta water when you combine the pasta with the sauce. This will help separate the strands and keep them saucy but not clumpy.

Are there any dietary alternatives I can use?
Absolutely! If you’re looking for gluten-free options, simply use gluten-free pasta and ensure your BBQ sauce is labeled gluten-free. Additionally, for a dairy-free version, you won’t need any cheese, and the honey keeps it sweet and luscious. Be sure to choose sausages free from common allergens if necessary!

BBQ Sausage & Pasta

BBQ Sausage & Pasta: Quick One-Skillet Comfort Delight

BBQ Sausage & Pasta is a comforting and quick one-skillet meal perfect for busy weeknights.
Prep Time 10 minutes
Cook Time 20 minutes
Total Time 30 minutes
Servings: 4 servings
Course: Pasta
Cuisine: American
Calories: 450

Ingredients
  

For the Pasta
  • 12 oz Rotini Pasta Feel free to swap for penne or bowtie pasta.
For the Sausage
  • 1 lb Sausage Choose between Andouille, spicy Italian, kielbasa, or chicken sausage.
For the Sauce
  • 2 Tbsp Olive Oil Essential for sautéing.
  • 3 cloves Garlic Minced.
  • 1 cup BBQ Sauce Opt for sweet or spicy based on preference.
  • 2 Tbsp Honey Balances savory notes.
  • 1 tsp Paprika Adjust according to desired spice level.
  • 1 tsp Chili Powder Adjust according to desired spice level.
  • 1 tsp Salt Necessary seasoning.
  • 1 tsp Black Pepper Necessary seasoning.
For Garnish
  • 1/4 cup Fresh Parsley Chopped.

Equipment

  • Large pot
  • Large skillet
  • Colander

Method
 

Cooking Instructions
  1. Cook the pasta in a large pot of salted boiling water according to package instructions until al dente, about 8–10 minutes. Drain and set aside, reserving some pasta water.
  2. Heat olive oil in a large skillet over medium-high heat. Add sliced sausage and cook for about 5–7 minutes until browned and caramelized. Remove the sausage and set aside, keeping the drippings in the pan.
  3. In the same skillet, add more olive oil if needed and lower heat to medium. Add minced garlic and sauté for about 1 minute until fragrant and golden.
  4. Pour in BBQ sauce and honey, stirring to combine with garlic. Add paprika, chili powder, salt, and pepper. Simmer for 2–3 minutes until sauce thickens slightly.
  5. Return sausage and cooked pasta to the skillet and toss everything together until coated with the sauce. Heat through for 1–2 minutes.
  6. Serve immediately, garnished with fresh parsley.

Nutrition

Serving: 1servingCalories: 450kcalCarbohydrates: 45gProtein: 20gFat: 20gSaturated Fat: 5gPolyunsaturated Fat: 1gMonounsaturated Fat: 3gCholesterol: 50mgSodium: 800mgPotassium: 500mgFiber: 3gSugar: 10gVitamin A: 300IUVitamin C: 2mgCalcium: 50mgIron: 2mg

Notes

This dish can be stored in the fridge for up to 4 days and reheats well in a skillet. Consider adding vegetables for extra nutrition.

Tried this recipe?

Let us know how it was!

Mouthwatering Lentil Bolognese Recipe for Ultimate Comfort

The kitchen filled with the comforting scent of simmering tomatoes and lentils, and I couldn’t help but smile. This Hearty Vegan Lentil Bolognese Recipe transforms a classic Italian favorite into a wholesome, plant-based delight that satisfies even the heartiest of appetites. With just a quick prep time, you can bring the warmth of feel-good comfort food to your table without the fuss. Whether you’re a devoted vegan or just looking for a delicious meat-free meal, this dish is both nourishing and rich in flavor, perfect for cozy dinners or meal-prepping for busy weeks ahead. Are you ready to discover how easy it can be to whip up this classic sauce that feels like a big, warm hug in a bowl?

Why is Lentil Bolognese So Satisfying?

Rich, Flavorful Experience: Each bite of this Lentil Bolognese is a hearty explosion of flavor, thanks to the well-rounded combination of tomatoes, lentils, and aromatic vegetables.
Quick Prep, Big Flavor: You can whip this meal up in under 30 minutes, making it a perfect choice for busy weeknights when you crave something special.
Comforting & Nourishing: This vegan delight serves as both comfort food and a wholesome option that doesn’t compromise on taste, making it suitable for everyone at the dinner table.
Endless Versatility: Love experimenting? Swap lentils for mushrooms or add a kick with crushed red pepper flakes—this recipe invites your creativity!
A Crowd-Pleaser: Serve it over spaghetti or use it as a filling for lasagna, and you’ll have everyone asking for seconds, whether they’re meat-lovers or herbivores!

Lentil Bolognese Recipe Ingredients

For the Sauce
Lentils – Powerhouse of protein and fiber; opt for green or brown for a hearty texture.
Canned Tomatoes – Sweet and tangy; choose whole peeled tomatoes for the best crushing quality.
Onion – Finely chopped yellow onion enhances the depth of flavor with its natural sweetness.
Carrots – Diced for natural sweetness and vibrant color; they create a lovely balance in your sauce.
Celery – Adds crispness and aromatic complexity to the dish; do not skip for a layered flavor.
Garlic – Freshly minced garlic infuses the dish with a delightful aromatic kick; fresh is key for robust taste.
Vegetable Broth – Gives richness to the sauce; low-sodium varieties are great for controlling salt intake.

For the Seasoning
Basil – Fresh basil leaves are a must; stir them in at the end for a garden-fresh burst of flavor.
Oregano – Dried oregano is essential; it adds that classic herbal essence to this Lentil Bolognese recipe.

For Serving (Optional)
Pasta – Choose your favorite type; spaghetti is classic, but feel free to get creative with your choice!

Step‑by‑Step Instructions for Lentil Bolognese Recipe

Step 1: Sauté Aromatics
In a large pot, heat a drizzle of olive oil over medium heat. Add the finely chopped onion, diced carrots, and celery, sautéing for about 5 minutes. Stir occasionally, allowing the vegetables to soften and the onion to turn translucent, creating a fragrant base that sets the stage for your flavorful Lentil Bolognese.

Step 2: Add Garlic & Spices
Once your vegetables are tender, stir in the freshly minced garlic and dried oregano. Cook for an additional minute until the garlic becomes aromatic; be careful not to let it burn. This step is crucial for infusing your Lentil Bolognese with rich flavors that will deeply enhance the sauce.

Step 3: Incorporate Lentils & Tomatoes
Add the rinsed lentils and crushed canned tomatoes into the pot. Pour in the vegetable broth, stirring everything together until well combined. Turn up the heat to bring the mixture to a gentle boil, and get ready for the comforting aromas to fill your kitchen as the foundation of your Lentil Bolognese takes shape.

Step 4: Simmer
Once boiling, reduce the heat to low and cover the pot. Let your Lentil Bolognese simmer gently for 25 to 30 minutes, stirring occasionally. You’ll know it’s ready when the lentils are tender and the flavors have melded beautifully. The sauce should be thick and hearty, perfect for serving.

Step 5: Taste & Adjust Seasoning
As you near the end of the simmering time, taste the sauce and adjust the seasoning as desired. Feel free to add a pinch of salt or a dash of pepper, enhancing the flavors to suit your palate. This is your chance to make the Lentil Bolognese truly yours!

Step 6: Add Fresh Herbs & Serve
Finally, stir in the freshly chopped basil just before serving. This will add a burst of garden-fresh flavor to your delightful Lentil Bolognese. Serve it over your favorite pasta or enjoy it on its own, reveling in the warm, hearty comfort it brings to your table.

Make Ahead Options

These Lentil Bolognese preparations are a game changer for busy home cooks! You can chop the vegetables (onion, carrots, celery) and store them in an airtight container in the fridge for up to 3 days to save time during your weeknight cooking. Additionally, the lentil sauce can be fully prepared and refrigerated for up to 5 days, allowing the flavors to deepen as it sits. When you’re ready to enjoy your meal, simply reheat the sauce in a pot over low heat, stirring occasionally, and cook your pasta of choice according to package instructions. You’ll find that this delicious Lentil Bolognese is just as satisfying as when you first made it—a perfect solution for meal prepping without sacrificing flavor!

Expert Tips for Lentil Bolognese Recipe

  • Quality Tomatoes Matter: Use high-quality canned tomatoes for an unbeatable flavor profile; they’ll elevate your Lentil Bolognese to restaurant-level goodness.

  • Taste as You Cook: Don’t skip the tasting! Adjust the seasoning throughout the cooking process, ensuring every bite is flavorful and tailored to your preference.

  • Let it Simmer: Allowing the sauce to simmer for 30 minutes or more deepens the complexity of flavors, making your Lentil Bolognese even more satisfying.

  • Spice It Up: If you crave a bit of heat, toss in some crushed red pepper flakes to add a gentle kick that balances the dish beautifully.

  • Creative Substitutions: Experiment with swapping lentils for finely chopped mushrooms, which adds a rich umami depth and variety to your comforting sauce.

Lentil Bolognese Recipe Variations

Feel free to unleash your creativity and make this Lentil Bolognese recipe truly your own. Let your taste buds guide you!

  • Mushroom Swap: Replace half of the lentils with finely chopped mushrooms for a deliciously earthy flavor and chewy texture. The mushrooms provide an umami punch that complements the sauce beautifully.
  • Spicy Kick: Add crushed red pepper flakes to the sautéing veggies for a hint of heat, adjusting to your spice preference. This kick makes each bite simply unforgettable!
  • Zoodle Delight: Swap out traditional pasta for zoodles (zucchini noodles) or spaghetti squash for a low-carb option that’s equally comforting and delightful. It’s a nutritious twist to enjoy!
  • Veggie Boost: Toss in diced bell peppers or zucchini along with the carrots and celery for added nutrition and color. The extra veggies will enhance the flavor and create a heartier dish.
  • Herb Medley: Experiment with a variety of fresh herbs, such as thyme or parsley, in addition to basil. This brings vibrancy and depth to your Lentil Bolognese, making every bite a celebration of freshness.
  • Nutty Flavor: Add a tablespoon of nutritional yeast for a cheesy flavor that’s an excellent addition for vegan diets. It adds a depth of flavor that enhances this comforting recipe without overpowering it.
  • Red Wine Infusion: Stir in a splash of red wine after adding the lentils and tomatoes for a richer sauce that echoes the traditional Italian roots of this dish. Just let it simmer for a bit longer!
  • Creamy Texture: Stir in a spoonful of hummus or a splash of almond milk right before serving for a creamy upgrade. It adds a velvety finish that elevates the overall experience.

For meal inspiration, pair your Lentil Bolognese with a fresh garden salad or toss it into a comforting Cheesy Hamburger Potato Soup for a delightful combination. Enjoy the process of creating and savoring this delicious meal!

How to Store and Freeze Lentil Bolognese

Fridge: Store your Lentil Bolognese in an airtight container for up to 5 days. Reheat gently on the stove or in a microwave, adding a splash of water to maintain moisture.

Freezer: For longer storage, freeze portions in airtight containers for up to 3 months. Thaw overnight in the fridge before reheating, and add water if the sauce appears thick.

Make-Ahead: Feel free to prepare this Lentil Bolognese in advance; it’s perfect for meal prep, allowing the flavors to deepen as it sits.

Reheating: When ready to enjoy, reheat on low heat, stirring occasionally until warmed through, ensuring that your comforting dish retains its hearty texture and flavor.

What to Serve with Hearty Vegan Lentil Bolognese?

Treat your taste buds to a well-rounded meal that elevates the comforting essence of lentil bolognese.

  • Creamy Mashed Potatoes: Their buttery richness pairs beautifully with the thick sauce, making for a cozy bite. Just imagine warm potatoes soaking up all that luscious lentil goodness!

  • Garlic Bread: Crunchy on the outside and soft on the inside, it’s perfect for sopping up every drop of sauce. This classic favorite will add a delightful crunch to your meal.

  • Mixed Green Salad: A refreshing mix of greens dressed with a tangy vinaigrette adds brightness and a crisp contrast, balancing the hearty flavors perfectly. Think of vibrant colors that will make your dish pop!

  • Roasted Vegetables: Seasonal veggies roasted to caramelized perfection bring sweetness and added nutrition along with delightful textures. Choose a colorful mix of carrots, bell peppers, and Brussels sprouts for your side.

  • Zucchini Noodles: A low-carb option that offers a fresh twist while still maintaining the indulgence of pasta. Top with lentil bolognese for a deliciously healthy alternative!

  • Red Wine: A glass of full-bodied red wine enhances the dish’s earthy flavors, creating an inviting atmosphere. Sip and savor as you enjoy your meal!

  • Chocolate Avocado Mousse: This rich and creamy dessert provides a decadent yet healthy conclusion to your meal. A sweet treat that feels indulgent without the guilt!

  • Elderflower Lemonade: A refreshing, floral drink that lightens the meal, making it special without overwhelming the palate. It’s an elegant finish to a cozy dinner spread.

Lentil Bolognese Recipe FAQs

What type of lentils should I use for my Lentil Bolognese?
Absolutely! For a hearty texture, I recommend using green or brown lentils in this Lentil Bolognese recipe. They hold their shape well during cooking and provide a fulfilling bite, complementing the richness of the sauce beautifully.

How should I store leftover Lentil Bolognese?
You can store your Lentil Bolognese in an airtight container in the refrigerator for up to 5 days. When reheating, I suggest adding a splash of water to keep the sauce moist and delightful. It’s perfect for meal prep!

Can I freeze Lentil Bolognese?
Very! My favorite way to save this dish is by freezing portions in airtight containers. It will last for up to 3 months. Just remember to thaw it overnight in the fridge before reheating, and feel free to add a little water if the sauce seems thick.

What should I do if my sauce is too thick?
No worries! If your Lentil Bolognese turns out too thick, simply stir in a little vegetable broth or water while reheating until you reach your desired consistency. It’s all about achieving that perfect, comforting texture!

Is this recipe suitable for those with food allergies?
Of course! This Lentil Bolognese is vegan and free from common allergens like dairy and meat. However, always double-check the packaging of your canned tomatoes and vegetable broth for any specific allergen information, especially if you’re cooking for others.

Can I add other vegetables to this Lentil Bolognese?
Definitely! This recipe is very versatile. Feel free to add bell peppers, zucchini, or even spinach for extra nutrients and flavors. Just adjust the cooking time as needed to ensure all your veggies are tender and delicious!

Lentil Bolognese Recipe

Mouthwatering Lentil Bolognese Recipe for Ultimate Comfort

This Lentil Bolognese Recipe transforms a classic Italian favorite into a wholesome, plant-based delight, perfect for cozy dinners.
Prep Time 10 minutes
Cook Time 30 minutes
Total Time 40 minutes
Servings: 4 servings
Course: Pasta
Cuisine: Italian
Calories: 320

Ingredients
  

For the Sauce
  • 1 cup Lentils Green or brown for hearty texture
  • 1 can Canned Tomatoes Whole peeled for best crushing quality
  • 1 medium Onion Finely chopped
  • 2 medium Carrots Diced
  • 2 stalks Celery Diced
  • 3 cloves Garlic Freshly minced
  • 2 cups Vegetable Broth Low-sodium variety recommended
For the Seasoning
  • 1 cup Basil Fresh leaves, add at the end
  • 1 teaspoon Oregano Dried
For Serving (Optional)
  • 8 oz Pasta Spaghetti recommended but any type works

Equipment

  • Large pot

Method
 

Step‑by‑Step Instructions for Lentil Bolognese Recipe
  1. In a large pot, heat a drizzle of olive oil over medium heat. Add the finely chopped onion, diced carrots, and celery, sautéing for about 5 minutes until softened.
  2. Stir in the freshly minced garlic and dried oregano, cooking for an additional minute until aromatic.
  3. Add the rinsed lentils and crushed canned tomatoes into the pot, along with the vegetable broth, stirring to combine.
  4. Bring the mixture to a gentle boil, then reduce heat to low and cover, letting it simmer for 25 to 30 minutes.
  5. Taste the sauce and adjust seasoning, adding salt or pepper as desired.
  6. Stir in the freshly chopped basil just before serving, and serve over your favorite pasta.

Nutrition

Serving: 1bowlCalories: 320kcalCarbohydrates: 47gProtein: 15gFat: 6gSaturated Fat: 1gSodium: 500mgPotassium: 800mgFiber: 12gSugar: 6gVitamin A: 4000IUVitamin C: 20mgCalcium: 70mgIron: 4mg

Notes

Use high-quality canned tomatoes for best flavor. Adjust seasoning to taste throughout cooking. This dish can be stored in an airtight container for up to 5 days in the fridge.

Tried this recipe?

Let us know how it was!

Heavenly Herb Cheese Bread: Your New Comfort Food Obsession

The sweet scent of fresh-baked bread filled the kitchen, instantly whisking me away to a bustling Italian bakery tucked away in a cobblestone alley. Today, I’m excited to share my Italian Herb Cheese Bread recipe, a delightful creation that combines the comforting essence of home with the savory surprise of creamy cheese and aromatic herbs. Not only is this loaf easy to whip up, but it also makes for a versatile companion—perfect as a mouthwatering appetizer, a delicious side for your favorite soup, or even a cozy snack all on its own. Whether you’re a seasoned home chef or just starting your culinary journey, you’ll find joy in crafting this delightful bread. So, are you ready to embrace the wonderful world of homemade baking?

Why Is Herb Cheese Bread So Irresistible?

Heavenly aroma: The moment you take this loaf out of the oven, your kitchen envelops you in a warm, cozy scent that invites everyone to gather.

Versatile delight: Enjoy it fresh, as an appetizer, or paired with your favorite soup for a comforting side dish.

Customizable flavors: Add your choice of cheeses or spices, from sun-dried tomatoes to a kick of cayenne, making it uniquely yours!

Crowd-pleaser: This bread is a hit at gatherings, surely impressing family and friends with its delicious layers of gooey cheese and herbs, much like our Banana Grilled Cheese that elevates classic comfort food.

Time-efficient: With straightforward steps, you can create a homemade masterpiece without spending all day in the kitchen.

Texture perfection: Savor the crispy exterior and pillowy interior, which creates a satisfying experience in every bite, reminiscent of our Strawberry Cheesecake Dump that balances delectable flavors and textures beautifully.

Herb Cheese Bread Ingredients

For the Dough

  • All-purpose flour – Provides the structure for the bread; substitute with bread flour for a chewier texture.
  • Active dry yeast – This leavening agent makes the bread rise; ensure it’s fresh for the best results.
  • Granulated sugar – Activates the yeast and adds a touch of sweetness.
  • Salt – Essential for enhancing flavor and controlling yeast activity.
  • Warm water (105-115°F) – Hydrates the dough and activates the yeast; use a thermometer for accuracy.
  • Olive oil – Adds richness and moisture; melted butter can be used for a different flavor.

For the Filling

  • Cream cheese – Creates a creamy filling with rich flavor; substitute with ricotta for a lighter version.
  • Shredded mozzarella cheese – Ensures gooey texture; consider provolone or sharp cheddar for variety.
  • Grated Parmesan cheese – Offers a salty, nutty flavor that complements the other cheeses.
  • Chopped fresh Italian parsley, basil, oregano – These aromatic herbs infuse the dough with delightful flavors; dried herbs can be used but in lesser amounts.
  • Garlic (minced and powder) – Adds depth to the filling; garlic salt can serve as a quick substitute.
  • Red pepper flakes (optional) – Provides a hint of heat; leave it out for a milder option.

For the Glaze

  • Egg + milk (or water) – An egg wash gives a beautiful, shiny crust; opt for water instead of milk if preferred.

For the Topping

  • Everything bagel seasoning – Adds a crunchy, flavorful topping if desired.
  • Additional grated Parmesan cheese – Enhances the cheesy crust flavor.
  • Dried Italian herbs – Optional for an extra layer of flavor on top of your Herb Cheese Bread.

With these ingredients, you’re well on your way to creating a sensational Herb Cheese Bread that will warm hearts and fill homes with comfort!

Step‑by‑Step Instructions for Italian Herb Cheese Bread

Step 1: Activate the Yeast
In a medium bowl, combine 1 cup of warm water (105-115°F), 2 tablespoons of granulated sugar, and 2 teaspoons of active dry yeast. Stir gently and let it sit for about 5-10 minutes until it becomes foamy and bubbly, indicating the yeast is alive and ready to work its magic in your Herb Cheese Bread.

Step 2: Mix the Dry Ingredients
In a large mixing bowl, whisk together 4 cups of all-purpose flour and 1 teaspoon of salt. This mixture creates the foundation of your dough, essential for achieving the perfect texture. Make sure to ensure there are no lumps, as a well-combined dry mixture leads to an even rise and delightful chewiness in the final Herb Cheese Bread.

Step 3: Combine Wet and Dry Ingredients
Pour the activated yeast mixture and 3 tablespoons of olive oil into the bowl with the flour mixture. Using a wooden spoon or your hands, mix until a shaggy dough begins to form. Don’t worry about it being perfect—this step is just about combining everything and getting ready to knead your Herb Cheese Bread dough into a soft, elastic ball.

Step 4: Knead the Dough
Turn the dough out onto a lightly floured surface and knead it for about 6-8 minutes. Use the heel of your hand to push the dough away from you, then fold it over and repeat. The dough should transform from sticky to smooth and elastic; consider adding flour little by little if it remains too tacky during this process.

Step 5: First Rise
Place the kneaded dough into a lightly oiled bowl, cover it with a clean kitchen towel, and let it rise in a warm place until doubled in size, typically 1 to 1.5 hours. You’ll know it’s ready when you gently poke it and the indentation remains. This rise brings air into your Herb Cheese Bread and imparts a lovely texture.

Step 6: Prepare the Filling
While the dough rises, mix the filling by combining 8 ounces of softened cream cheese, 1 cup of shredded mozzarella cheese, 1/2 cup of grated Parmesan, and 1/4 cup of chopped fresh herbs like parsley, basil, and oregano. Add 1 teaspoon of minced garlic and season with salt and pepper to taste. This rich filling will add flavors that beautifully complement your Herb Cheese Bread.

Step 7: Preheat the Oven
About 15 minutes before the dough is finished rising, preheat your oven to 375°F (190°C), ensuring that it’s ready for your delightful Herb Cheese Bread. Prepare a baking sheet by lining it with parchment paper so that your bread can bake evenly and release without sticking.

Step 8: Roll Out the Dough
Once the dough has risen, punch it down gently to release the air, then turn it out onto a floured surface. Roll the dough into a rectangle approximately 12×18 inches, keeping it evenly thick for uniform baking. Visualizing the final shape will help guide your rolling and ensure a delightful Herb Cheese Bread!

Step 9: Spread the Filling
Evenly spread your prepared cheesy filling across the rolled-out dough, leaving about a 1-inch border around the edges. Be generous with your filling, but avoid going too close to the edges to prevent any spillage during baking. Imagine how the melted cheese will permeate the Herb Cheese Bread as it cooks!

Step 10: Roll Up the Dough
Starting from one edge, carefully roll the dough tightly into a log shape. Be sure to pinch the seam to seal it well as you go, preventing the filling from escaping. This step is crucial in shaping your Herb Cheese Bread into a magnificent, cheesy centerpiece.

Step 11: Twist the Strands
With the log seam side down, use a sharp knife to cut it lengthwise down the center, revealing the beautiful filling inside. With the cut sides facing up, twist the two strands around each other, creating a stunning display that adds texture and flair to your Herb Cheese Bread.

Step 12: Transfer to Baking Sheet
Carefully lift the twisted loaf and place it on the prepared baking sheet, shaping it into a round or keeping it a traditional loaf shape. Adjust as necessary, making sure it has a little room to expand during baking. Your Herb Cheese Bread is now almost ready to bake!

Step 13: Brush with Egg Wash
In a small bowl, whisk together 1 egg and 1 tablespoon of milk or water to create an egg wash. Brush the mixture over the top of your dough for an appealing golden glaze. If desired, sprinkle everything bagel seasoning or additional grated Parmesan over the top to enhance the flavor and add a crunchy texture to your Herb Cheese Bread.

Step 14: Bake
Place the baking sheet in the preheated oven and bake the Herb Cheese Bread for 25-30 minutes. You’ll know it’s ready when the crust turns golden brown and the filling bubbles enticingly from the inside. Your kitchen will soon be filled with the scrumptious aroma of freshly baked bread.

Step 15: Cool
Once baked, remove the Herb Cheese Bread from the oven and let it cool on the baking sheet for a few minutes before transferring it to a wire rack. Allow it to cool slightly, as this will help the interior set so that you can slice it beautifully without losing any filling.

How to Store and Freeze Herb Cheese Bread

Room Temperature: Keep the fully cooled Herb Cheese Bread wrapped in a clean kitchen towel or placed in a bread box to maintain its freshness for up to 3 days.

Fridge: To extend its life, store leftover bread in an airtight container in the refrigerator for up to a week. Note that it may lose some of its original texture.

Freezer: Wrap the cooled Herb Cheese Bread tightly in plastic wrap and foil. Store in the freezer for up to 2 months. To enjoy later, simply thaw at room temperature or reheat in the oven for a crispy finish.

Reheating: To revive the bread, preheat the oven to 350°F (175°C) and warm for about 10-15 minutes; this restores the gooey cheese and fresh aroma!

Expert Tips for Herb Cheese Bread

  • Fresh Yeast Importance: Ensure your yeast is fresh to activate properly—this is crucial for the perfect rise in your Herb Cheese Bread.

  • Temperature Matters: Use a thermometer to check the warm water; too hot can kill the yeast and ruin your dough.

  • Kneading Technique: If the dough sticks during kneading, gradually add more flour a little at a time. A well-kneaded dough leads to better texture.

  • Chill Filling: Briefly chill the filling before spreading—this makes it easier to apply, keeping it from oozing out during baking.

  • Glaze for Shine: Don’t skip the egg wash; it gives your Herb Cheese Bread a lovely, golden crust that’s visually appealing and delicious!

What to Serve with Italian Herb Cheese Bread

Elevate your Italian Herb Cheese Bread experience by pairing it with these delightful accompaniments that balance flavors and textures.

  • Marinara Sauce: Perfect for dipping, this tangy sauce adds acidity that cuts through the richness of the cheese, creating a delightful balance.

  • Garlic Butter Shrimp: Juicy, perfectly cooked shrimp in garlic and butter add a luxurious touch that takes every bite to the next level.

  • Simple Green Salad: A fresh salad with mixed greens, cherry tomatoes, and a light vinaigrette adds a crisp, refreshing contrast to the warm, soft bread.

  • Creamy Tomato Soup: Warm up with a rich, luscious tomato soup. The silky texture and savory flavor complement the herb-filled bread beautifully.

  • Balsamic Glazed Veggies: Roasted vegetables drizzled with balsamic glaze bring a sweet and tangy element, enhancing the savory flavors of the bread.

  • White Wine Spritzer: A light and refreshing drink, the crispness of a white wine spritzer enhances the meal while keeping it light and enjoyable.

Serving these alongside your Italian Herb Cheese Bread transforms it into a memorable feast that comforts and delights.

Herb Cheese Bread Variations & Substitutions

Feel free to let your creativity shine with these exciting twists on the classic herb cheese bread!

  • Cheese Options: Swap mozzarella with cheddar, Gruyere, or goat cheese for unique flavors. Each cheese brings its own meltiness and taste profile.
  • Spicy Kick: Add cayenne pepper or diced jalapeños to the filling for a fiery surprise tucked away in each slice. A little heat can elevate the savory experience beautifully!
  • Veggie Boost: Incorporate chopped spinach, sun-dried tomatoes, or roasted red peppers for added depth and color. Vegetables bring freshness and make every bite an adventure.
  • Herb Variations: Experiment with fresh herbs like chives, rosemary, or thyme instead of standard Italian herbs. Each blend of herbs creates a distinct flavor that can truly personalize your bread.
  • Texture Twist: For a crunch, sprinkle crushed nuts or seeds on top before baking. This adds delightful contrast, reminiscent of our Chicken Grilled Cheese that surprises the palate!
  • Gluten-Free Option: Use a gluten-free flour blend as a substitute for all-purpose flour. Just ensure you’re following the right ratios per your blend’s instructions for the best results.
  • Sweet Surprise: Try a sweet twist by mixing in some honey or adding cinnamon to the filling for a sweet bread variation. Just imagine that aroma wafting through your kitchen!
  • Everything Bagel Twist: Instead of just rosemary and sea salt, top your bread with everything bagel seasoning for a flavor-packed crust that’s extraordinary. It adds irresistible crunch and taste, making it a showstopper.

With these variations, you’re sure to create a herb cheese bread that’s not only comforting but uniquely tailored to your taste! Consider pairing it with a delightful dip, or enjoy it alongside a fresh salad to make every meal special.

Make Ahead Options

These Italian Herb Cheese Bread are perfect for busy weeknights or meal prep enthusiasts! You can prepare the dough and filling up to 24 hours in advance; simply refrigerate the dough wrapped in plastic and store the filling in an airtight container. When you’re ready to bake, allow the dough to come to room temperature for about 30 minutes before rolling it out, and mix the filling ingredients just before spreading. This way, you’ll have a fresh, flavorful loaf that tastes just as delightful as if you made it the same day. Just follow the final steps of rolling, twisting, and baking, and enjoy the comforting aroma filling your home!

Italian Herb Cheese Bread Recipe FAQs

What types of cheese work best for Herb Cheese Bread?
Absolutely! For the filling, I recommend using a mix of mozzarella for that gooey texture and cream cheese for creaminess. If you’re feeling adventurous, try swapping in cheeses like Gruyere or goat cheese for delightful variations. Provolone or sharp cheddar also make excellent choices for a flavorful twist!

How should I store leftover Herb Cheese Bread?
To keep your Herb Cheese Bread fresh, wrap it in a clean kitchen towel or place it in a bread box for up to 3 days at room temperature. For longer storage, keep it in an airtight container in the fridge for up to a week, knowing that it may lose some texture.

Can I freeze Herb Cheese Bread?
Certainly! To freeze your Herb Cheese Bread, first allow it to cool completely. Then, wrap it tightly in plastic wrap, followed by foil, to protect it from freezer burn. It can be stored for up to 2 months. When you’re ready to enjoy, thaw it at room temperature or reheat in the oven for about 10-15 minutes at 350°F (175°C) to restore its delicious texture.

How do I know if my yeast is fresh?
Very important! To test your yeast, combine it with warm water (105-115°F) and a bit of sugar. Wait for about 5-10 minutes—if it becomes foamy and bubbly, it’s active and ready to use. If there’s no reaction, it’s best to get new yeast for your Herb Cheese Bread.

What can I do if my dough is too sticky?
If you find your Herb Cheese Bread dough is too sticky during kneading, don’t fret! Gradually add more flour, a tablespoon at a time, until it reaches a smooth and elastic consistency. Remember, a well-kneaded dough is key to achieving that perfect texture!

Herb Cheese Bread

Heavenly Herb Cheese Bread: Your New Comfort Food Obsession

This Herb Cheese Bread combines cheesy goodness with aromatic herbs, making it perfect for any occasion.
Prep Time 30 minutes
Cook Time 30 minutes
Rising Time 1 hour 30 minutes
Total Time 2 hours 30 minutes
Servings: 8 slices
Course: Appetizers
Cuisine: Italian
Calories: 250

Ingredients
  

For the Dough
  • 4 cups All-purpose flour or bread flour for a chewier texture
  • 2 tablespoons Active dry yeast ensure fresh
  • 2 tablespoons Granulated sugar activates the yeast
  • 1 teaspoon Salt enhances flavor
  • 1 cup Warm water 105-115°F
  • 3 tablespoons Olive oil or melted butter
For the Filling
  • 8 ounces Cream cheese or ricotta for lighter version
  • 1 cup Shredded mozzarella cheese consider provolone or cheddar
  • 1/2 cup Grated Parmesan cheese complementary flavor
  • 1/4 cup Chopped fresh herbs (parsley, basil, oregano) dried herbs can be used in lesser amounts
  • 1 teaspoon Minced garlic depth of flavor
  • Red pepper flakes optional for heat
For the Glaze
  • 1 large Egg
  • 1 tablespoon Milk or water
For the Topping
  • Everything bagel seasoning optional
  • Additional grated Parmesan cheese for crust flavor
  • Dried Italian herbs optional

Equipment

  • Mixing Bowl
  • Wooden spoon
  • Baking Sheet
  • Thermometer
  • Wire rack

Method
 

Step-by-Step Instructions for Italian Herb Cheese Bread
  1. In a medium bowl, combine 1 cup of warm water, 2 tablespoons of sugar, and 2 teaspoons of yeast. Stir gently and let it sit for 5-10 minutes until foamy.
  2. In a large mixing bowl, whisk together 4 cups of flour and 1 teaspoon of salt until no lumps remain.
  3. Pour the activated yeast mixture and 3 tablespoons of olive oil into the flour mixture. Mix until a shaggy dough forms.
  4. Knead the dough on a floured surface for 6-8 minutes until smooth and elastic.
  5. Place the dough in a lightly oiled bowl, cover, and let it rise in a warm place for 1 to 1.5 hours until doubled in size.
  6. Mix the filling by combining 8 ounces of softened cream cheese, 1 cup of mozzarella, 1/2 cup of Parmesan, 1/4 cup of herbs, and 1 teaspoon of minced garlic.
  7. Preheat the oven to 375°F about 15 minutes before the dough is done rising.
  8. Roll out the dough into a rectangle approximately 12x18 inches.
  9. Spread the filling evenly across the rolled-out dough, leaving a 1-inch border.
  10. Roll the dough tightly from one edge to create a log shape, pinching the seam to seal.
  11. Cut the log lengthwise down the center and twist the strands together.
  12. Place the twisted loaf on a baking sheet and brush with egg wash. Optionally sprinkle with seasoning or cheese.
  13. Bake for 25-30 minutes until golden brown and filling bubbles.
  14. Cool on the baking sheet for a few minutes before transferring to a wire rack.

Nutrition

Serving: 1sliceCalories: 250kcalCarbohydrates: 30gProtein: 10gFat: 10gSaturated Fat: 5gCholesterol: 30mgSodium: 300mgPotassium: 200mgFiber: 1gSugar: 1gVitamin A: 100IUCalcium: 200mgIron: 1mg

Notes

Ensure your yeast is fresh for best results. Use a thermometer for water temperature and add flour slowly when kneading if the dough is sticky.

Tried this recipe?

Let us know how it was!

Crispy Fried Pickles: Your Fun, Guilt-Free Snack Adventure

As I tossed my latest creation into the air fryer, the familiar scent of sizzling pickles wafted through my kitchen, bringing back memories of summer barbecues and late-night snacking. These Air Fryer Fried Pickles are not only a delightful homage to classic Southern cuisine but also a healthier twist for those of us looking to cut back on grease without sacrificing flavor. With a quick prep time and an irresistibly crispy texture, they make the perfect appetizer that will have everyone reaching for more. Whether you’re hosting a gathering or simply indulging in a solo snack, the tangy crunch of these pickles paired with a creamy dipping sauce is sure to elevate your culinary game. Ready to discover how simple it is to whip up this crowd-pleaser? Let’s dive in!

Why are Air Fryer Fried Pickles a Must-Try?

Crispy, Guilt-Free Delight: These Air Fryer Fried Pickles give you all the crunch without the grease, making them a healthier choice for snacking.

Quick & Easy: With minimal prep and cook time, they fit perfectly into any busy schedule, allowing you to enjoy a deep-fried classic without the fuss.

Irresistible Flavor: Bursting with tangy goodness, each pickle will transport your taste buds straight to Southern kitchens. Pair them with our creamy dip for the ultimate flavor experience!

Crowd-Pleasing Appetizer: Perfect for entertaining, these fried pickles will have your guests raving, just like our Korean Fried Chicken or Crispy Southern Fried Chicken would.

Versatile Snacking: Use different pickles or dips to create your personalized twist, ensuring every batch is a new flavor adventure. Enjoy the crispy joy today!

Fried Pickles Ingredients

• Get ready to crunch!

For the Pickles

  • Sliced Pickles – Choose dill pickles for a classic tang; feel free to swap with bread and butter pickles for a sweeter twist.
  • Eggs – Use large eggs for the best coating results; they help the breading stick perfectly.
  • Flour – This thickens the egg wash for better breadcrumb adhesion; simply omit it for a gluten-free option.
  • Hot Sauce (e.g., Tabasco) – Adds a delicious spicy kick; adjust according to your heat preference.
  • Salt – Essential for enhancing overall flavor; don’t skip this part!
  • Black Pepper – A mild heat booster; customize the amount to suit your taste.
  • Panko Breadcrumbs – Offers a lighter, crispier texture compared to standard breadcrumbs; traditional breadcrumbs can also work if needed.

For the Dipping Sauce

  • Sour Cream – The creamy base that pairs perfectly with your fried pickles.
  • Mayonnaise – Adds richness to the dip, making it extra delicious.
  • Minced Onions – For crunch and flavor; chop finely for the best texture.
  • Minced Garlic – Gives the dip depth; using fresh garlic will really elevate the flavor!
  • Dried Dill (optional) – Adds an herby note; feel free to skip if you prefer a simpler flavor.

With these ingredients, you’re all set to create the most scrumptious air fryer fried pickles!

Step‑by‑Step Instructions for Air Fryer Fried Pickles

Step 1: Prep Pickles
Begin by laying the sliced pickles between paper towels to thoroughly dry them. This crucial step ensures that the egg wash adheres properly, giving your Air Fryer Fried Pickles the perfect crispy coating. Allow them to sit for about 10 minutes while preparing the egg wash to absorb excess moisture.

Step 2: Make Egg Wash
In a shallow dish, whisk together the eggs, flour, hot sauce, salt, and black pepper until smooth. This flavorful egg wash helps the breadcrumbs cling beautifully to the pickles. Aim for a consistency that’s not too thick; you want each pickle to be generously coated but not dripping.

Step 3: Coat Pickles
Take each dried pickle slice and first dip it into the egg wash, ensuring it’s fully covered. Then, roll it in the panko breadcrumbs for that crunch. Arrange the coated pickles on a clean baking sheet, allowing them some space to promote even cooking in the air fryer.

Step 4: Air Fry
Preheat your air fryer to 400°F (200°C). Once heated, arrange the coated pickles in a single layer in the basket. Spray them lightly with cooking oil and air-fry for about 5-7 minutes. The pickles should become golden brown and crispy; check for this visual cue as a sign they’re ready to flip.

Step 5: Flip and Finish
Carefully flip the pickles after the initial cooking time and spray them again with oil. Air-fry for an additional 5-7 minutes until they are uniformly golden brown and crispy. Keep an eye on them as they cook; the right texture should be crunchy on the outside while tangy and soft inside, making perfect Air Fryer Fried Pickles.

Step 6: Prepare Dip
While your fried pickles are cooking, mix the sour cream, mayonnaise, minced onions, minced garlic, salt, pepper, and optional dried dill in a bowl. This creamy dip complements the crispy pickles wonderfully. Blend all ingredients until smooth, adjusting seasoning to your taste for the ultimate dip experience.

Step 7: Serve
Once your Air Fryer Fried Pickles are done, serve them hot alongside the creamy dip for a delightful appetizer. Arrange them artistically on a platter to showcase their crunchiness. This step brings your dish full circle, ready to delight your family and friends with every tangy, crispy bite.

Make Ahead Options

These Air Fryer Fried Pickles are perfect for busy home cooks looking to save time! You can prepare the pickles by following steps 1 to 3 (drying, egg washing, and coating) up to 24 hours in advance. Simply layer the coated pickles on a baking sheet lined with parchment paper, cover, and refrigerate. To maintain their crunchiness, it’s vital to avoid stacking them on top of each other. When you’re ready to serve, just pop them into the air fryer for about 10-14 minutes (flipping halfway) until they’re golden brown. You’ll enjoy deliciously crispy fried pickles with minimal effort, making snack time a breeze!

Variations & Substitutions for Fried Pickles

Feel free to unleash your creativity and make this fried pickles recipe your own!

  • Bread and Butter Pickles: Swap dill pickles for sweet bread and butter pickles if you’re in the mood for a sweeter crunch. The flavor shift can be a delightful surprise!

  • Spicy Kick: Add a dash of cayenne pepper to your egg wash for a fiery twist that will awaken your taste buds. Spicy fried pickles are a fun way to elevate your snack game!

  • Gluten-Free Option: Replace all-purpose flour with a gluten-free flour blend to keep it safe for gluten-sensitive friends while maintaining that crispy texture.

  • Parmesan Cheese: Mix grated Parmesan cheese into the panko breadcrumbs for an added layer of flavor and richness that perfectly complements the tanginess of the pickles.

  • Ranch Seasoning: Incorporate ranch seasoning into the breadcrumb mixture to give your fried pickles a savory twist. It’s like having a taste of ranch with every crispy bite!

  • Zesty Mustard Dip: For a tangy alternative to the sour cream dip, mix in some zesty mustard to create a dynamic duo that complements the fried pickles perfectly.

  • Panko Alternatives: If you don’t have panko, try substituting with crushed cornflakes or tortilla chips for a unique texture and added crunch.

  • Herbal Infusion: Add chopped fresh herbs like parsley or chives to your dipping sauce for a fresh, vibrant touch that brightens up the flavor profile beautifully.

Each of these variations can easily transform your fried pickles into a brand-new experience! Enjoy experimenting to discover your favorite combination. And don’t forget to check out our delightful Cheesy Fried Egg and Crispy Feta Fried Eggs for more fun flavors!

What to Serve with Air Fryer Fried Pickles

There’s nothing quite like complementing the crispy, tangy goodness of fried pickles with delightful sides and drinks that elevate your snacking experience.

  • Creamy Ranch Dressing: A classic pairing, the coolness of ranch enhances the zesty crunch of fried pickles perfectly.

  • Spicy Bloody Mary: This savory cocktail’s spiced tomato base elevates the tangy bite, making it a fun brunch companion.

  • Crispy Sweet Potato Fries: Their sweetness provides a delicious contrast to the tangy pickles, plus they add extra crunch to your plate.

  • Zesty Coleslaw: This refreshing side brings a tangy crunch and balances the richness of fried pickles, creating a refreshing palate cleanser.

  • Grilled Chicken Sandwich: Pairing fried pickles with a juicy chicken sandwich adds texture and a tangy punch for a satisfying meal.

  • Beer-battered Onion Rings: This crunchy delight shares the same indulgent vibe as fried pickles, making for a hearty appetizer combo.

  • Homemade Guacamole: The creaminess of guacamole adds richness that beautifully complements the crispy pickles, offering a fun flavor twist.

  • Chilled White Wine: A crisp, chilled glass of white wine pairs well, providing a light and refreshing sip to balance each bite.

  • Brownie Bites: For a sweet finish, serving mini brownies brings chocolatey richness that contrasts nicely with the pickles’ tang.

Tips for the Best Air Fryer Fried Pickles

  • Drying Pickles: Ensure pickles are thoroughly dried before coating to prevent sogginess and ensure optimal adherence of the egg wash.

  • Proper Egg Wash: Use large eggs and whisk them well with the other ingredients for a smooth mixture; this helps the breadcrumbs stick effectively.

  • Choose the Right Thickness: Opt for thicker-cut pickles for a satisfying crunch and avoid them becoming too soft during cooking.

  • Spacing Matters: Arrange pickles in a single, even layer in the air fryer basket; overcrowding can result in uneven cooking and some pickles being less crispy.

  • Adjust Spiciness: Modify the amount of hot sauce in your egg wash according to personal preference; this allows you to control the heat level while enjoying those crispy fried pickles.

How to Store and Freeze Fried Pickles

Fridge: Store your Air Fryer Fried Pickles in an airtight container for up to 2 days to maintain their crunch. It’s best to reheat them for a crispier bite.

Freezer: For longer storage, freeze the fried pickles in a single layer on a baking sheet before transferring to a freezer-safe bag. They can last up to 3 months frozen.

Reheating: When ready to enjoy leftover fried pickles, reheat them in the air fryer at 370°F (188°C) for 3-5 minutes. This ensures they regain their crispy texture.

Room Temperature: If serving for a party, allow fried pickles to sit at room temperature for no more than 1 hour. After this, refrigerate leftovers promptly to keep them fresh.

Air Fryer Fried Pickles Recipe FAQs

How do I choose the best pickles for frying?
Absolutely! For the finest Air Fryer Fried Pickles, I recommend sticking with dill pickles for that classic tangy flavor. If you prefer sweetness, bread and butter pickles can add a delightful twist. Make sure to select firm pickles without any dark spots all over, as fresher pickles enhance the overall crunch and flavor.

What is the best way to store leftover fried pickles?
After enjoying your crispy snack, store your leftover Air Fryer Fried Pickles in an airtight container in the fridge for up to 2 days. To reintroduce that perfect crunch, pop them back in the air fryer at 370°F (188°C) for about 3-5 minutes. This should do wonders in reviving their original texture!

Can I freeze air-fried pickles?
Of course! If you want to freeze your Air Fryer Fried Pickles for later, lay them out in a single layer on a baking sheet first, making sure they don’t touch. Freeze them for about 1-2 hours, then transfer to a freezer-safe bag. They can be stored this way for up to 3 months. When you’re ready to enjoy, simply reheat in the air fryer until crispy again!

I’m having trouble with the breading coming off; what should I do?
Very! If you find the breading is coming off your pickles, make sure they are thoroughly dried between paper towels after you slice them. This crucial step ensures the egg wash adheres properly. Using fresh large eggs in your egg wash can also help with adherence. If you still have issues, try increasing the quantity of flour in your egg wash to create a thicker binding layer.

Are these fried pickles suitable for people with gluten allergies?
Yes, indeed! For a gluten-free option, simply omit the flour in your egg wash. Instead, you can use a gluten-free flour blend or cornstarch to help with the texture. Always ensure that your panko breadcrumbs are certified gluten-free as well, allowing everyone to enjoy these delicious Air Fryer Fried Pickles!

Fried Pickles

Crispy Fried Pickles: Your Fun, Guilt-Free Snack Adventure

These Air Fryer Fried Pickles are a crispy, guilt-free snack that's bursting with flavor and a perfect appetizer for any gathering.
Prep Time 15 minutes
Cook Time 15 minutes
Total Time 30 minutes
Servings: 4 servings
Course: Appetizers
Cuisine: Southern
Calories: 200

Ingredients
  

For the Pickles
  • 1 jar Sliced Pickles Dill or bread and butter for variation
  • 2 large Eggs For coating
  • 1/2 cup Flour Omit for gluten-free
  • 1 tablespoon Hot Sauce Adjust for spice preference
  • 1 teaspoon Salt Essential for flavor
  • 1/2 teaspoon Black Pepper Customize to taste
  • 1 cup Panko Breadcrumbs For extra crunch
For the Dipping Sauce
  • 1 cup Sour Cream Creamy base for dip
  • 1/2 cup Mayonnaise Adds richness
  • 1/4 cup Minced Onions For flavor and crunch
  • 2 cloves Minced Garlic Fresh will enhance flavor
  • 1 teaspoon Dried Dill Optional for herby flavor

Equipment

  • Air Fryer

Method
 

Step-by-Step Instructions for Air Fryer Fried Pickles
  1. Lay the sliced pickles between paper towels to dry for about 10 minutes.
  2. Whisk together the eggs, flour, hot sauce, salt, and black pepper until smooth.
  3. Dip each pickle slice in the egg wash, then roll in panko breadcrumbs.
  4. Preheat air fryer to 400°F (200°C) and arrange pickles in a single layer.
  5. Air-fry for 5-7 minutes until golden brown, then flip and spray with oil.
  6. Air-fry for an additional 5-7 minutes until crispy and golden.
  7. Mix the dip ingredients together until smooth and serve with hot fried pickles.

Nutrition

Serving: 1servingCalories: 200kcalCarbohydrates: 22gProtein: 4gFat: 10gSaturated Fat: 2gPolyunsaturated Fat: 1gMonounsaturated Fat: 7gCholesterol: 50mgSodium: 600mgPotassium: 200mgFiber: 1gSugar: 2gVitamin A: 500IUVitamin C: 1mgCalcium: 50mgIron: 1mg

Notes

Ensure pickles are fully dried before coating and don't overcrowd the air fryer basket for best results.

Tried this recipe?

Let us know how it was!

Delicious Sushi Cups: Your Easy No-Bake Snack Delight

Walking through a bustling market, the vibrant colors of fresh produce caught my eye, and I couldn’t help but imagine all the delicious meals that could come from them. That’s when the idea for these Customizable No-Bake Sushi Cups hit me. With their delightful bite-sized portions, they’re perfect for turning your favorite vegetables into a quick and fun appetizer. Plus, they are vegetarian-friendly and take mere minutes to prepare, making them an effortless choice for those busy days or spontaneous gatherings. Picture creamy avocado mingling with crisp veggies, all topped with a zesty drizzle of spicy mayo—trust me, you won’t be able to resist! Are you ready to elevate your snack game and create your own sushi masterpiece? Let’s dive in!

Why are these Sushi Cups a Must-Try?

Unmatched Versatility: These sushi cups can be tailored to your taste; from zesty sauces to colorful veggies, the combinations are endless!

Quick and Easy Preparation: With no baking required, you can whip these up in no time—perfect for last-minute gatherings or a tasty afternoon snack.

Crowd-Pleasing Flavor: The delightful blend of creamy avocado, crunchy veggies, and zesty mayo means everyone will be raving about your creation!

Healthier Choice: Packed with fresh ingredients, these sushi cups are a guilt-free indulgence, making them the ideal alternative to fast food.

Meal Prep Friendly: You can prepare these up to 24 hours in advance, giving you more time for fun and festivities. For a delightful dessert to pair, consider making these Chocolate Granola Cups too!

Sushi Cups Ingredients

• Create your flavorful sushi cups masterpiece with these essential ingredients!

For the Base

  • Sushi Rice – Provides the foundation for your cups; use any short-grain rice if sushi rice is unavailable.
  • Water – Essential for cooking the sushi rice to perfection.

For the Filling

  • Finely Chopped Veggies – Adds a fresh crunch; consider options like carrots, cucumber, bell peppers, or sprouts.
  • Steamed Mukimame (Shelled Edamame) – Boosts protein and texture; available frozen or in pods (about 15 pods yield 1/4 cup).
  • Diced Avocado – Offers a creamy richness; substitute with hummus or tahini for a different twist.

For the Sauce

  • Sauce (Soy Sauce, Tamari, or Coconut Aminos) – Infuses flavor; pick according to dietary preferences (gluten-free or soy).
  • Mayonnaise – The base for your spicy mayo; for a vegan option, use plant-based mayo.
  • Sriracha Sauce – Adds the desired heat to your mayo mix; adjust to your taste preference.
  • Honey – Balances out the spiciness; omit if you’re looking for a vegan version.
  • Sesame Oil – Adds a nutty flavor to your mayo; a neutral oil can be a suitable substitute.

For the Garnish

  • Black Sesame Seeds – Perfect for adding visual appeal and a slight crunch to finish off your sushi cups.

Now you’re all set to create these delightful sushi cups that are bound to impress and satisfy!

Step‑by‑Step Instructions for Sushi Cups

Step 1: Prepare the Sushi Rice
Begin by rinsing the sushi rice under cold water until the water runs clear to remove excess starch. In a pot, combine the rinsed rice with the appropriate amount of water, then bring it to a boil over medium-high heat. Once boiling, reduce the heat to low, cover, and simmer for about 20 minutes until the rice is tender and all the water is absorbed.

Step 2: Form the Rice Cups
Once the sushi rice is cooked, allow it to cool slightly for about 10 minutes. Next, using silicone muffin liners or a muffin tin, take handfuls of rice and firmly press it into the bottom and up the sides of each cup to create a solid base. Chill the formed rice cups in the refrigerator for 20 minutes to help them hold their shape.

Step 3: Prepare the Filling
While the rice cups are chilling, in a large mixing bowl, combine finely chopped veggies, steamed mukimame, and diced avocado. Pour in your choice of sauce, whether it’s soy sauce, tamari, or coconut aminos, and gently mix everything together until the ingredients are evenly coated and vibrant, creating a fresh filling for your sushi cups.

Step 4: Make the Spicy Mayo
In a separate bowl, whisk together mayonnaise, Sriracha sauce, honey, and sesame oil until smooth and well combined. Taste the mixture and adjust the Sriracha based on your desired level of spiciness. This zesty mayo will be the perfect complement to your sushi cups, adding creaminess and heat.

Step 5: Assemble and Garnish the Sushi Cups
Remove the sushi rice cups from the fridge and fill each cup generously with the prepared veggie and mukimame mixture. Drizzle the spicy mayo over the top of each filled cup, allowing it to cascade beautifully down the sides. Finally, sprinkle black sesame seeds on top for an appealing finish, adding a slight crunch to every bite of your delicious sushi cups.

What to Serve with Customizable No-Bake Sushi Cups

When you elevate your sushi cups with complementary sides and drinks, the dining experience becomes a delightful journey of flavors.

  • Crispy Seaweed Salad: A refreshing complement, its umami flavor and crunch perfectly balance the creamy sushi cups.

  • Miso Soup: Warm and comforting, miso soup adds a savory depth that enhances the overall meal, perfect for a sushi-inspired dinner.

  • Edamame Pods: Lightly salted and simple, these provide a pop of protein that pairs well with the sushi cups, creating a satisfying bite.

  • Cucumber Salad: Cool, crisp cucumbers soaked in rice vinegar give a bright contrast to the rich flavors of the sushi cups while adding vibrant color.

  • Fruity Green Tea: This lightly sweetened beverage helps cleanse the palate, making each bite of your sushi cups a fresh experience.

  • Chocolate Mochi: As a dessert option, these chewy delights offer a touch of sweetness, rounding out your meal with a delightful Japanese twist.

For a heartier option, consider whipping up some sweet potato tempura. Its crispy exterior and soft interior complement the textures in the sushi cups beautifully!

Sushi Cups: Delightful Customization Awaits!

Feel free to let your creativity shine as you whip up these sushi cups, transforming simple ingredients into a flavorful experience.

  • Dairy-Free: Swap mayonnaise for cashew cream mixed with a touch of lemon juice for your zesty mayo.
  • Spicy Kick: Add diced jalapeños or a splash of chili oil to your filling for an extra heat infusion. Your taste buds will love the extra adventure!
  • Protein-Packed: Consider adding grilled chicken, tofu, or shredded crab for a heartier version that satisfies every craving.
  • Crunchy Texture: Toss some crushed nori strips into your filling for a delightful crunch and beautiful seaweed flavor. It’s like having sushi without the roll!
  • Colorful Greens: Replace traditional veggies with vibrant seasonal picks such as radishes, snap peas, or shredded purple cabbage for a burst of color and nutrients.
  • Sweet Twist: Drizzle a hint of sweet chili sauce over the filled sushi cups before serving for a tangy-sweet contrast everyone will enjoy.
  • Sesame Flavor Boost: Infuse ground sesame seeds or tahini into your filling for an additional nutty flavor that complements the overall dish. You can even use it in place of the avocado!
  • Savory Sauces: Explore other sauces like ponzu or teriyaki to pour over your cups, creating exciting new flavor profiles with every batch.

With so many adaptable options, you can enjoy these sushi cups again and again! For a delightful dessert to pair with your creations, how about some Easter Dirt Cups? They’re a fun addition to any meal!

Make Ahead Options

These sushi cups are a fantastic option for meal prep enthusiasts! You can prepare the sushi rice cups up to 24 hours in advance by pressing the cooled rice into silicone muffin liners and storing them in an airtight container in the refrigerator. Additionally, you can chop the veggies and steam the mukimame ahead of time, keeping them fresh for up to 3 days in the fridge. When you’re ready to serve your sushi cups, simply fill the rice bases with the veggie and mukimame mixture, drizzle with the spicy mayo, and garnish with black sesame seeds. This way, you’ll have a delightful appetizer ready to go, making your busy days a little brighter and your meals effortless!

Expert Tips for Sushi Cups

Silicone Liners: Use silicone muffin liners for hassle-free removal; they’ll ensure your sushi cups come out intact and beautifully shaped.

Chill Time Matters: Allow the formed rice cups to chill for 20 minutes to set properly, which makes handling and filling easier.

Custom Fillings: Don’t hesitate to customize your sushi cups! Swap in proteins like imitation crab or cooked shrimp, accommodating everyone’s taste buds.

Freshness is Key: For the best quality, prepare your sushi cups no more than 24 hours in advance and store in an airtight container.

Avoid Sticking: If you’re concerned about rice sticking, lightly grease the muffin liners for easy removal; it’ll save you from frustration later.

Spicing it Up: Adjust the level of Sriracha in your spicy mayo according to your heat preference; this way, everyone can savor their unique sushi cups!

How to Store and Freeze Sushi Cups

Fridge: Store sushi cups in an airtight container and enjoy within 2 days for the best flavor and texture.

Freezer: While sushi cups are best fresh, you can freeze the rice base for up to 1 month. Fill just before serving to maintain freshness.

Reheating: If using frozen rice cups, thaw overnight in the fridge and reheat in the microwave for 15-30 seconds until warm. Avoid reheating filled cups.

Assembling Tips: To keep the filling fresh, prepare sushi cup components separately, storing veggies and sauces in airtight containers until you’re ready to assemble.

Sushi Cups Recipe FAQs

How do I choose the right ripeness of avocado for my sushi cups?
Absolutely! For your sushi cups, select avocados that are slightly soft to the touch but not overly mushy. They should be dark green in color and give a little when pressed gently. If they’re too firm, let them ripen on your countertop for a couple of days before using.

How should I store leftover sushi cups?
Very! To store sushi cups, place them in an airtight container in the refrigerator and enjoy within 2 days to maintain their freshness. If you see the rice starting to lose its moisture or dry out, it’s best to consume them sooner for optimal flavor.

Can I freeze sushi cups to enjoy later?
Of course! While the filled sushi cups are best enjoyed fresh, you can freeze just the sushi rice base for up to 1 month. To freeze, allow the rice to cool completely, then pack it into an airtight freezer bag, pressing out excess air. When you’re ready to enjoy, thaw it in the fridge overnight. Assemble the cups fresh with your desired fillings just before serving.

What can I do if the rice cups fall apart when removed from the liner?
Don’t fret! If your rice cups are crumbling, it might be due to insufficient chilling time. Always press the rice firmly into the muffin liners to create a solid base and chill them for at least 20 minutes. If using a traditional muffin tin, lightly greasing the tin can help with removal.

Are these sushi cups suitable for people with dietary restrictions?
Certainly! These sushi cups can be easily adapted for various dietary needs. For gluten-free diets, make sure to use tamari or coconut aminos instead of soy sauce. If you’re accommodating vegans, simply replace traditional mayonnaise with plant-based mayo and omit the honey. The customizable nature allows these cups to fit many dietary preferences, making them perfect for gatherings!

How can I incorporate protein into my sushi cups?
Great question! For those looking to boost the protein content, consider adding ingredients like imitation crab, cooked shrimp, or even chickpeas. If you’re using proteins, mix them with your finely chopped veggies before filling the rice cups. Just ensure they’re in bite-sized pieces for the best texture and taste!

Sushi Cups

Delicious Sushi Cups: Your Easy No-Bake Snack Delight

Enjoy these customizable No-Bake Sushi Cups, perfect vegetarian-friendly appetizers packed with flavor.
Prep Time 10 minutes
Cook Time 20 minutes
Chill Time 20 minutes
Total Time 50 minutes
Servings: 4 cups
Course: Appetizers
Cuisine: Japanese
Calories: 250

Ingredients
  

For the Base
  • 1 cup Sushi Rice Use short-grain rice if sushi rice is unavailable.
  • 1 cup Water
For the Filling
  • 2 cups Finely Chopped Veggies Consider options like carrots, cucumber, bell peppers, or sprouts.
  • 1/4 cup Steamed Mukimame (Shelled Edamame) About 15 pods yield this amount.
  • 1 medium Diced Avocado Substitute with hummus or tahini for a different twist.
For the Sauce
  • 2 tablespoons Soy Sauce or Tamari or Coconut Aminos Pick according to dietary preferences.
  • 2 tablespoons Mayonnaise Use plant-based mayo for a vegan option.
  • 1 teaspoon Sriracha Sauce Adjust to taste.
  • 1 teaspoon Honey Omit for a vegan version.
  • 1 teaspoon Sesame Oil A neutral oil can be a suitable substitute.
For the Garnish
  • 1 tablespoon Black Sesame Seeds For visual appeal.

Equipment

  • Pot
  • Muffin Tin
  • Mixing Bowl
  • whisk
  • Silicone Muffin Liners

Method
 

Step-by-Step Instructions for Sushi Cups
  1. Rinse the sushi rice under cold water until the water runs clear. Combine the rinsed rice with water in a pot, bring to a boil, then simmer for about 20 minutes until tender.
  2. Allow the cooked sushi rice to cool slightly for about 10 minutes. Firmly press handfuls of rice into silicone muffin liners to create a solid base. Chill in the fridge for 20 minutes.
  3. In a mixing bowl, combine finely chopped veggies, steamed mukimame, and diced avocado. Pour in your choice of sauce and gently mix until all ingredients are coated.
  4. Whisk together mayonnaise, Sriracha, honey, and sesame oil in a separate bowl until smooth. Adjust Sriracha based on desired spiciness.
  5. Fill each chilled rice cup with the veggie mixture, drizzle spicy mayo over the top, and sprinkle with black sesame seeds.

Nutrition

Serving: 1cupCalories: 250kcalCarbohydrates: 35gProtein: 7gFat: 10gSaturated Fat: 1gPolyunsaturated Fat: 2gMonounsaturated Fat: 6gCholesterol: 5mgSodium: 250mgPotassium: 400mgFiber: 4gSugar: 2gVitamin A: 500IUVitamin C: 10mgCalcium: 40mgIron: 1.5mg

Notes

Customize with proteins like imitation crab or cooked shrimp. Prepare components separately for freshness.

Tried this recipe?

Let us know how it was!

Parmesan Focaccia Bread: The Ultimate Cozy Baking Delight

The warm, inviting aroma of baking bread wafts through my kitchen, instantly transporting me to a quaint Italian bakery. Today, I’m excited to share my homemade Garlic Parmesan Focaccia Bread, a recipe that brings a touch of culinary magic right to your home. This bread is not only easy to whip up, but it’s also incredibly versatile; perfect for serving alongside hearty soups or transforming into a dazzling sandwich for lunch. Infused with savory garlic and topped generously with Parmesan cheese, each bite delivers a delightful abundance of flavor and texture. Plus, the pillowy softness paired with a golden, crispy crust makes it a true crowd-pleaser. Ready to roll up your sleeves and surprise your taste buds? Let’s dive into making this irresistible Garlic Parmesan Focaccia Bread together!

Why Is This Focaccia Bread Amazing?

Irresistible aroma: As soon as you take this loaf out of the oven, the savory scent of garlic and melted Parmesan cheese will fill your home, enticing everyone to gather around.
Easy baking: With just a few basic ingredients, even novice bakers can master this delightful bread without any fuss.
Versatile delight: Enjoy it plain, use it for sandwiches, or pair it with soups and salads to elevate your meals. Be sure to check out this Garlic Parmesan Roasted Shrimp for the perfect companion!
Crowd-pleaser: Impress your friends and family at gatherings or potlucks – this bread is sure to be a hit!
Customizable options: Feel free to experiment with different cheeses and toppings to make it truly your own, just like my Homemade Parmesan Crusted Chicken recipe!

Parmesan Focaccia Bread Ingredients

To create the perfect Garlic Parmesan Focaccia Bread that will have everyone asking for seconds, gather these essentials:

For the Dough

  • All-purpose flour – Provides structure; you can substitute with gluten-free flour if desired.
  • Instant yeast – Acts as the leavening agent for lovely rise; remember, active dry yeast can work but needs proofing in warm water first.
  • Salt – Enhances flavor and controls yeast activity for a balanced taste.
  • Warm water (about 110°F) – Activates yeast; double-check that it’s not too hot to avoid ruining it.
  • Sugar – Feeds the yeast for a better rise; a small amount goes a long way!
  • Extra virgin olive oil – Keeps the dough moist and is perfect for greasing the pan.

For the Garlic Infusion

  • Garlic (minced) – Adds that savory punch; sauté it briefly to infuse the oil with its aromatic taste.
  • Parmesan cheese (freshly grated) – Delivers a rich, cheesy flavor; feel free to swap with Pecorino or Asiago for a delicious twist!

For Topping

  • Dried Italian herbs or rosemary – Optional for an extra burst of flavor that screams Italian!
  • Flaky sea salt – Perfect for sprinkling on top, enhancing both taste and texture.

With these ingredients, you’re all set to bake your delicious Parmesan Focaccia Bread!

Step‑by‑Step Instructions for Garlic Parmesan Focaccia Bread

Step 1: Mix Dough
In a large mixing bowl, combine warm water, sugar, and instant yeast. Allow this mixture to sit for about 5 minutes, until it becomes foamy and bubbly. Next, sift in the all-purpose flour and salt, then mix until a sticky dough forms. Knead the dough for about 5-6 minutes with a stand mixer fitted with a dough hook or by hand for 8-10 minutes until it’s smooth and elastic.

Step 2: First Rise
Coat the kneaded dough lightly with extra virgin olive oil to prevent sticking, then cover it with a clean kitchen towel. Let the dough rise in a warm spot for 1 to 1.5 hours, or until it has doubled in size. You’ll know it’s ready when it’s so fluffy that pressing it lightly leaves a dent in the surface.

Step 3: Prepare Garlic Oil
While the dough is rising, prepare the garlic infusion. In a small saucepan over low heat, pour in 1/4 cup of extra virgin olive oil and add the minced garlic. Sauté the garlic gently for about 1 minute, just until fragrant, being careful not to brown it. Once aromatic, remove it from heat and set aside to cool slightly.

Step 4: Stretch and Second Rise
After the first rise, grease a 9×13-inch baking pan with olive oil. Gently transfer the dough to the pan, pressing it out to fill the corners. If the dough resists stretching, let it rest for 10 minutes, then try again. Cover the pan with a towel and allow the dough to rise for another 30-45 minutes, until it puffs up again.

Step 5: Top & Bake
Preheat your oven to 425°F (220°C) while the dough is in its second rise. Once ready, use your fingers to dimple the surface of the dough, creating little pockets. Brush the top generously with the garlic oil mixture, then sprinkle with freshly grated Parmesan cheese, Italian herbs, and a touch of flaky sea salt. Bake in the preheated oven for 20-25 minutes, until golden brown and your kitchen smells heavenly.

Step 6: Cool & Serve
Once baked, remove the Garlic Parmesan Focaccia Bread from the oven and allow it to cool in the pan for about 5-10 minutes. Then, transfer it to a wire rack to cool slightly. Slice it into squares or rectangles, and serve warm, enjoying the soft, fluffy interior contrasted with the crisp, savory crust.

Make Ahead Options

These Garlic Parmesan Focaccia Bread loaves are perfect for meal prep enthusiasts! You can mix and knead the dough up to 24 hours in advance and refrigerate it instead of letting it rise at room temperature. When you’re ready to bake, simply allow it to come to room temperature for about 30 minutes before the second rise. Additionally, you can prepare the garlic oil and store it in an airtight container for up to 3 days in the fridge, enhancing the flavor while saving time. Just follow the final steps of dimpling, topping, and baking, and you’ll have a delicious, homemade focaccia that’s just as tasty as if it were freshly made!

What to Serve with Garlic Parmesan Focaccia Bread

Whether you’re planning a cozy family dinner or hosting friends for a gathering, the possibilities are endless when it comes to sides that elevate this heavenly focaccia!

  • Herbed Olive Oil Dip: A simple blend of high-quality olive oil and fresh herbs creates a fragrant dip that beautifully complements the savory focaccia.

  • Hearty Italian Soup: Pair with a bowl of minestrone or tomato basil soup for a warm, comforting meal. The bread is perfect for soaking up every last drop!

  • Fresh Garden Salad: A light and crisp salad of mixed greens, cherry tomatoes, and a tangy vinaigrette brings a refreshing balance to the rich flavors of the bread.

  • Savory Charcuterie Board: Create an inviting spread with cured meats, cheeses, and olives. The focaccia adds a wonderful texture alongside a variety of bites.

  • Roasted Vegetables: Roast seasonal vegetables with olive oil and herbs for a colorful side dish. Their caramelized sweetness pairs delightfully with the focaccia’s garlicky notes.

  • Wine Pairing: Serve with a glass of Italian red wine, like Chianti, to enhance the meal’s flavors. Its acidity perfectly cuts through the richness of the bread.

  • Classic Bruschetta: Top slices of focaccia with a fresh tomato-basil mixture for a delightful appetizer. The bread’s texture holds up beautifully against the toppings.

  • Cheesy Garlic Breadsticks: Serve alongside for a comforting feast. The two garlicky options together create a delicious, indulgent experience.

Each of these pairings takes your Garlic Parmesan Focaccia Bread to new heights, ensuring a memorable meal every time!

How to Store and Freeze Garlic Parmesan Focaccia

Room Temperature: Store the focaccia bread in an airtight container or wrapped in plastic wrap for up to 2 days to keep it fresh and soft.

Fridge: If you prefer, you can refrigerate the focaccia, but this may dry it out; it’s best enjoyed at room temperature.

Freezer: For longer storage, freeze the focaccia for up to 2 months. Wrap it tightly in plastic wrap and then in aluminum foil to prevent freezer burn.

Reheating: When ready to enjoy, thaw it at room temperature, then warm it in the oven at 350°F (175°C) for about 10 minutes to restore its delightful texture.

Expert Tips for Parmesan Focaccia Bread

  • Perfect Water Temperature: Ensure your warm water is around 110°F and not too hot to avoid killing the yeast, which can hinder your dough rise.
  • Watch the Rise: Allow the dough enough time to rise fully; this is crucial for achieving that light and airy texture in your Parmesan Focaccia Bread.
  • Grease Generously: Use plenty of olive oil in your baking pan for crispier edges and a delightful golden crust.
  • Dimple with Care: When dimpling the dough, use gentle pressure to create pockets without deflating it too much—this ensures the perfect texture!
  • Experiment Freely: Feel free to customize toppings like different cheeses or fresh herbs to make the recipe uniquely yours. Remember, the joy of homemade focaccia is all about flavor!

Variations & Substitutions for Parmesan Focaccia Bread

Feel free to let your culinary creativity shine as you customize this delightful bread to suit your tastes!

  • Dairy-Free: Omit the Parmesan and replace it with nutritional yeast for that cheesy flavor without dairy. This makes the focaccia accessible for those with dietary restrictions!

  • Herb-Infused: Substitute the dried Italian herbs with fresh basil or thyme for a burst of vibrant flavor that adds a lovely twist to the traditional recipe. The fresh herbs elevate the bread to a new level of deliciousness.

  • Olive Lovers: Add sliced olives or sun-dried tomatoes to the dough before the second rise for a Mediterranean flair that takes your focaccia from delightful to extraordinary. These ingredients pair beautifully with garlic and Parmesan.

  • Spicy Kick: Incorporate red pepper flakes into the garlic oil or sprinkle them on top before baking for a heat boost that adds excitement to each bite. This is perfect for heat lovers seeking an extra punch!

  • Whole Wheat: Substitute half or all of the all-purpose flour with whole wheat flour for a heartier version that’s packed with flavor and fiber while still maintaining that delightful texture.

  • Caramelized Onions: Top with caramelized onions before baking for an added layer of sweetness and depth that enhances the overall flavor profile of the focaccia. This makes for a delicious and elegant touch!

  • Savory Cheddar: Swap out the Parmesan with sharp cheddar cheese for a different flavor experience. The cheddar will melt beautifully and create a richer taste, perfect for cheese lovers.

While you’re embarking on these variations, don’t forget to explore other delicious options like the Parmesan Italian Sausage Ditalini Soup that pairs wonderfully with your focaccia or serve it alongside Garlic Parmesan Chicken. Feel free to mix and match to create the perfect combination for you and your loved ones!

Garlic Parmesan Focaccia Bread Recipe FAQs

How do I know if my yeast is fresh?
To check if your yeast is still active, mix it with warm water (about 110°F) and a pinch of sugar. Let it sit for about 5-10 minutes. If it becomes foamy and bubbly, your yeast is good to go! If not, it’s time to grab a new packet.

What’s the best way to store leftover focaccia?
Store your Garlic Parmesan Focaccia Bread at room temperature in an airtight container or wrapped in plastic wrap for up to 2 days to maintain its softness. If it’s in a humid environment, refrigerating it may help but could also dry it out a bit. For the optimal taste, I often just leave it out, fresh for immediate enjoyment!

Can I freeze focaccia, and how do I do it?
Absolutely! To freeze your focaccia, let it cool completely, then wrap it tightly in plastic wrap. Next, wrap it in aluminum foil (or use a freezer-safe bag) to prevent freezer burn. It can be stored in the freezer for up to 2 months. When you’re ready to enjoy, simply thaw it at room temperature and warm it in the oven at 350°F for about 10 minutes to bring back its lovely texture.

Why did my focaccia not rise properly?
If your focaccia didn’t rise, it could be due to the water temperature being too hot or too cold when activating the yeast, or perhaps the yeast was expired. Make sure to check the temperature is around 110°F, and if your dough isn’t rising, give it a warm and cozy spot to rest; sometimes, a colder environment can slow that yeast down.

Can I make variations with other toppings?
Absolutely! The more the merrier when it comes to toppings. You can add olives, sun-dried tomatoes, or different cheeses like Pecorino or Asiago. It’s a delightful way to customize your Garlic Parmesan Focaccia Bread to suit your tastes, and each variation brings its own burst of flavor. Enjoy experimenting!

Parmesan Focaccia Bread

Parmesan Focaccia Bread: The Ultimate Cozy Baking Delight

Homemade Garlic Parmesan Focaccia Bread that's easy to make and perfect for any meal.
Prep Time 15 minutes
Cook Time 25 minutes
Rising Time 1 hour 30 minutes
Total Time 2 hours 10 minutes
Servings: 8 slices
Course: Dinner
Cuisine: Italian
Calories: 180

Ingredients
  

For the Dough
  • 3 cups all-purpose flour Can substitute with gluten-free flour
  • 1 packet instant yeast
  • 1 teaspoon salt
  • 1.5 cups warm water About 110°F
  • 1 tablespoon sugar
  • 1/4 cup extra virgin olive oil For greasing the pan
For the Garlic Infusion
  • 4 cloves garlic Minced
  • 1 cup Parmesan cheese Freshly grated
For Topping
  • 1 tablespoon dried Italian herbs Optional
  • 1 teaspoon flaky sea salt

Equipment

  • Mixing Bowl
  • Stand mixer
  • 9x13-inch baking pan
  • Small saucepan

Method
 

Step-by-Step Instructions
  1. In a large mixing bowl, combine warm water, sugar, and instant yeast. Allow this mixture to sit for about 5 minutes, until foamy.
  2. Sift in the all-purpose flour and salt, then mix until a sticky dough forms. Knead the dough for about 5-6 minutes with a stand mixer or by hand for 8-10 minutes until smooth.
  3. Coat the kneaded dough with olive oil, cover with a towel, and let rise in a warm spot for 1 to 1.5 hours, until doubled in size.
  4. In a small saucepan over low heat, combine olive oil and minced garlic. Sauté for about 1 minute until fragrant, then let cool.
  5. Grease a 9x13-inch baking pan with olive oil. Transfer the dough to the pan, pressing it out to fill the corners. Let it rest for 10 minutes if it resists stretching.
  6. Cover the pan and allow the dough to rise for another 30-45 minutes until puffy.
  7. Preheat the oven to 425°F (220°C). Dimple the dough, brush with garlic oil, sprinkle with Parmesan, herbs, and sea salt. Bake for 20-25 minutes until golden brown.
  8. Cool in the pan for 5-10 minutes, then transfer to a wire rack. Slice and serve warm.

Nutrition

Serving: 1sliceCalories: 180kcalCarbohydrates: 28gProtein: 5gFat: 6gSaturated Fat: 1gMonounsaturated Fat: 4gSodium: 300mgPotassium: 100mgFiber: 1gSugar: 1gCalcium: 5mgIron: 6mg

Notes

This bread is perfect for sandwiches, soups, and can be customized with various toppings.

Tried this recipe?

Let us know how it was!

Stay Connected

Get recipes via email: